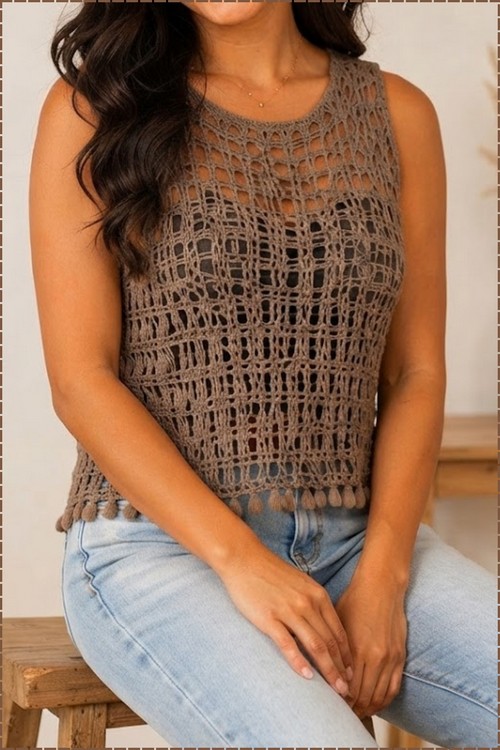
Spring and summer layering call for an open mesh like this drop shoulder crochet sweater, worked as two flat panels from one long foundation chain. A bobble row along the hem adds the only boho detail, and you can skip it for a plain finish on an easy beginner crochet sweater.
Taupe keeps an open mesh from looking like beachwear. It’s a quiet colour, and the rectangular stitch repeat gives the fabric enough structure that you don’t need shaping rows to hold the shape. Armholes sit low because of the drop shoulder, further down the arm than a set-in sleeve would, and that’s where the relaxed line comes from. Watch your gauge on this one; open mesh grows a lot once it’s off the hook, so block your swatch before committing. The mesh top with V neckline runs the same grid rhythm with a shaped neck and sleeves added.
Crochet A Drop Shoulder Sweater

Body builds from a long foundation chain in two flat panels joined at the sides, so the mesh grid runs consistently from hem to neckline without any stitch changes mid panel. The bobble row at the lower hem is the only decorative detail and it sits below the main grid as a separate border, which means you can skip it for a cleaner finish without touching the rest of the pattern.
Materials & Tools
- Cordonê thread (100% polyamide, tex 220), worked with two strands held together throughout
- 2.0 mm crochet hook (or 2.5 mm if your tension runs tight)
- Scissors
- Tapestry needle
- Gauge and finished dimensions: Width: 48 cm · Height/Length: 50 cm (These are the sample dimensions from the source pattern — adjust your chain count and row count to match your own measurements.)
- Stitch multiple: The block pattern works in multiples of 5.
- Abbreviations used in this pattern: ch = chain · dc = double crochet · dtr = double treble crochet · hdc = half double crochet · sl st = slip stitch · st(s) = stitch(es) · sp = space · rep = repeat
Learn Stitch Before Starting
Difficulty & Time
Intermediate, despite the beginner-friendly construction. The cordonê thread on a 2.0 mm hook is finer than most yarn projects, and tight thread requires more controlled tension than standard yarn. The stitch pattern itself — alternating dc blocks and hdc rows — is very repetitive and predictable. If you’ve never worked with thread before, try a small swatch first. The two-panel seaming makes assembly approachable even for first-time garment makers.
Beginner Technique Notes
- Working with two strands together: Throughout this pattern, you hold two strands of thread at the same time and treat them as one. Pull from two separate balls (or wind one ball into two smaller ones) and let them feed evenly off your hook together. This doubles the weight of the thread and fills in the fine gauge without changing the hook size.
- Double treble crochet (dtr): This is a very tall stitch — taller than a standard dc. To make one: yarn over 3 times (not 2 like a dc), insert your hook, pull up a loop, then yarn over and pull through 2 loops at a time, 4 times in total. It takes a moment to get used to, but the rhythm is the same as a dc — just more yarn-overs at the start. The dtr creates the tall, open block in Row 2.
- Half double crochet pulled through all loops (hdc variation): In Row 3 of this pattern, the hdc is worked by pulling the yarn through all loops on the hook at once — not the standard 2-loop finish. This creates a tighter, more textured stitch than a normal hdc. When you reach that step, insert your hook, yarn over, pull up a loop (you’ll have 3 loops on the hook), then yarn over and pull through all 3 at once.
- The stitch multiple: Your foundation chain must be a multiple of 5. If you’re adjusting for a different size, count your chain in groups of 5 — every group becomes one block repeat. Add the extra chains specified for each panel (3 for Panel 1, 2 for Panel 2) after reaching your last full group.
- The picot stitch: A picot is a small decorative loop that creates a pointed lace edge. To make one: chain 5 (or the number specified), then sl st back into the base of those chains. That closes the loop into a little point. Repeat at even intervals across the edge.
The Pattern
Making the Two Panels (Make Two Identical Panels)
Both panels are rectangular and worked to the same finished dimensions. They differ only in how the foundation row begins.
Panel 1 — Starting with High/Double Crochets
Foundation chain:
- Chain a multiple of 5, then add 3 extra chains. (Example: 105 + 3 = 108 chains.)

Row 1:
- Hold the last chain, ch 2, and work 1 dc in the next ch.
- Work 1 dc in the following ch.
- Ch 2, skip 2 sts on the base chain, and work a block of 3 dc in the 3rd st.
- Repeat [ch 2, skip 2, 3 dc in next st] across the entire row, ending with 3 dc.
If you’re new to reading crochet patterns, don’t worry, just follow along with the video tutorial below and use the written pattern as a reference!
Row 2:
- Ch 4, turn.
- Work dtr sts over the base dc sts from the previous row.
- Ch 2, skip to the next block, and work a block of 3 dtr. Repeat across.
Row 3:
- Ch 2 only, turn.
- Work hdc (pulling through all loops at once) over the previous dtr sts.
- Ch 2, skip, and work 3 hdc over the next block. Repeat across.

Continuing:
- Alternate Row 2 (dtr blocks) and Row 3 (hdc textured blocks) until the panel reaches your desired length. (The sample pattern measures 50 cm.)
Panel 2 — Starting with Open Spaces
- Chain the same multiple of 5, but add only 2 extra chains instead of 3. (This shifts the border alignment so the two panels alternate differently when seamed.)
- Begin with a foundation row of open spaces: ch 5, skip 2, then start your 3-stitch blocks.
- Continue with the same alternating Row 2/Row 3 pattern as Panel 1 through all remaining rows.

Edging — Picot Border
Work the picot edging along the neckline and any other edges you want finished.
- Ch 5, skip a short distance along the edge, and sl st into the next st.
- Repeat [ch 5, skip, sl st] across to create a row of evenly spaced decorative points.
- (For a denser edge, use fewer skipped stitches between each picot; for a more open edge, skip more.)
Assembly
Shoulder seams:
- Lay both panels flat. Align them at the top edge, shoulder-to-shoulder.
- Seam the outer shoulder sections together on each side, leaving the center open for the neckline.
Armhole shaping:
- Measure out the width you need for each armhole opening on both sides of the joined panels.
- Mark the armhole depth with a pin or stitch marker before sewing the side seams.

Side seams:
- Seam both sides of the panels together from the bottom hem upward, stopping at the base of the marked armhole on each side.
Optional sleeves:
- If you want sleeves, make smaller rectangular panels to your desired sleeve length.
- Seam each sleeve panel into a tube, then attach the tube to the armhole opening.
- (Elbow-length sleeves can be made with a shorter rectangle; full-length sleeves need a panel that reaches from shoulder to wrist.)
Tips & Troubleshooting
- Swatch before you start. Thread on a 2 mm hook with two strands is a very different experience from standard yarn. Work a swatch of 20 stitches across 6 rows and measure it against a tape measure before committing to the full panel length. Tension with thread is easy to misjudge on the first project.
- Count your chain in groups of 5 as you go. Thread is hard to count once you’ve pulled it off the ball and stretched it out. Every 5 chains, place a slip of paper or a small marker as a visual anchor so you don’t have to recount from scratch if you lose your place.
- Mark the armhole width before seaming. It’s far easier to mark, measure, and adjust the armhole opening while the panels are lying flat than after you’ve begun seaming. Use pins to test the fit before picking up your needle.
- Seam from the bottom up on each side. Starting from the hem and working toward the armhole gives you better control over tension in the seam than working from the armhole down. The seam will lie flatter.
- Press the panels lightly before assembly. Thread fabric responds well to a light press with a damp cloth — it evens out the row height and makes aligning the two panels for seaming significantly easier.
FAQ
1. I’ve never worked with thread before — is this pattern suitable for me? Thread crochet is manageable, but it does ask for tighter tension and more patience than yarn. If you’re a beginner to thread specifically, make a small swatch first to get used to the feel. The stitch pattern itself — once you understand Row 2 and Row 3 — is highly repetitive and forgiving.
2. What does “multiples of 5” mean for sizing? It means your foundation chain must be divisible by 5. If you want to adjust the width, add or subtract 5 chains at a time. Adding 5 chains to Panel 1’s foundation adds one more block repeat across the row; removing 5 removes one. Count in groups of 5 as you chain.
3. What’s the difference between Panel 1 and Panel 2? Panel 1 starts with a ch-3 addition after the last multiple-of-5 chain and begins with the dc block row. Panel 2 uses a ch-2 addition and opens with a row of spaced squares instead. The difference means that when you seam the two panels together, the block patterns at the edges alternate rather than matching exactly — giving the finished seam a more seamless, interlocked look.
4. Can I make this in a heavier yarn on a larger hook? Yes. Keep the stitch multiple of 5 and the two-panel construction intact, and adjust your chain count to match your new gauge. The dtr will look proportionally larger on a bigger hook, which gives the blocks more openness — useful in a lighter-weight cotton or linen for a summer version.
5. Do I have to add sleeves, or does it work as a sleeveless top? It works perfectly as a sleeveless top — just seam the sides and leave the armhole openings as-is. The drop shoulder silhouette reads as intentional without sleeves. The sleeve option described in Step 3 is fully optional.