Autumn family photos and cold preschool mornings call for a chunky kids crochet sweater with a relaxed body and sleeves long enough to grow into. Give the crochet sweater for boys to a nephew turning three or four, and pair it with olive cargo pants for a playground look.
Olive and cream stripes across the body, a ribbed collar that folds soft at the neck and a matching beanie finished with one small wooden button. This chunky sweater is sized for kids, worked in a simple two color repeat that never needs more than one ball on the go. The construction is close to a baby sweater scaled up, so anyone who has made one will already know the shape.
Sweater Crochet Kids

Stripes are the only decision to make. Two rows of each color alternate the whole way up the body and continue down each sleeve, so the color changes fall in the same place on every panel and the bands line up at the seam without any counting. The collar and cuffs are worked separately in vertical ribbing and attached last, which is what gives them the stretch to pull over a child’s head.
Materials and Tools
- Lightweight acrylic yarn in two contrasting colours. The sample uses olive green and cream white.
- 3.5 mm crochet hook for the ribbing and the tighter worked sections.
- 4 mm crochet hook for the main body and sleeve fabric.
- Yarn needle for weaving in ends and sewing the seams.
- Sharp scissors.
- Stitch markers, at least four.
- A soft tape measure for checking panel length as you go.

Get Ready with This Stitch
Difficulty and Time
I would call this a confident beginner project. Nothing in it is technically hard, but there is a fair amount of repetition and a little bit of shaping at the neckline, so it rewards patience more than skill. The stitches used are chain, slip stitch, single crochet, half double crochet, and a half double crochet decrease. Most makers finish it across a weekend or over four to five relaxed evenings. The long ribbed bands are the slowest part, so I usually work those while watching something and save the shaping for when I am properly awake.
Beginner Technique Notes
- Ribbing here is simply single crochet worked into the back loop only. Working into the back loop pushes the front loop forward and creates the raised vertical ridges that make the band stretch. The band is worked sideways as a long narrow strip, then the body is built along its long edge, which is why the row count for the ribbing looks so high compared to the body. When you pick up stitches along that edge, aim your hook into the grooves and ridges rather than counting individual rows, and spread the stitches evenly so the hem does not flare or pull in.
- Colour changes are cleanest when you make them on the last stitch of the row rather than at the start of the next one. Work the final stitch until only two loops remain on your hook, then yarn over with the new colour and pull through both loops. The stitch finishes in the new shade and the next row starts without a visible bump. Leave tails of about 15 cm every time you change so you have enough to weave in securely later. Half double crochet is worked in both loops for the body unless the pattern tells you otherwise.
The Pattern
Bottom Ribbing for the Front and Back Panels
- Using the 3.5 mm hook and olive green yarn, chain 10, which is 9 stitches plus 1 turning chain.
- Row 1: Skip the first chain and work 1 single crochet into each remaining chain across. [9 sts]
- Row 2: Chain 1, turn, and work 1 single crochet into the back loop only of every stitch across. [9 sts]
- Repeat Row 2 for every following row, counting your stitches at the end of each one so the band stays a consistent width. [9 sts]
- Continue until the band measures 32 to 33 cm along its length, which works out to roughly 51 rows.
- On the very last stitch of the final row, stop when the last two loops remain on the hook and complete that stitch using white yarn, then secure the knot.
- Set this band aside and make a second identical band the same way for the second panel.

Front Body Panel
- Switch to the 4 mm hook and continue with white yarn.
- Row 1: Chain 1, then work 51 half double crochets evenly across the long top edge of the ribbing, placing your hook into the grooves and ridges as you travel along. [51 sts]
- Rows 2 to 4: Chain 1, turn, and work 51 half double crochets across in both loops. [51 sts]
- Those four rows complete the first white colour block.
- Change to olive green on the last stitch of Row 4, then work 2 rows of half double crochet in green. [51 sts]
- Change back to white and work 4 rows of half double crochet. [51 sts]
- Continue alternating in this sequence, 4 rows of white followed by 2 rows of green, keeping the stripe order consistent all the way up.
- Work approximately 32 rows of half double crochet in total for the front panel, at which point the panel measures roughly 36 cm wide and 31 to 32 cm long.
Reading crochet patterns can be tricky when you’re just starting out, feel free to follow the video tutorial below instead!
Back Body Panel
- Work the back panel exactly as the front, starting from its own olive green ribbed band and following the same striping sequence.
- Work 34 rows of half double crochet in total, which is 2 rows more than the front, so the back neckline sits slightly higher on the shoulders.
Front Neckline Shaping
- Chain 1, turn, and work 17 half double crochets along one side of the panel, then stop and leave the remaining stitches unworked. [17 sts]
- Set the second shoulder aside temporarily and shape this side first.
- Next row: Chain 1, turn, decrease over the first 2 stitches, then work half double crochet to the end of the row.
- Repeat this decrease at the neckline edge across approximately 5 rows in total, until the shoulder measures 14 stitches wide. [14 sts]
- Fasten off and weave the tail in loosely for now.
- Rejoin your yarn to the second shoulder and repeat the same 17 stitch shaping and decrease sequence to match. [14 sts]

Back Neckline Shaping
- Work 15 half double crochets along one side of the back panel, leaving the remaining stitches unworked. [15 sts]
- Work approximately 3 decrease rows at the neckline edge, decreasing over the first 2 stitches of each shaping row, so the back neck stays shallower than the front.
- Fasten off, leaving a long tail on one side for sewing the shoulder seam.
- Rejoin yarn and repeat the same 15 stitch shaping and 3 decrease rows on the second shoulder. [15 sts]
Joining the Shoulder Seams
- Lay the front and back panels together with the wrong sides facing inward and the shoulders lined up.
- Match the shoulder edges stitch for stitch before you start sewing so the neckline stays centred.
- Using the long tail you left on the back panel, slip stitch or whip stitch the front and back together across each shoulder seam.
- Repeat on the second shoulder and leave the neckline opening free.
Neck Ribbing
- Using the 3.5 mm hook and working from the right side of the sweater, join your yarn at the neckline edge.
- Chain 7, which is 6 stitches plus 1 turning chain.
- Skip the first chain and work 6 single crochets back down the chain. [6 sts]
- Anchor the strip to the neckline by working 2 slip stitches into the collar edge, spaced slightly apart.
- Turn, skip the slip stitches, and work 6 single crochets into the back loops only, travelling back up the ribbing strip. [6 sts]
- Repeat the sequence of 6 back loop single crochets followed by 2 anchoring slip stitches all the way around the collar.
- Keep your anchoring slip stitches evenly spaced so the collar neither ruffles nor pulls tight against the neck.
- When you reach the beginning, slip stitch the two short ends of the collar band together and weave in all tails.
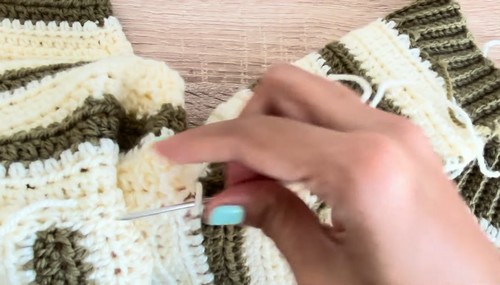
Sleeves
- Using the 3.5 mm hook and the same ribbing method as the bottom band, make a cuff strip of 28 rows of single crochet worked in the back loops only. [9 sts]
- Slip stitch the two short ends of the cuff together to close it into a round.
- Switch to the 4 mm hook and work 28 half double crochets evenly around the top edge of the cuff. [28 sts]
- Join with a slip stitch at the end of the round, then chain 1 and turn.
- Continue working in joined rounds from the right side, joining and chaining 1 at the end of every round.
- Increase gradually as you work up the sleeve, adding an increase in the first stitch of a round, or an increase in both the first and last stitches of a round where more width is needed.
- Follow the same colour sequence as the body, 4 rounds of white alternating with 2 rounds of green, so the stripes line up when the sleeve is attached.
- Keep increasing at a steady pace until the sleeve reaches roughly 15 cm in arm width and measures approximately 47 stitches around. [47 sts]
- Fasten off, leaving a long tail for sewing.
- Make a second sleeve the same way, matching the stripe placement and increase spacing of the first.
Assembly and Finishing
- Turn the sweater inside out so you are sewing from the wrong side.
- Align the centre of the sleeve top with the shoulder seam and pin or hold it in place.
- Pin the rest of the sleeve evenly around the armhole opening before you begin, easing any extra fabric across the underarm rather than bunching it in one spot.
- Sew or slip stitch the sleeve circumference to the armhole opening, working from the inside.
- Repeat for the second sleeve.
- Using white yarn, sew the underarm seams of each sleeve and continue down the side seams of the body in one continuous line.
- Turn the sweater right side out and check every seam from the outside for gaps or puckering.
- Weave in all remaining tails securely, splitting each tail through the fabric in two directions so nothing works loose in the wash.

Tips and Troubleshooting
- Count the stitches at the end of every ribbing row. Back loop only work makes the last stitch of a row easy to miss, and losing one stitch narrows the band permanently.
- Measure the bottom ribbing lying flat and unstretched. Ribbing is elastic, so if you measure it under tension you will end up with a hem that gapes.
- Place a stitch marker at the start of each sleeve round. Joined rounds with a turning chain are easy to lose track of once the striping starts.
- If the body panel flares outward above the ribbing, your 51 pick up stitches are spaced too generously. Pull the row back and redistribute them more evenly.
- If the panel pulls in and cups instead, your pick up row is too tight. Try the row again with a slightly looser tension rather than switching hooks.
- Change colour on the final stitch of a row every time, never at the beginning of the next one, and your stripe lines will stay crisp.
- Work the neckline decreases only at the neck edge, never at the armhole edge, or the shoulder will narrow and the sleeve will not sit properly.
- Block both body panels before seaming. Half double crochet fabric relaxes noticeably and blocking makes the two panels match far more closely.
- Pin the sleeve into the armhole at four points first, the shoulder seam, the underarm, and the two midpoints, then ease the fabric between the pins.
- Weave ends in as you finish each section instead of saving them all for the end. There are a lot of colour changes in this sweater and they add up fast.
Yarn Substitution
The sample uses lightweight acrylic, which is the sensible choice for a child’s sweater because it survives repeated washing and holds stripe definition well. If you want to swap, stay within the same weight and check your fabric before committing. Cotton gives lovely stitch clarity but is heavier and less springy, so the ribbing will not recover as well. A wool blend is warmer and blocks beautifully, though you will want a superwash version for anything a small person actually wears. Whatever you choose, work a small swatch in half double crochet first and compare it to the panel measurements.
Customization Ideas
The stripe rhythm is the easiest thing to play with. Try equal blocks of three rows in each colour for a bolder look, or keep the green stripes and swap the cream for mustard, dusty pink, or charcoal. A third accent colour used only on the collar and cuffs pulls the whole piece together nicely. You can lengthen the body by working extra half double crochet rows before starting the neckline, remembering to add the same number to both panels. For a longer sleeve, simply continue the striping sequence and hold your increases steady once the width is right.
Frequently Asked Questions
- Can I make this in a different size? Yes. Because the body is two straightforward rectangles, sizing up mostly means making the ribbed hem band longer, which gives you more stitches to pick up along its edge, and then working more rows before the neckline shaping. Measure a sweater that already fits the child and use those numbers as your target. Keep the neckline shaping proportional and check the shoulder width so the sleeves still land in the right place.
- Why is the back panel worked two rows longer than the front? Necklines sit differently front and back. The front needs to dip lower so it clears the throat comfortably, while the back should sit higher against the nape. Adding two rows to the back panel and using fewer decrease rows there creates that difference naturally, without any extra shaping work.
- Do I have to work the sleeves in the round? No. If joined rounds are not your favourite, you can work each sleeve flat as a tapered rectangle and seam it up the underarm at assembly time. You will lose the continuous stripe line at the join, but it is a perfectly valid approach and some makers find the flat version easier to keep even.
- My stripes do not line up between the body and the sleeves. What went wrong? Almost always this is a row height difference rather than a counting mistake. If your sleeve rounds are working up slightly tighter or looser than the body rows, the stripes drift over the length of the piece. Check your sleeve tension against a body panel early on, and adjust before you are twenty rounds deep.
- How do I stop the collar from being too tight to pull over the head? The anchoring slip stitches control this. If you space them too closely together, the collar band gets pulled in and the opening shrinks. Space them slightly apart as you work around, and test the collar over the child’s head, or over a similar sized object, before you slip stitch the two ends together.