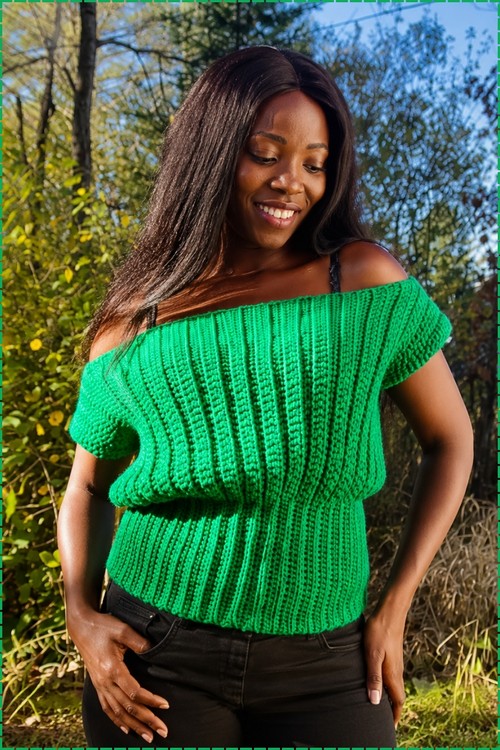
This vivid green off-shoulder crochet sweater pairs a folded ribbed collar with a gathered blouson hem. Two flat panels form the garment, while alternating single and double crochet sections create a fitted lower body and relaxed neckline.
Ribbing on this sweater runs vertically from hem to collar in unbroken columns, which is what gives the fabric the dense stretchy quality that lets it sit off the shoulder without a drawstring or elastic holding it in place. The fold-over collar is the same rib panel extended and turned down, so the neckline gets a double layer of thickness right where it needs it. It shares that fold-over construction with the slouchy off shoulder sweater but uses a shorter length and a blouson waist instead of a straight hem.
Off Shoulder Crochet Sweater

Bright green is the colorway used in the tutorial and it photographs well against the red studio background in the process shots. The blouson effect at the waist comes from working a tighter ribbed band at the bottom rather than from any shaping decrease, so the stitch count stays consistent and the construction stays straightforward. A single solid color in a smooth yarn will show the rib columns at their clearest.
Materials and Tools
- Craft Smart Value yarn (medium weight, size 4, 100% acrylic, in Ivy/Green) — approximately 1.5 skeins
- A 5.5 mm (I/9 US) crochet hook
- Scissors
- Darning needle
- Stitch marker
- Tape measure
Basic Stitch to Know
Sizing
This pattern is written for a size small, worked as two identical panels of 40 rows each. Each row has 25 single crochet stitches at the bottom (the fitted torso section) and 35 double crochet stitches at the top (the loose, off-shoulder section).
Difficulty and Time
This is a wonderful beginner-to-intermediate project. If you can single crochet and double crochet, the stitch work holds no surprises. The one thing that takes attention is keeping the two stitch sections correctly divided each row — that’s what the stitch marker is for. With 40 rows per panel and two panels to make, it’s a satisfying one or two session project.
Beginner Technique Notes
Two concepts make this pattern work:
- Working in back loops only: For almost every stitch in this pattern, you insert your hook into just the back loop (the loop farther from you) rather than both loops. This creates a slight textural ridge and gives the fabric a stretchy, layered look. The exception is the very first and very last stitch of each row, where you work through both loops to create a cleaner, more even outer edge.
- The stitch transition: In Row 1, you work 25 single crochet stitches, then the remaining 35 stitches are double crochet. On every subsequent row, you switch direction — the double crochet section comes first (because you turned the work), followed by the single crochet section. A stitch marker placed in the 25th stitch of Row 1 tells you exactly where to make that switch every time.
The Pattern
Two identical panels are worked flat and seamed together at the sides, leaving the top and armhole areas open.
Foundation Chain
- Make a slip knot and chain 60 stitches.
- Add 1 extra turning chain. (This does not count as a stitch.)

Row 1 — Setting Up the Sections
- Skip the very first turning chain.
- Working in the back loops of the foundation chain:
- Crochet 25 single crochet stitches. Place a stitch marker in the 25th stitch to mark the boundary.
- Crochet 35 double crochet stitches for the remainder of the chain.
Row 2 Onward — The Repeat Row
- Chain 1 and turn your work. (The turning chain does not count as a stitch.)
- Double crochet section: Work double crochet stitches in the back loop of each stitch until you reach 1 stitch before your stitch marker.
- Single crochet section: Move or replace the stitch marker as needed and work single crochet stitches in the back loop up to the end of the row.
- Edge note: For the very first and very last stitch of the row, work through both loops instead of just the back loop to create a cleaner, more even border.

Complete Panel 1
- Repeat the repeat row until you have completed 40 rows total.
- Fasten off, leaving a very long yarn tail — you will use this to seam the panels together.
Just starting out with crochet? The video tutorial below is a great place to begin, or challenge yourself with the written pattern below!
Create Panel 2
- Repeat the exact same process: chain 60, work Row 1, and complete 40 rows total to create a second identical panel.
- Leave a long yarn tail on this panel as well.
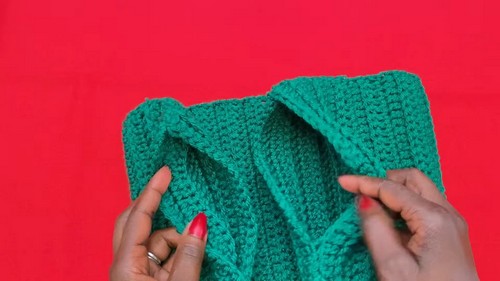
Assembling and Seaming the Top
- Lay the two panels flat against each other.
- Use stitch markers to mark off the armhole openings on both sides — leave the top neckline open and mark where to stop sewing along each side seam.
- Thread your long yarn tail onto the darning needle.
- Seam the sides closed from the bottom up to the armhole marker using a mattress stitch or whipstitch, picking up the inside loop of one panel and the outside loop of the other for a neat, seamless join.
- Repeat on the other side.

Tips and Troubleshooting
- Use the stitch marker religiously. The whole top depends on the 25 single crochet / 35 double crochet split staying consistent across all 40 rows. If the marker isn’t in the right stitch, the line between the fitted and floaty sections will drift. Move it at the end of every row.
- Work the edge stitches through both loops. That single-loop exception at the first and last stitch of each row is easy to forget, but it’s what makes the outer edges look finished rather than slightly wavy. Set yourself a reminder at the start of each row.
- Leave your yarn tails genuinely long. A short tail runs out before you finish the side seam. The pattern instructs a long tail — be generous, at least 18 to 20 inches, so you have enough to sew the full seam without running short midway.
- Count after every fifth row. It’s easy to gain or lose a stitch when switching between single and double crochet. Doing a quick count at row 5, 10, 15, and so on means any error gets caught while it’s still easy to fix.
- Match your panels before seaming. Lay both panels side by side and confirm they’re the same number of rows and the same dimensions before you pick up the needle — tiny differences in tension can make them slightly different in height, and seaming mismatched panels creates a pull.
Yarn Substitution
Any smooth medium weight (size 4) acrylic or cotton will work on the 5.5 mm hook. The key is choosing a smooth, non-fuzzy yarn so the stitch definition between the single and double crochet sections stays crisp — fuzzy or textured yarns will blur the visual line. A cotton or cotton blend will give more drape and airiness for summer wear; acrylic is more affordable and stretches beautifully with wear.
Customization Ideas
- Adjust the size. The pattern is written for a size small (chain 60, 40 rows). A longer chain increases the height; more rows widens the top. Measure and test to find your fit.
- Change the stitch split. More single crochet stitches and fewer double crochet would raise the fitted section higher; fewer single crochet and more double crochet creates a lower, more off-the-shoulder drape.
- Add a ruffle. Work a few rows of shell stitches or increases along the top double crochet edge before seaming for a ruffled off-shoulder detail.
- Skip the crop. Add more foundation chains at the start for a longer, tunic-length version of the same top.
- Try a stripe. Changing yarn color at the boundary between the single and double crochet sections creates a bold horizontal stripe right where the fitted section meets the floaty top.
Frequently Asked Questions
1. Why does the construction use two different stitches instead of shaping? Single crochet and double crochet are different heights, which means the same yarn worked over the same number of rows creates different amounts of fabric. The double crochet section is taller and looser, naturally creating a wider, draper upper section — the off-shoulder effect comes from physics, not shaping rows.
2. What does “working in back loops only” actually do? It leaves the front loop of each stitch unworked and visible, which creates subtle horizontal ridges across the fabric. It also makes the fabric slightly more elastic than working through both loops, which is why the fitted torso section has a pleasant stretch when worn.
3. Do I have to use a mattress stitch for the seams — can I slip stitch them instead? Yes. A slip stitch seam worked on the inside is slightly faster and creates a firm, secure join. The mattress stitch gives a more invisible result from the outside. Either works; use whichever you find easier.
4. My two panels came out slightly different heights — how do I fix this before seaming? If the difference is one or two rows, you can ease the seam slightly — distribute the difference evenly along the full length of the seam rather than trying to match row for row. If the difference is larger, it’s worth undoing the longer panel’s final rows to match. Checking after completing the first panel (before starting the second) and matching your tension helps avoid this.
5. Can I make this without the back loop only technique? Yes, but the fabric will look and feel different — denser, flatter, and with less stretch. The back loop only texture is a significant part of what makes the finished top look the way it does. If you substitute standard both-loop stitches, consider going up one hook size to maintain similar drape.