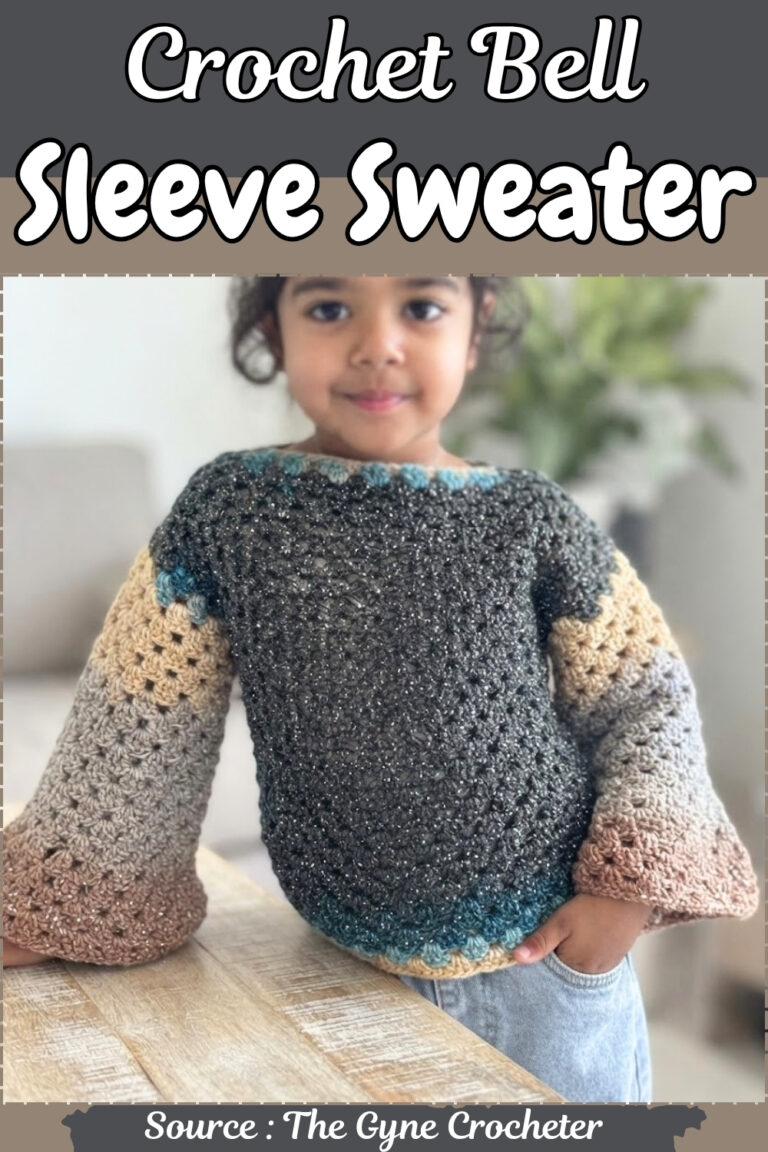
Spring afternoons suit the minimalist crochet sweater, with roomy short sleeves showing granny squares in dusty rose, sage and sky blue. Light-wash jeans and a front tuck turn the boxy granny square sweater into an easy coffee-run outfit, finished by a pale blue neckline.
Sometimes the most interesting sweater details are the ones you almost miss, and the granny square sleeves on this beige pullover from The Homestyle Homestead are exactly that kind of quiet statement. The solid DC body keeps the overall look clean and wearable, making it a natural companion to the boho sweater if you enjoy mixing granny motifs into pullover constructions.
Minimalist Crochet Sweater

The body panel crochets up quickly in rows of double crochet, then the granny square sleeves are joined at the corners to complete the silhouette. That construction approach means you can work the body and the squares separately at your own pace before bringing everything together at the end.
Difficulty and Time
- Skill level: Advanced beginner. If you can chain, single crochet, half double crochet, double crochet, and thread a tapestry needle, you have everything you need.
- Skills used: Foundation chain, single crochet, half double crochet, double crochet, working into a chain space, slip stitch joins, blanket stitch seaming, whip stitch border.
- Time to make: Most makers finish this over a week or two of relaxed evening stitching. The two body panels take the bulk of that time. The eight granny squares work up quickly and make good travel or television projects, and assembly usually fills one long, calm afternoon.
Materials and Tools
- Size 4 worsted weight yarn. The original sweater used Hobby Lobby yarn, working through roughly one 454g skein for the body panels, plus additional yarn for the granny squares and the trim.
- 5.5 mm crochet hook.
- Tapestry needle with a blunt tip for seaming and weaving in ends.
- Stitch markers or bobby pins for marking measurements and holding seams in place.
- Measuring tape.
- Scissors.
- A contrasting yarn color for the neckline and hem trim. Blue was used in the original, but any color that plays well with your main shade will work.
Know Before You Start
Abbreviations Used
- ch = chain
- sc = single crochet
- hdc = half double crochet
- dc = double crochet
- sl st = slip stitch
- st / sts = stitch / stitches
Beginner Technique Notes
- Half double crochet is the workhorse of this sweater, and it is worth getting comfortable with before you commit to a full panel. Yarn over first, then insert your hook, pull up a loop, yarn over again, and draw through all three loops in one motion. It sits taller than single crochet and denser than double crochet, which is exactly what you want in a garment fabric. Work a small practice swatch of ten or fifteen stitches, and pay attention to how tightly you are pulling through. That habit decides the drape of the entire sweater.
- Tension matters more here than in almost any other beginner project, because the panels are measured rather than counted into a size. If your grip tightens as you settle in, your panel narrows without you noticing, and the two halves will not match at seaming time. Check your width against your measuring tape every so often as you go. The same goes for your foundation chain, which should be worked loosely enough that your hook slides into each chain without a fight. A cramped chain pulls the whole bottom edge in.
- The blanket stitch is your seaming method throughout, worked with a blunt tapestry needle through both the front and back loops along each edge. It creates a flat, tidy join that lies smoothly against the body instead of forming a ridge. Keep your seaming yarn at the same tension as your crochet, since a tight seam puckers and a loose one gapes. Granny squares are the other new element for some makers, and the rhythm is simple once it clicks: clusters of three double crochets along the sides, and a chain space at each corner.
The Pattern
Taking Your Measurements
- Measure the widest part of your hips and seat.
- Measure your waist and love handle area, roughly around the belly button.
- Measure your bust straight across at the fullest point.
- Choose the largest of these three measurements so the sweater fits over every part of you comfortably. The video example used a 40 inch measurement.
- Divide that largest measurement in half to find the width of each panel. In the example, 40 inches divided in half gives 20 inches wide per panel.

Step 1: Crocheting the Body Panels (Make 2)
You will make two identical rectangles, one for the front and one for the back.
- Make a slip knot and place it on your 5.5 mm hook.
- Chain loosely across until your chain reaches your target panel width, such as 20 inches.
- Count your chains, leaving out the final chain sitting on your hook, and write that number down so the second panel matches exactly.
- Row 1: Work 1 sc in the second chain from the hook.
- Work 1 sc in each remaining chain across the row.
- Ch 1 and turn.
- Row 2 and all following rows: Work hdc across the entire row. To make each hdc, yarn over, insert your hook into the stitch, pull up a loop, yarn over, and pull through all 3 loops on your hook.
- Ch 1 and turn at the end of each row.
- Keep repeating rows of hdc until the panel reaches your desired sweater length.
- Keep your tension consistent from row to row so the panel does not stretch or widen unintentionally.
- Make the second panel to match, using the chain count you wrote down.
- Back panel adjustment: Work the back panel two rows longer than the front panel to allow room for the neckline shaping.
Don’t let crochet patterns intimidate you! If you’re a beginner, the video tutorial below makes it super easy to follow along!
Step 2: Shaping the Front Panel Neckline
This small shaping step keeps the sweater from sitting tight against your throat.
- Hold the front panel up against yourself to check where the neckline should begin.
- Count 25 stitches in from the edge of the panel to mark the start of the neckline.
- Place a stitch marker or bobby pin at that stitch.
- Join your yarn at the outer edge of the panel.
- Work hdc from the outer edge up to your marked stitch, working 25 stitches.
- Ch 1 and turn.
- On the next row back, work slightly fewer stitches, such as 23 stitches, to create a gentle step up for the shoulder.
- Fasten off.
- Repeat the same shaping on the opposite side of the front panel so both shoulders match.
Step 3: Joining the Shoulders
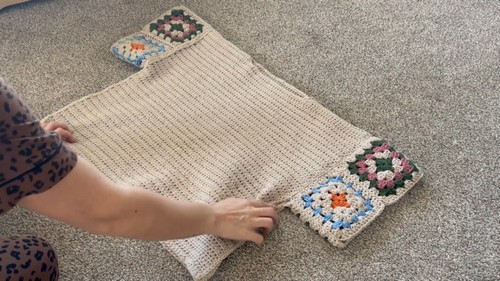
- Lay the front and back panels together with both right sides facing, or both wrong sides facing, whichever finish you prefer.
- Thread your tapestry needle with yarn.
- Seam each shoulder using the blanket stitch, working through both the back and front loops for a smooth, seamless join.
- Knot securely and weave in all loose ends.
- Slip the piece over your head to check that the neck opening is comfortable before moving on.
Step 4: Crocheting the Granny Square Sleeves (Make 8 Squares Total)
Each sleeve uses 4 granny squares, so you will need 8 squares in total. Each square is worked over 5 rounds.
Round 1
- Ch 4 and sl st into the very first chain to form a small center ring.
- Ch 2, which counts as your first stitch.
- Work 2 dc into the center ring, then ch 2 to form your first corner space.
- Work 3 dc into the ring, then ch 2.
- Repeat that sequence of 3 dc and ch 2 until you have 4 corners in total.
- Sl st into the top of the beginning ch 2 to join the round.
- Fasten off here if you are changing colors.
Rounds 2 through 5
- Join your next color into any corner chain 2 space.
- Ch 2, then work 2 dc, ch 2, 3 dc all into that same corner space.
- Along each side, work 3 dc into each empty space between the clusters of the previous round.
- In each of the remaining 4 corner spaces, work 3 dc, ch 2, 3 dc.
- Sl st to join at the end of the round.
- Continue in the same way until the square has 5 rounds in total.
- Repeat until you have 8 squares.
Step 5: Assembling and Attaching the Sleeves
- Take 4 granny squares and lay them out in a line, alternating colors if you like.
- Sew the 4 squares together using the blanket stitch to form a sleeve strip.
- Repeat with the remaining 4 squares to make the second sleeve strip.
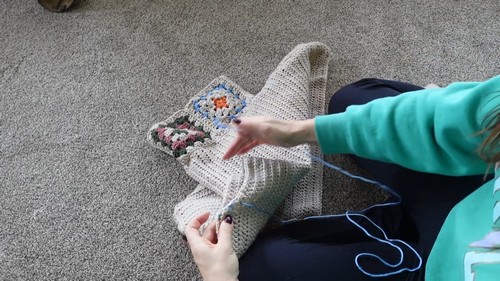
- Find the center seam of a sleeve strip and line it up with the shoulder seam of the sweater body.
- Pin the strip in place with stitch markers or bobby pins.
- Blanket stitch the long edge of the granny square strip across the armhole opening of the sweater body.
- Repeat with the second sleeve strip on the other side.
- Fold the sweater at the shoulders so the front and back panels line up with the lower edges of the sleeves.
- Blanket stitch from the wrist edge of the sleeve all the way down the side of the sweater body to close the side seam.
- Repeat on the second side.
- If one side runs slightly longer than the other, adjust your tension or ease the stitches in as you seam.

Step 6: Finishing and Border Trim
- Choose a contrasting yarn color for your trim, such as blue.
- Work a whip stitch or a simple crochet border around the neckline opening for a clean finish.
- Work the same trim along the bottom hem of the sweater.
- Go back over the whole sweater and check that every yarn tail is securely woven in.
- Trim the ends close to the fabric.
Tips and Troubleshooting
- Swatch before you chain. Work a small square of half double crochet first so you can see how your fabric drapes. If it feels stiff, loosen your tension or move up a hook size before committing to a full panel.
- Chain loosely. A tight foundation chain pulls the bottom edge of the panel inward and is nearly impossible to fix later without ripping back. Your hook should slide into each chain easily.
- Write down your chain count immediately. The second panel needs to match the first, and it is far easier to trust a number on paper than to recount a 20 inch chain.
- Measure your panel width every few inches. Tension creeps as you relax into the rhythm, and a panel that starts at your target width can quietly narrow over time.
- Try the panels on before seaming. Hold them against your body to check the length and where the shoulders will fall. Adding a few more rows now is much easier than unpicking a finished seam.
- Pin generously before you sew. Stitch markers or bobby pins along the whole seam keep both layers aligned and stop one side from drifting longer than the other.
- Check the neck opening early. Once your shoulder seams are joined, slip the piece over your head before you attach the sleeves. Fixing a tight neckline at this stage is quick.
- Block your granny squares if they curl. A light steam or wet block evens out the corners and makes the squares far easier to seam into straight strips.
- Weave ends as you go. Granny squares with color changes generate a lot of tails, and dealing with them in batches is much less painful than facing all of them at the end.

Yarn Substitution
- Any smooth size 4 worsted weight yarn will work well here, and that opens up a lot of options. Acrylic is the practical choice for an everyday sweater since it holds its shape, washes easily, and comes in endless colors for the granny squares. A wool or wool blend gives you warmth and beautiful stitch definition, while cotton produces a heavier, cooler garment with more drape and less bounce. What matters most is that your substitute matches your gauge closely enough that a panel worked to your measured width still feels like the fabric you want against your skin.
- Because the panels are sized by measurement rather than by stitch count, a slight gauge difference will not ruin the fit, but it will change your yardage. The original used roughly one 454g skein for the body panels plus extra for the squares and trim, so buy generously if you are substituting, especially in a heavier fiber. Avoid highly textured novelty yarns for the granny squares, since the clusters and corner spaces get lost in the fuzz. Save fluffy or self striping yarns for the trim, where the texture reads as a deliberate accent.
Customization Ideas
- The granny square sleeves are the natural place to play. Work all eight squares in a single color for a quiet, minimalist look, or alternate two shades along each strip for a subtle checkerboard. Scrap yarn works beautifully here, and a fully scrappy sleeve against a solid body reads as intentional design rather than leftovers. You can also match the square centers to your trim color so the whole sweater feels tied together, or reverse it entirely and let the body be the neutral backdrop for very loud, very happy sleeves.
- Length and fit are just as adjustable. Add more rows to the body panels for a tunic that falls past the hip, or stop short for a cropped version that sits at the waist. Because you choose your own panel width from your own measurements, adding a couple of inches to each panel gives you a relaxed oversized fit without any extra math. You can also change the trim entirely, swapping the whip stitch border for a row of single crochet, a small picot edge, or a deeper ribbed cuff at the hem for a more structured finish.
Frequently Asked Questions
- Do I need to know how to read a gauge swatch to make this sweater? No. This pattern is built around your own body measurements rather than a fixed stitch count, so you chain until you reach your target width instead of matching a stated gauge. That said, working a small practice swatch is still worth the ten minutes, because it shows you how your yarn and hook combination drapes. If the fabric feels stiff and boardy, adjust your tension or hook before starting a full panel.
- How do I know how long to make the body panels? Hold the panel against yourself as you work and stop when it reaches the length you want the finished sweater to be. Remember that the back panel is worked two rows longer than the front to allow for the neckline shaping. If you are unsure, err slightly long, since a sweater that sits a bit low always looks more deliberate than one that rides up.
- Can I make this sweater without seaming? Not with this construction. The design depends on two flat panels joined at the shoulders and sides, and the granny square sleeves are sewn on as separate strips. The upside is that seaming with a blanket stitch is genuinely easy to learn and gives the shoulders real structure, which helps a rectangular sweater hang well instead of sagging.
- My granny squares are not all the same size. What went wrong? This is almost always tension rather than a mistake in the stitch pattern. Squares worked at the start of a session are often looser than ones worked when you are tired or tense. Check that every square has the full 5 rounds, then block them all to the same dimensions. Blocking evens out small differences and makes the sleeve strips far easier to assemble.
- Can I make the sleeves longer or shorter? Yes. Each sleeve here is made from 4 granny squares sewn into a strip, which gives a particular length. If you want a longer sleeve, add another square to each strip, and if you want a shorter one, use fewer. Just remember to keep both sleeves identical, and adjust your total number of squares accordingly.