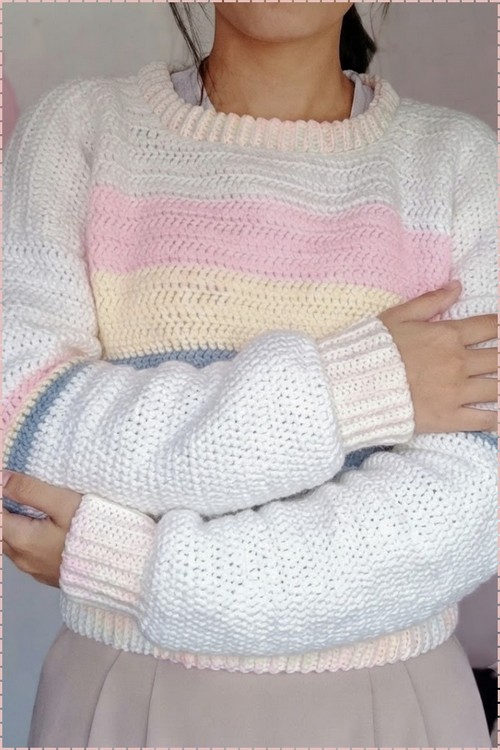
Blush pink and butter yellow bands stripe the chest of a cottagecore crochet sweater, set against a soft cream body with ribbed cuffs. Garden picnics and slow weekend mornings call for the pastel crochet sweater design tucked into a pleated skirt or worn loose with jeans.
Pastel color blocking and a cozy pullover silhouette are a cottagecore combination that rarely misses, and this sweater from Im Widilicious delivers both without overcomplicating the construction. The stripe arrangement across the chest gives it an effortless vintage feel that sits naturally alongside the crochet vintage sweater from the same designer.
Crochet Cottagecore Sweater

The body panels are worked flat and seamed at the shoulders and sides, making the assembly straightforward even for beginners tackling their first color-change pullover. Ribbed cuffs and a neat neckband finish the piece with the kind of clean edges that make it look far more involved than it is.
Materials
- Soft bulky or chunky weight yarn — milk cotton or a similar soft acrylic blend works well
- Main color (the tutorial uses white) plus accent colors for the stripes (blue, yellow, and pink are used as reference)
- Crochet hook sized for your yarn weight
- Scissors
- Yarn needle for weaving in ends
Learn the Stitch First
Difficulty and Time
Difficulty: Easy — every technique is beginner-level. Estimated time: 10–16 hours depending on yarn weight, speed, and number of color stripes.
Beginner Technique Notes
- Chain (ch): Make a slip knot on your hook, yarn over, and pull the yarn through the loop. One chain made. Repeating this builds your foundation chain.
- Single crochet (sc): Insert your hook into a stitch, yarn over and pull up a loop (2 loops on hook), yarn over and pull through both loops. One single crochet made.
- Double crochet (dc): Yarn over first, then insert your hook into a stitch, pull up a loop (3 loops on hook), yarn over and pull through 2 loops, then yarn over and pull through the remaining 2 loops. A double crochet is taller than a single crochet and is the main stitch used for the sweater body and sleeves.
- Back loop only (BLO): Every stitch has two loops on top — front and back. The back loop is the one farthest from you. Working into only the back loop creates a horizontal ridge that gives the ribbing its stretchy, textured appearance. This is used for all the cuffs, bands, and collar.
- Chain 2 turning chain: At the start of every double crochet row, chain 2 before turning. This counts as your first double crochet of the new row. Skip the stitch directly below it and begin working into the next stitch.
- Slip stitch seaming: To join two pieces together, hold them with the edges aligned. Insert your hook through both layers, pull up a loop, and pull it through the loop already on your hook. One slip stitch join made. Work one slip stitch per stitch or row along the seam.
- Color changes: To switch yarn colors, work the last stitch of the current color until 2 loops remain on your hook. Pull the new color through those 2 loops to complete the stitch. Chain 2 with the new color and continue. Cut and secure the old color.
- Take your time on color changes at the start — they can feel fiddly the first few times but quickly become routine. Always pull snugly when joining the new color so the join does not leave a visible gap.
The Pattern
Step 1: Ribbed Cuffs and Bottom Bands
All four ribbed pieces — two sleeve cuffs and two body hem bands — are worked the same way using back loop only single crochet.
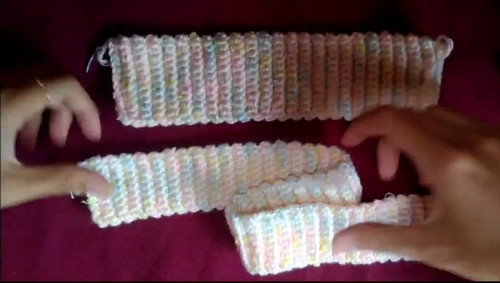
Sleeve cuffs (make 2):
- Chain 13 stitches.
- Row 1: Single crochet into the 2nd chain from the hook and into every chain to the end of the row.
- Row 2 and all following rows: Chain 1, turn, and work single crochets in the back loop only across every stitch.
- Continue working back and forth for a total of 47 rows.
- Fasten off at the end of Row 47.
- Make a second identical cuff.
If you’re still learning how to read crochet patterns, no stress! Follow the video tutorial below and use the written pattern below as you get more comfortable!
Bottom body bands (make 2):
- Follow the exact same method as the cuffs, but start with a foundation chain of 9 stitches instead of 13.
- Work the same number of rows.
- Make 2 identical pieces — one for the front panel base, one for the back panel base.
Step 2: Front Body Panel
Base color section:
- Attach your main color to the first row of the bottom band and chain 2 (this counts as your first double crochet).
- Work double crochets across the row until you have 95 double crochets total.
- Chain 2, turn, and work 1 double crochet in each stitch across.
- Continue for a total of 9 rows in the main color.

Color-block stripes:
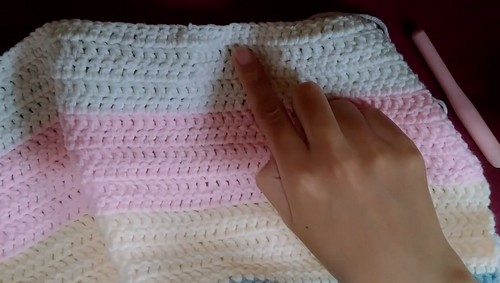
- Change to your first accent color and work 6 rows of double crochet.
- Change to your second accent color and work 6 rows of double crochet.
- Change to your third accent color and work 6 rows of double crochet.
- Change back to the main color and work 5 rows of double crochet.
Shoulder shaping and neck opening:
- First shoulder: Work 35 double crochets, chain 2, and turn. Work back and forth on these 35 stitches for a few rows to build the shoulder height. Fasten off.
- Second shoulder: Leave the center stitches unworked for the neck opening. Count 35 stitches from the opposite edge, attach yarn, chain 2, and work 35 double crochets. Work back and forth to match the first shoulder height.
Neckline edging:
- Work a round of single crochets all the way around the neckline opening. Along the side edges of the double crochet rows, place 2 single crochets into the side of each row for a smooth, even finish.
Step 3: Back Body Panel
- The back panel does not have a neck drop, so it is worked straight throughout without shoulder shaping.
- Follow the same color-block stripe sequence as the front panel.
- Work straight double crochet rows for a total of 42 rows.
- Fasten off.
Step 4: Sleeves (Make 2)
Increase row for the puff/flared effect:
- Attach yarn at the first row of a sleeve cuff.
- Work the first row of the sleeve with increases to create the flared shape: work 1 double crochet in each of the first 3 stitches, then work 2 double crochets into the 4th stitch. Repeat this sequence — 3 regular double crochets, then 2 into the next stitch — across the entire row.
Continuing the sleeve:
- Chain 2, turn, and work 1 double crochet in every stitch across with no further increases.
- Continue working back and forth for a total of 34 rows, incorporating color stripe changes to match your body panel style.
- Make a second identical sleeve.
Step 5: Assembly
- Turn all pieces inside out so the seams will be hidden on the inside when finished.
- Align the edges of the pieces you want to join. Insert your hook through both layers, pull through a slip knot, and chain 1 to anchor.
- Work one slip stitch per corresponding stitch or row along the seam to join the pieces.
- Join the front and back panels at both shoulder sections and both side seams.
- Attach both sleeves into the armhole openings.

Step 6: Collar
- Count the total number of stitches or loops around the finished neckline opening.
- Make a separate ribbed collar band using the same back loop only single crochet method as the cuffs and hem bands, but start with a foundation chain of 6 stitches.
- Work as many rows as needed to match the total neckline circumference.
- Slip stitch the collar band closed around the neckline opening to attach it.
Tips
- Leave long tails when fastening off each color stripe — at least 6 inches. Shorter tails are harder to weave in securely through the double crochet fabric, and a tail that comes loose on a color join will leave a small hole at the stripe edge.
- Do the increase row for the sleeves carefully and count as you go. The 3-stitch, 1-increase repeat needs to stay consistent across the full row to keep the flare even on both sides. If the first sleeve came out wider than expected, recount your increase frequency before starting the second one.
- Try the sweater on after joining the shoulder seams but before seaming the sides. Adjust the side seam length at that stage rather than after everything is closed — it is much easier to leave a slightly longer armhole opening before the sleeves go on than to unpick a finished seam.
Yarn Substitution
Milk cotton or a soft cotton-acrylic blend is the right choice here. The softness matters because the collar and cuffs sit directly against skin. A scratchy or rough yarn at the same weight will work structurally but will feel uncomfortable to wear. If you cannot find milk cotton, look for any soft DK or chunky blend with at least some cotton content. Avoid very stiff 100% cotton — it will not drape as softly as the fabric needs to for the puff sleeve silhouette to fall correctly.
FAQ
- I have never made a sweater before. Is this really beginner-friendly? Yes. Every stitch in this pattern — chain, single crochet, double crochet, slip stitch, and back loop only — is used in basic beginner projects. If you have made a hat, a dishcloth, or a simple bag, you already know everything you need to make this sweater.
- What do I do if my panels are different widths after working them? This usually comes from tension changes between projects. Block both panels flat to the same width before seaming — pin them to matching measurements, mist with water, and let them dry. For acrylic yarn, a light steam (held above the surface, not pressed directly) will relax the stitches and even them out.
- How do I know when to change colors? Change colors at the start of a new row, not mid-row. Complete the last stitch of the current color until 2 loops remain on your hook, then pull your new color through both loops and chain 2 with the new color. Cut and secure the old color after 2–3 inches of tail.
- The shoulder seams look uneven on the two sides — what went wrong? Count the rows on your first shoulder and write it down before starting the second. Matching row for row on both shoulder sections is what keeps the neckline sitting level. If one side has a row more or fewer than the other, the collar will tilt slightly to one side.
- Can I change the stripe colors to anything I want? Absolutely. The color sequence in this pattern is purely decorative. Work the same number of rows in each stripe section and the sweater will come out the same shape regardless of which colors you choose. You can also make the whole sweater in a single color if you prefer.