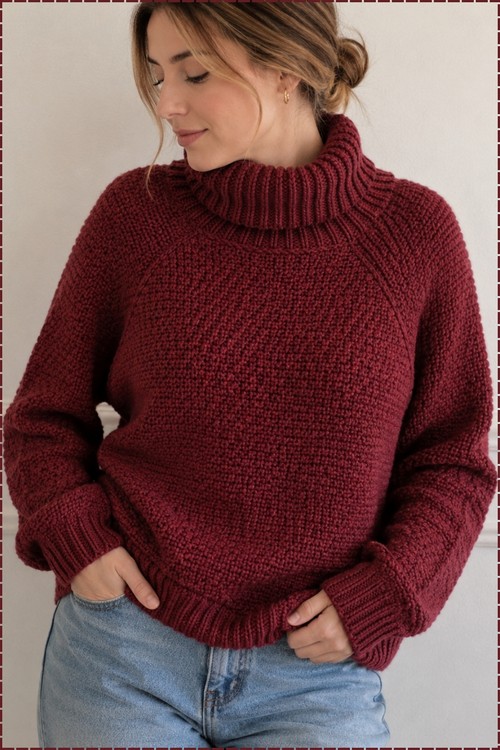
Jeans go straight underneath a crochet funnel neck sweater for the whole of winter. The wide collar folds over once and stays put, and the same rib closes both the cuffs and the hem.
Deep burgundy makes this one feel like autumn before you even pull it on. The body works up in a fine pebbled texture while the collar, cuffs, and hem all get a chunky ribbed treatment that frames the whole piece. Anyone who has already finished an oversized sweater will recognize the relaxed shaping here, just with a warmer neckline on top.
Crochet Funnel Neck Sweater

Construction stays manageable because the sleeves grow out of the raglan lines instead of being set in afterward. You can work the collar taller or shorter depending on how much fold you want at the neck. Sizing is flexible as well, so the fit can sit close or stay roomy without touching the stitch pattern itself.
Quick Facts
- Skill level: Intermediate
- Hook: 4 mm
- Yarn: Medium weight (Size 4), 100% acrylic (the original uses Craft Smart in Wine)
- Construction: Seven separate pieces — front and back body welts, body panels, sleeve cuff ribs, sleeve bodies, and a roll neck — all seamed together
- Main stitch: Alternating double crochet and single crochet rows for a textured, reversible fabric
- Estimated time: A substantial multi-session project; the stitch count is detailed and consistent throughout
Customization Ideas (Before You Begin)
Since this pattern has precise stitch counts and row numbers for every piece, adjustments are best made before you start rather than mid-project:
- Size up or down. The body and sleeve stitch counts are specific to the original size — adjusting the foundation pickup count on the body or sleeves and keeping the row-count proportions will re-size the sweater.
- Change the collar height. The roll neck is 70 rows of back-loop-only single crochet. Fewer rows gives a mock-neck; more gives a dramatic oversized roll. The chain-26 foundation stays the same either way.
- Adjust the ribbing width. The body welts are worked on 15 single crochet (chain 16); the cuffs on 10 single crochet (chain 11). Adding or removing chains widens or narrows the ribbing band.
- Go solid or two-tone. All pieces are specified in one color, but switching colors between the body panels and the collar or cuffs gives a clean accent without changing any construction.
- Shorten the sleeve. The sleeve body runs 41 rows total. Working fewer rows after the increase section shortens the sleeve before the armhole.
Materials and Tools
- Craft Smart medium weight yarn (Size 4), in Wine — or any medium weight acrylic of your choice
- A 4 mm crochet hook
- Tapestry needle
- Scissors
Common Stitch to Know
The Pattern
Seven pieces: 2 body welt ribbings, a back panel, a front panel with neck shaping, 2 sleeve cuff ribbings, 2 sleeve bodies, and 1 roll neck collar. All pieces are slip-stitched or seamed together in assembly.
The main body stitch alternates double crochet and single crochet on every stitch across the row, with the stitch type swapping between rows:
- Even rows: chain 2, turn. Work across as double crochet, single crochet, double crochet, single crochet to the end. (Total: 93 stitches per body row.)
- Odd rows: chain 1, turn. Work across as single crochet, double crochet, single crochet, double crochet to the end.
The ribbing (body welts, cuffs, and collar) is worked as single crochet in the back loop only, worked flat then slip stitched into a tube.
Part 1: Body Welt Ribbing (Make 2 — Front and Back)
- Chain 16.
- Row 1: 15 single crochet.
- Rows 2–62: Chain 1, turn, 15 single crochet in the back loop only.
- Slip stitch the short ends together to form a tube.

Part 2: Back Panel
- Row 1: Pick up 93 single crochet along the ribbing edge. (The original method: alternate 2 single crochet, 1 single crochet, 2 single crochet, 1 single crochet across the edge.)
- Rows 2–61 — alternating pattern:
- Even rows: chain 2, turn. Work 93 stitches as double crochet, single crochet, double crochet, single crochet across.
- Odd rows: chain 1, turn. Work 93 stitches as single crochet, double crochet, single crochet, double crochet across.
- Fasten off after Row 61.
If you’re a beginner and crochet patterns feel confusing, start with the video tutorial below, it’s the easiest way to learn as you go!
Part 3: Front Panel
- Rows 1–51: Work exactly as the back panel — 93 stitches across, alternating the DC-SC pattern on even and odd rows.
- Rows 52–61 — neck shaping (decrease 1 stitch each row, working each shoulder side separately after splitting for the neck opening):
- Row 52: 40 stitches in the DC-SC pattern
- Row 53: 39 stitches
- Row 54: 38 stitches
- Row 55: 37 stitches
- Row 56: 36 stitches
- Rows 57–61: 35 stitches
Part 4: Sleeve Cuff Ribbing (Make 2)
- Chain 11.
- Row 1: 10 single crochet.
- Rows 2–30: Chain 1, turn, 10 single crochet in the back loop only.
- Slip stitch the short ends together to form a tube.

Part 5: Sleeve Body (Make 2)
- Row 1: Pick up 40 single crochet along the cuff ribbing edge. (The original method: alternate 2 single crochet, 1 single crochet, 1 single crochet, 2 single crochet, 1 single crochet, 1 single crochet across.)
- Rows 2–4: Work 40 stitches in the DC-SC alternating pattern with no shaping.
- Rows 5–32 — increase rows: Work 2 increases every 3rd row at rows 5, 8, 11, 14, 17, 20, 23, 26, 29, and 32. The stitch count builds from 42 up to 60 stitches across these 10 increase rows.
- Rows 33–41: Work 60 stitches in the DC-SC pattern with no increases.

Part 6: Roll Neck
- Chain 26.
- Row 1: 25 single crochet.
- Rows 2–70: Chain 1, turn, 25 single crochet in the back loop only.
- Slip stitch the short ends together to form a tube.
Part 7: Assembly
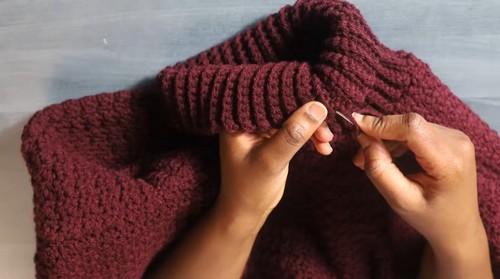
- Slip stitch the front and back panels together at the shoulder seams, leaving space at the armhole openings on each side.
- Slip stitch the sleeves into the armhole openings.
- Seam the sleeve and side seams closed.
- Attach the roll neck collar to the neckline opening.
- Weave all ends in with a tapestry needle.
Tips and Troubleshooting
- Track even and odd rows on the body. The DC-SC alternating pattern depends on stitch type swapping every row — even rows start with a chain-2 and double crochet, odd rows start with chain-1 and single crochet. Losing track of which row you’re on is the most common mistake. Mark Row 1 with a stitch marker and count from there.
- Count your pickup stitches on the ribbing edges. Both the body panels (93 stitches) and the sleeve bodies (40 stitches) rely on a specific pickup count from the ribbing edge. Count after completing the first row and confirm the number before building further — off-count errors here compound across every subsequent row.
- Work both neck-shaping sides to match. The front panel splits for the neck from Row 52 onward, with each shoulder decreasing independently. Make sure both sides hit the same final stitch count (35 stitches by Row 57) before seaming.
Frequently Asked Questions
1. Why does the alternating DC-SC pattern swap direction between even and odd rows? Starting even rows with a double crochet and odd rows with a single crochet ensures the stitches stack correctly on top of each other as the fabric grows — double crochet over double crochet, single crochet over single crochet. Without the swap, the columns would misalign and the textured pattern would break.
2. How do I increase evenly in the sleeve body? Each increase is simply 2 stitches worked into 1 stitch. Work the increase at the beginning and end of the sleeve row on each increase row — rows 5, 8, 11, 14, 17, 20, 23, 26, 29, and 32 — which adds 2 stitches per row at those 10 points. This grows the sleeve from 40 to 60 stitches across the shaped section.
3. The roll neck is 70 rows — does it actually roll that much? Yes. Worked in back-loop-only single crochet for 70 rows, the collar tube has enough height to fold over once or twice. The natural curl of the single crochet fabric (BLO especially) creates the roll without any extra shaping. If you want a more relaxed, less oversized roll, work fewer rows — 40 to 50 gives a standard roll neck.
4. Can I work the ribbing pieces in the round instead of flat and seamed? You can, but working flat then seaming gives you more control over the tension and stitch count before committing to the tube. The seam on a BLO single crochet ribbing is also nearly invisible when sewn carefully. If you work in the round, adjust for the absence of a turning chain and track your stitch counts carefully to keep the count consistent.