Pair a classic crochet sweater for women with a pleated midi skirt and ankle boots for chilly office days and weekend errands. Friends tend to mistake a knit look crochet sweater for a store-bought turtleneck, so the finished piece makes a smart handmade gift for a mum or sister.
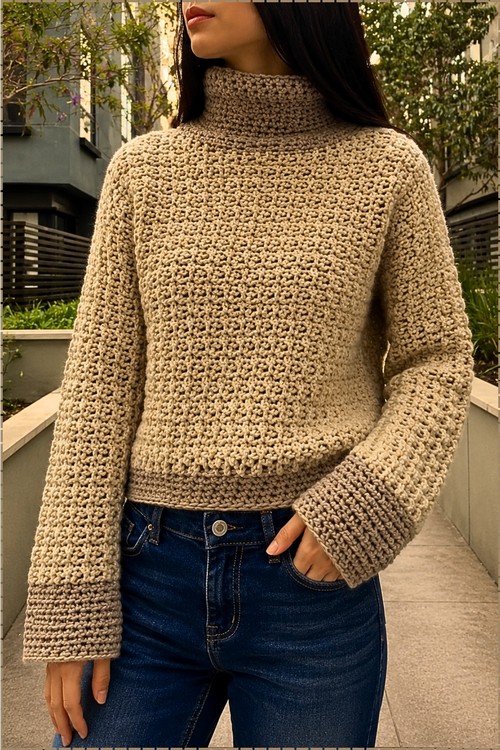
Oatmeal beige, a collar that folds over high on the neck, and sleeves that widen from elbow to wrist. There is nothing loud about this classic crochet sweater, which is exactly the appeal, and the dense pebbled fabric gives it enough surface interest that a neutral palette never reads flat.
Classic Crochet Sweater

Texture comes from the stitch rather than the color. A tight all over pebble builds a warm fabric with almost no drape loss, and the same repeat runs unbroken from hem to collar so there is no panel to match up. Smooth cuffs and a folded neckband break the texture at both ends, and the body stops just at the hip for a slightly shortened line over jeans.
Why I love this one: the mesh structure keeps a bulky yarn from feeling heavy, and the turtleneck worked in a spiral looks far more refined than the effort it takes.
Materials and Tools
- Bulky weight yarn, wool and acrylic mix recommended
- Plan for at least 5 balls for a size small to complete the body, sleeves, and turtleneck
- 8 mm crochet hook
- Tapestry needle for seaming and weaving ends
- Rustproof pins for aligning panels before sewing
- Scissors
- Stitch markers for tracking spiral rounds in the collar
Stitch First, Then Start
Difficulty and Time
- Skill level: beginner to confident beginner
- Stitches used: chain, single crochet, decrease, slip stitch
- Construction: two flat body panels, two flat sleeve panels, seamed and assembled, collar worked in the round
- Time: most makers complete this over a week of regular evening sessions at this gauge
Customization Ideas
- Work more than 16 body rows for a longer, hip length or tunic fit
- Stop at 14 rows for an even shorter cropped version
- Add more spiral rounds to the collar for a deeper, more dramatic turtleneck
- Skip the turtleneck entirely and finish the neckline with 2 rounds of single crochet for a simple crew neck
- Extend the cuffs by continuing in spiral single crochet until you reach a preferred sleeve length
- Work a bottom band in a contrast color for a simple color detail
- Chain a wider starting count for an oversized, boxy fit
The Pattern
Make 2 identical body panels and 2 identical sleeves before assembling. All pieces use the same chain 1 skip 1 single crochet mesh throughout.
Sizing
- Size small: chain 42 [42 ch]
- Size medium: chain 44 to 46 [44 to 46 ch]
- Size large: chain 48 to 52, choosing the wider end for a baggier result [48 to 52 ch]
Step 1: Front and Back Body Panels (Make 2)
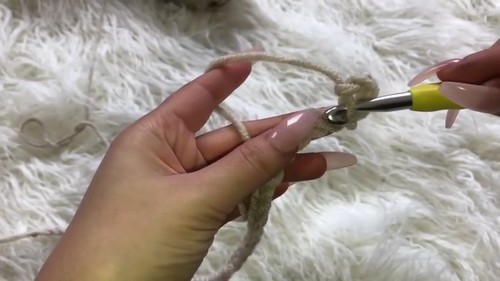
- Make a slip knot and chain your starting count for your size
- Block off the last chain with your finger, then chain 4
- Skip the chain immediately after the blocked chain
- Place a single crochet into the second chain from the end
- Chain 1, skip the next chain, and place a single crochet in the chain after
- Repeat the chain 1, skip 1, single crochet sequence across to the end of the setup row
- To begin body rows, chain 3, which counts as the turning chain plus one chain space, and flip the work
- Skip the very first chain in the row and place a single crochet into the next chain
- Continue the chain 1, skip 1, single crochet pattern to the end of the row
- Repeat for 16 rows total, or add more rows for a longer sweater; 16 rows produces a waist length cropped fit
- To shape the shoulders and neckline, fold the finished body piece in half and mark the shoulder boundaries on both left and right sides
- Continue the same mesh pattern for 3 to 5 rows along the left shoulder section only, leaving the center open for the neck
- Fasten off, then return to the right shoulder section and work the same 3 to 5 rows
- Fasten off and set the panel aside
- Make a second identical panel for the back
Reading crochet patterns can be tricky when you’re just starting out, feel free to follow the video tutorial below instead!
Step 2: Sleeves (Make 2)
- Chain an even number that fits loosely around your upper arm; the sample used approximately 28 to 34 chains depending on size [28 to 34 ch]
- Block off the last chain, chain 4, skip the blocked chain, and place a single crochet into the next chain
- Repeat the chain 1, skip 1, single crochet pattern across the row
- Chain 3, flip the work, skip the first chain, and continue the mesh pattern across
- Repeat for as many rows as needed to reach your desired sleeve length
- Fasten off and make a second matching sleeve

Step 3: Assembly
- Align the front and back body panels at the shoulders and join the shoulder seams using single crochet or a tapestry needle seam
- Attach yarn at the bottom edge and single crochet the side seams of both panels together, leaving an opening on each side sized to fit the sleeve
- Join the sleeves to the armhole openings by sewing or single crocheting around the attachment point, keeping stitches loose and slightly stretchy so the seam does not pull or cinch

Step 4: Turtleneck Collar
- Attach yarn at a corner of the neckline opening
- Chain 1 and work a full round of single crochets evenly spaced around the entire neckline to create the base
- From this point, work in a continuous spiral without joining rounds with a slip stitch, which removes any visible seam line from the finished collar
- Work 5 to 6 rounds of plain single crochet, placing one single crochet into each stitch
- Over the next 5 to 6 rounds, work decreases near the corners and sides of the neckline by inserting the hook into a stitch, pulling up a loop, inserting the hook into the next stitch, pulling up a second loop, then yarning over and pulling through all 3 loops together
- Work 2 more plain rounds
- Slip stitch to finish and fasten off

Step 5: Edging and Finishing (Optional)
- For a neater, slightly cinched bottom hem, attach yarn at the lower edge and work about 5 rounds of spiral single crochet around the entire hem
- If the sleeves need extra length, continue working spiral single crochet rounds directly off each cuff until the sleeve reaches the length you want
- Weave in all ends
Tips and Troubleshooting
Keep your seams genuinely loose when attaching the sleeves. Bulky yarn at an 8 mm hook produces thick seam ridges if the joining stitches are pulled firm, and a tight armhole seam restricts movement in a way you will feel immediately on wearing. Single crochet seams done with a slightly larger hook than the main body work well here. For the turtleneck spiral, place a stitch marker at the start of each new round even though you are not joining, so you can track your progress through the decrease rounds accurately. The collar narrows gradually, and losing count of which round you are on leads to uneven shaping.
Yarn Substitution
Any true bulky weight yarn can substitute here, but stay close to the wool and acrylic blend recommendation if warmth and drape are priorities. A 100% acrylic bulky tends to feel lighter and squishier but loses the structured look once washed. A wool heavy blend gives a more premium result and blocks beautifully if you want to open up the mesh slightly after finishing. Avoid chenille or velvet textured bulky yarns because the chain space mesh requires visible stitch definition to read well. A superwash wool blend is an excellent alternative if you want wool warmth with easy care.
FAQ
- Can I make this sweater without any experience crocheting garments? Yes. The body pattern is a two step repeat and the assembly follows a simple flat panel construction. The only technique that benefits from a little practice is the decrease used to taper the turtleneck, and that is just a basic single crochet decrease. Work a small swatch of the mesh stitch and one or two decrease stitches before starting and you will feel confident by the time the pattern calls for them.
- What if my panels come out slightly different sizes? Block both panels before seaming. Bulky yarn responds well to light misting and pinning, and most minor size differences will ease out. If one panel is significantly wider, count your starting chains again, since an off count in the stitch multiple is almost always the cause.
- How do I get a clean shoulder seam? Pin the panels together before joining. Align the shoulder row counts on both sides and pin every few stitches rather than just at the edges. Single crocheting through both layers with the panels held wrong sides together gives a seam that sits on the outside as a neat decorative ridge, which suits a chunky sweater well.
- Can I make the turtleneck shorter? Reduce the plain rounds before and after the decrease section. The collar as written produces a full height turtleneck that folds over. Cutting the round counts roughly in half gives a mock neck that sits up without folding, which is a flattering alternative for anyone who finds a full turtleneck too warm.