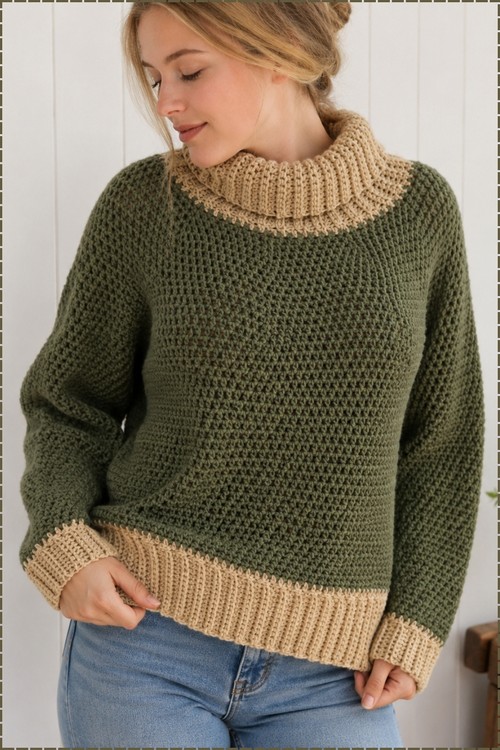
Two colours give a crochet high neck sweater its whole look when one sits only at the edges. Olive and tan cover the body and the ribbed bands, and the collar folds over without needing extra rows.
Tan ribbing frames every edge of this crochet high neck sweater, wrapping the folded collar, both cuffs and a deep hem band against an olive green body. A dense textured stitch fills the body and sleeves, raglan lines angle from the neck across the shoulders, and the fit stays loose through the torso. Work the contrast bands in the same yarn weight as the body, since a lighter yarn in the hem lets the sweater stretch out of shape.
Crochet High Neck Sweater

Two colors doing all the work here, and the contrast is what makes it read as finished rather than homemade. Olive covers the body while a warm tan handles the collar, cuffs, and hem, so the shaping shows up without any extra stitchwork. If you liked the pace of this beginner sweater, the same steady rhythm carries you through this one.
The whole thing comes together without seaming, which removes the step most people dread at the end of a garment. Sleeves are worked straight down from the yoke and the collar goes on last, tall enough to fold over on itself. Swapping the two colors or working it in one shade both hold up fine, so the palette is yours to decide.
Materials
- Yellow / lemon yarn for the ribbing (turtleneck, hem, and cuffs) — approximately color l124 from Lemire Reborn or equivalent
- Green yarn for the body and sleeves — approximately color l173 or equivalent
- A 4.5 mm hook for all ribbing sections
- A 6.0 mm hook for the body and sleeves
- Yarn needle, scissors, and stitch markers

Go-To Stitch to Know
The Pattern
Step 1: The Turtleneck Collar
- Using the 4.5 mm hook and yellow yarn, make a slip knot and chain 25.
- Skip the first chain and work single crochet all the way down. (24 stitches total.)
- Chain 1, turn, and continue working single crochet in the back loop of each stitch.
- Repeat this row until you have completed 70 rows of ribbing.
- Lay the ribbing flat, bring the two ends together, and slip stitch the ends closed to form a tube. Turn the collar inside out so the seam is hidden.

Step 2: Neckline Base and First Increases
- Switch to the 6.0 mm hook and green yarn.
- Place 70 half double crochet evenly around the bottom opening of the turtleneck (1 per row). Slip stitch to join the round.
Still getting the hang of reading crochet patterns? That’s completely okay, the video tutorial below breaks everything down in a simple, beginner-friendly way!
First increase round:
- Chain 1, place a stitch marker, and work 6 half double crochet, then 2 half double crochet in the 7th stitch. Repeat this pattern all the way around to reach 77 stitches.
- Yoke expansion — rounds 2 to 5: Continue in continuous rounds without joining, increasing by 7 stitches each round:
- Round 2: half double crochet in the next 7 stitches, 2 half double crochet in the 8th.
- Round 3: half double crochet in the next 8 stitches, 2 half double crochet in the 9th.
- Round 4: half double crochet in the next 9 stitches, 2 half double crochet in the 10th.
- Round 5: half double crochet in the next 10 stitches, 2 half double crochet in the 11th.
- Work 5 plain rounds of half double crochet with no increases.

Second set of increase rounds:
- Round 1: half double crochet in the next 11 stitches, increase in the 12th.
- Round 2: half double crochet in the next 12 stitches, increase in the 13th.
- Round 3: half double crochet in the next 13 stitches, increase in the 14th.
- Round 4: half double crochet in the next 14 stitches, increase in the 15th.
- Round 5: half double crochet in the next 15 stitches, increase in the 16th.
- Work another 5 plain rounds of half double crochet.
Step 3: Creating Armholes
- Fold the work in half to locate the front, back, and sides.
- Count and mark 38 stitches on each side for the armholes using stitch markers.
- Work half double crochet around the body until you reach the stitch just before the first armhole marker.
- Chain 7 loosely, skip the 38 marked armhole stitches, and join with a half double crochet in the stitch immediately after the armhole marker.
- Repeat for the second armhole: half double crochet to the next marker, chain 7 loosely, skip the 38 stitches, and half double crochet into the stitch after the marker.
- Complete the round by working half double crochet back around.
- On the following round, work 1 half double crochet into the back loop of each of the 7 chain stitches to bridge the armpit seamlessly.
Step 4: The Body
- Continue working in the round with half double crochet for the body.
- Work 30 rows total. (Adjust length here if you prefer a cropped or longer sweater.)
- Fasten off the green yarn.
Step 5: Bottom Ribbing Border
- Switch back to the 4.5 mm hook and yellow yarn.
- Work 1 transition round of half double crochet evenly around the bottom edge.
- Loosely chain 13. Skip the first chain and single crochet down the chain (12 stitches).
- Slip stitch into the next 2 stitches along the bottom edge of the jumper, skip 2 stitches, and work back up the ribbing with single crochet.
- Continue this back-and-forth ribbing pattern all the way around the bottom hem.
- Slip stitch the final and first edges of the ribbing together to close the band. Fasten off and weave in ends.

Step 6: Sleeves (Make 2)
- Attach green yarn with the 6.0 mm hook at the center of the underarm chain.
- Work 10 rounds of plain half double crochet around the arm opening. Note your total stitch count (approximately 50 stitches) to ensure both sleeves match.
- Decrease pattern:
- Work 1 decrease round: half double crochet in the next 3 stitches, then work a decrease (2 half double crochet together). Repeat around, ending with a decrease in the last 5 stitches.
- Work 10 rounds of plain half double crochet, then 1 decrease round.
- Work 4 rounds of plain half double crochet, then 1 decrease round. Repeat this 4-round-plus-decrease block 4 times.
- On the final sleeve round, work 3 half double crochet, then 1 decrease all the way around to taper the wrist.
- Fasten off the green yarn.
Step 7: Sleeve Cuffs
- Switch back to the 4.5 mm hook and yellow yarn.
- Work 1 transition round of half double crochet around the wrist opening.
- Loosely chain 13, skip the first chain, and single crochet down (12 stitches).
- Slip stitch into the next 2 stitches of the sleeve and work back up the ribbing.
- Repeat the ribbing pattern all the way around the wrist. Slip stitch the ends together to close the cuff. Fasten off and weave in all ends.
- Fold the cuffs outward to match the turtleneck.
A Few Tips
- Keep the armhole chains loose. The 7-chain bridges across each armhole need to be genuinely loose — tight chains pull the underarm in and create an uncomfortable restriction. Chain a size up if your tension runs tight.
- Note your sleeve stitch count before starting the second. Write down the total from the first sleeve foundation round immediately. Matching both sleeves to the same number is what keeps them the same length.
- Work the increase rounds with a stitch marker at the first stitch of each round. Without a marker, continuous rounds are easy to lose track of — move the marker up on each new round so you always know where the round started.
Frequently Asked Questions
1. Why does the ribbing for the collar, hem, and cuffs use a smaller hook than the body? The 4.5 mm hook makes the back-loop-only single crochet ribbing tighter and denser, which gives it the stretch and structure it needs to hold its shape. The body uses the 6.0 mm hook for a looser, more comfortable fabric. Using the same hook for both would make the ribbing too stretchy to hold its edge.
2. How do I know when the yoke is big enough before making the armholes? Try it on — hold it up over your head and check that the yoke reaches comfortably past your armpits and over your shoulders before you start Step 3. Top-down construction is ideal for this kind of live fitting. If it’s not there yet, work more increase or plain rounds.
3. Can I adjust the body length beyond 30 rows? Yes, easily. The 30-row body is the original length — add rounds for a longer jumper or remove them for a crop. The only thing to keep consistent is finishing on green yarn before switching to yellow for the hem ribbing.