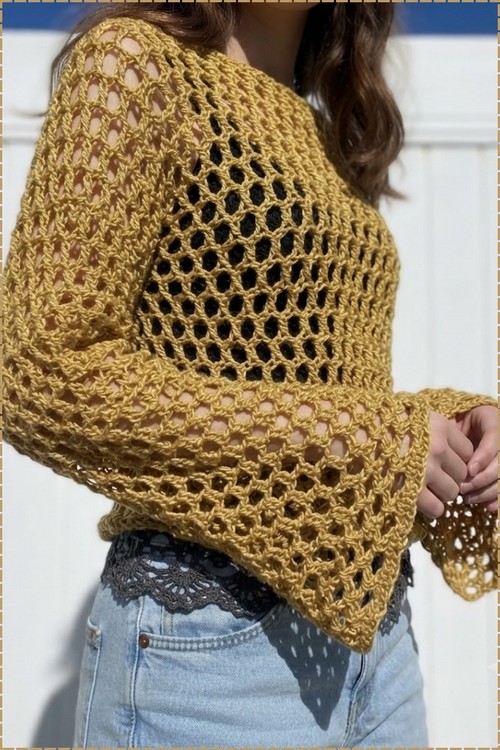
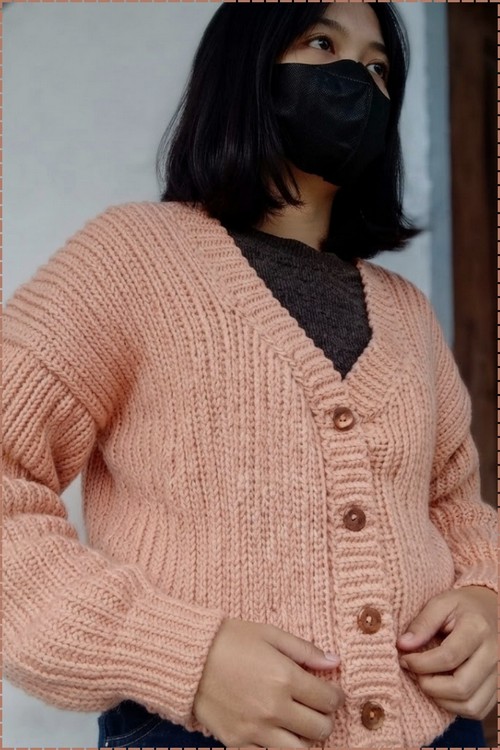
Layer a crochet vintage sweater design for women over a black turtleneck, and the peachy ribbed texture with long cuffed sleeves reads soft and polished. Office days and autumn errands suit the peach crochet sweater, with a hip length ribbed hem that sits neatly over jeans or a midi skirt.
Vintage silhouettes in crochet tend to look far more complex than they actually are, and this salmon pink button-front cardigan from Im Widiliciouz is a good example of that. The relaxed v-neck shape and wooden button placket give it an effortless layered look similar to the slouchy oversized sweater but with a more structured front closure.
Crochet Vintage Sweater

The ribbed texture runs vertically across the body and sleeves, giving the finished piece that knit-like density that photographs beautifully and wears even better. Fitted cuffs and a clean button band complete the vintage feel without adding any complicated finishing steps.
Materials
- Chunky weight yarn, soft and slightly fuzzy — approximately 8 balls (milk cotton or a soft acrylic blend both work well)
- 3.0 mm crochet hook
- Stitch markers (at least 2)
- Buttons — 4, sized to fit the buttonholes
- Yarn needle
- Scissors
Get Familiar with the Stitch
Difficulty and Time
Difficulty: Beginner-intermediate — all stitches are basic, but the project involves multiple panels, V-neck shaping, and a sideways button band. Estimated time: 15–25 hours depending on yarn choice and working speed.
Beginner Technique Notes
- Back loop only (BLO): Look at the top of any stitch — you see a small V shape made of two loops. The back loop is the one farthest away from you. Working into only that loop leaves the front loop unworked and creates a horizontal ridge. Every stitch in this pattern is worked in the back loop only from Row 2 onward, and that is what gives the fabric its knit-like appearance.
- Half double crochet (HDC): Yarn over, insert your hook into the stitch, pull up a loop (3 loops on hook), yarn over and pull through all 3 loops at once. This is the main body stitch throughout.
- Single crochet (SC): Insert hook into stitch, pull up a loop (2 loops on hook), yarn over and pull through both loops. Used for the bottom ribbing edge on every panel.
- HDC decrease (HDCdec): Yarn over, insert hook into next stitch and pull up a loop, yarn over, insert hook into following stitch and pull up another loop (5 loops on hook), yarn over and pull through all 5 loops. Two stitches reduced to one. Used for the V-neck shaping.
- Stitch marker use: A stitch marker placed on the 8th stitch of the bottom ribbing section keeps you oriented on every row. Moving it up each row takes one second and prevents counting errors across 66 rows of alternating row types.
- Chain-2 turning chain for HDC: At the end of every odd row, chain 2 before turning. This chain-2 acts as the first HDC of the new even row. At the end of even rows, chain 1 before turning for the single crochet ribbing section.
- Buttonhole construction: The button band buttonholes are made by working 3 single crochets, chaining 3 (which skips 3 stitches), then completing the rest of the row with single crochets. The chain creates an opening sized to a standard button.
The Pattern
Part 1: Back Panel
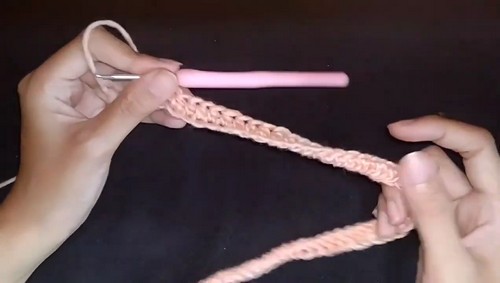
Foundation chain:
- Chain 100 stitches. Add more stitches if you want a longer sweater length.
Row 1 (odd row):
- Make a single crochet in the 2nd chain from the hook, then continue making single crochets until you have 8 single crochets total.
- Place a stitch marker on the 8th single crochet — this marks the edge of the bottom ribbing.
- Work half double crochets from the marker to the end of the row.
- Chain 2 and turn.
Row 2 (even row):
- Work half double crochets in the back loop of every stitch across, working from the back side of the fabric.
- Continue to the stitch marker, remove it, and work the final 8 stitches in back loop single crochets.
- Chain 1 and turn.
Reading crochet patterns can be tricky when you’re just starting out, feel free to follow the video tutorial below instead!
Row 3 (odd row):
- Work 8 back loop single crochets. Replace the stitch marker on the 8th stitch.
- Work back loop half double crochets to the end of the row.
- Chain 2 and turn.
Continuing the back panel:
- Alternate between odd rows and even rows in this pattern.
- Continue for a total of 66 rows.
Part 2: Right Front Panel
- Work the same alternating odd and even row pattern as the back panel for 21 rows, keeping the front neckline side open for V-neck shaping.
V-neck decreases:
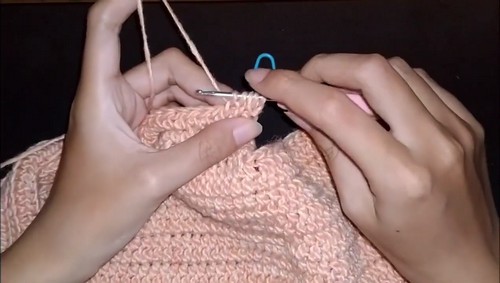
- At the neckline edge, work an HDC decrease at the beginning or end of the row (depending on which side the neckline falls).
- Continue the established body pattern and bottom ribbing while working the neckline decrease on each relevant row.
- Work decrease rows for a total of 10 rows.
- Fasten off.
Part 3: Left Front Panel
Foundation chain:
- Chain 50 stitches.
Row 1:
- Make a single crochet in the 2nd chain from the hook, continue until you have 8 single crochets total.
- Place a stitch marker on the 8th single crochet.
- Work half double crochets to the end of the row, working 2 half double crochets into the last loop to create an increase.
- Chain 2 and turn.
Row 2 and following rows:
- Begin the row with an increase — 2 half double crochets into the first loop. Mark the increased stitch.
- Work across with half double crochets and back loop half double crochets in the body section.
- Finish with back loop single crochets at the bottom ribbing edge.
- Alternate odd and even rows while incorporating the increase at the neckline edge for 10 rows total.
Row 11 — neckline extension:
- Chain 30 extra stitches to extend the neckline.
- Work back across the row in the established pattern, including the new chain stitches.
Completing the left front panel:
- Continue working evenly — no further increases — up to 20 rows total.
- Fasten off.
Part 4: Sleeves (Make 2)
Foundation chain:
- Chain 75 stitches.
Row 1:
- Make a single crochet in the 2nd chain from the hook, continue until you have 13 single crochets total.
- Place a stitch marker on the 13th single crochet — this marks the cuff border.
- Work half double crochets to the end of the row.
- Chain 2 and turn.
Sleeve rows:
- Alternate between odd and even rows using the same back loop half double crochet and back loop single crochet pattern as the body panels.
- Continue for a total of 48 rows.

Sleeve seam:
- Fold the sleeve in half so the two short edges meet.
- Slip stitch the seam closed from the cuff end up to the open sleeve top.
- Make the second sleeve identically.
Part 5: Assembly
Shoulder seams:
- Place the right and left front panels on top of the back panel with right sides facing together.
- Slip stitch the outer shoulder seams closed on both sides.
Attaching the sleeves:
- Align the top of each sleeve with the armhole opening created at each side.
- Slip stitch the sleeve to the armhole on both sides.
Side seams:
- Slip stitch down both body sides and along the underarm of each sleeve to close.
Part 6: Front Border and Button Band
Base border:
- Join yarn at the bottom right front corner, chain 1, and work a row of single crochets evenly all the way up the right front edge, around the collar, and down the left front edge. Do not cut the yarn at the end.
Button band:
- Chain 9 and make a single crochet in the 2nd chain from the hook. Work 8 single crochets down the chain to complete the first strip.
- Slip stitch into the next 2 stitches along the cardigan’s front edge to anchor the strip, then turn and work back up the strip in back loop single crochets.
- Continue working the strip back and forth, attaching to the front edge 2 stitches at a time as you go.
Buttonholes:
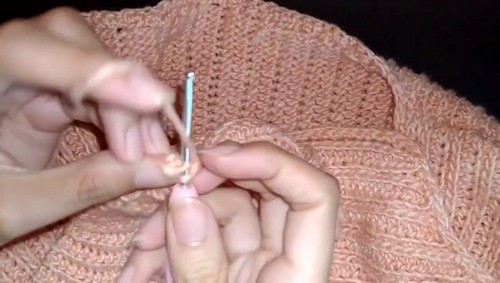
- On rows 14, 28, 42, and 56 of the button band, create a buttonhole: work 3 single crochets, chain 3 (skip 3 stitches), then complete the rest of the row with single crochets.
Finishing:
- Fasten off securely when the band is complete.
- Sew 4 buttons onto the opposite front edge to align with the buttonholes.
- Weave in all remaining ends.
Tips
- Move the stitch marker every single row. The marker on the 8th (or 13th for sleeves) stitch is what keeps your ribbing section from drifting. If you lose it for even a few rows, the single crochet and half double crochet sections blur together and the bottom edge loses its clean line.
- Work your back loop stitches from the correct side. On even rows, the pattern notes that you work from the “back side of the stitches” — this means the wrong side of the fabric is facing you. Do not flip the work; just work from the side that is facing you after the turn. This is what creates the continuous knit-like ridge on the right side.
- Count your sleeve rows carefully. With 48 rows to track and a regular alternating pattern, it is easy to lose count mid-project. Use a row counter or make a simple tally mark on paper. Getting both sleeves to the same row count is far easier than unpicking one to match the other.
- Check shoulder seam alignment before sewing. Lay the front panels over the back panel on a flat surface before slip-stitching. The ribbing sections at the bottom edge should align, and the shoulder width on each front panel should visually match the corresponding shoulder section on the back. Adjust if anything looks off before committing.
- Test your button size on the buttonhole chain. Chain 3 for the buttonhole works for standard medium buttons — but before finishing the full band, slip your chosen button through a practice chain-3 to confirm the fit. A button that is too large will pull the band; too small and it will slip through accidentally.
- Block the finished cardigan before sewing on buttons. A light steam or wet block will relax the back loop stitches, even out the rows, and give the button band a flat, professional finish. Do the blocking before attaching buttons so the heat does not damage them.
Yarn Substitution
The 3.0 mm hook used here is much smaller than what is typically recommended for chunky yarn — this is intentional. The tight hook-to-yarn ratio produces a dense, structured fabric that holds its shape and genuinely looks knitted. If you use a bulkier or looser yarn, the texture will change and the fabric may feel floppy rather than structured. Milk cotton is an excellent substitute for a soft, smooth result. A fuzzy or slightly hairy yarn adds extra knit-like character to the ridges. Avoid stiff 100% cotton at this weight — the texture works better with some softness or stretch in the fiber.
Customization Ideas
- Length: The back panel chains more stitches for a longer sweater. Add to the foundation chain in multiples to keep the row math consistent.
- Sleeve length: Work more or fewer than 48 rows for longer or shorter sleeves. The cuff ribbing width is set by the 13-stitch marker, so the sleeve length is entirely in the row count.
- Button placement: The buttonholes land at rows 14, 28, 42, and 56 of the band. Space them differently for more or fewer buttons — just calculate the interval based on your total band row count.
- Color: Work the full cardigan in one color for a classic vintage look, or change colors between the body and the button band for a contrast trim.
- Collar depth: The chain-30 neckline extension on the left front panel determines how deep the V-neck collar sits. Chain more for a deeper V, fewer for a shallower one.
FAQ
- Why does this pattern use a 3.0 mm hook with chunky yarn? The very small hook used with chunky yarn creates a tight, dense fabric that holds its shape and mimics knit fabric. A larger hook would produce a looser, more open fabric that would not have the same structured, vintage-knit appearance. The tight tension is the whole point.
- The two front panels look different from each other — is that correct? Yes. The right front panel is shaped with V-neck decreases and has no extra neckline chain. The left front panel has the opposite shaping — neckline increases across the first 10 rows, followed by a chain-30 extension for the neckline, and no decreases. They are intentionally asymmetric and are designed to meet at the center front neckline when assembled.
- How do I know where to place the buttonholes on the button band? The buttonholes fall at rows 14, 28, 42, and 56 of the button band. Count your rows as you work the band and create the chain-3 buttonhole on those specific rows. If your cardigan is a different length or you want a different number of buttons, divide your total band row count by the number of buttons to find your interval.
- Can I make this in a DK or worsted weight instead of chunky? You can, but you will need to significantly adjust your stitch and chain counts because a lighter yarn on a smaller hook will produce a narrower fabric per stitch. Swatch first and measure your stitch gauge, then recalculate the foundation chain to reach your desired panel width. The technique and row structure stay the same.
- What type of buttons work best for this cardigan? Large statement buttons — 2.5 to 3 cm — suit the chunky scale of the fabric well and are easier to button through the chain-3 hole. Test your button against a practice chain before finishing the full band. Flat buttons with a back shank or simple 4-hole buttons both work. Avoid very thick or dome-shaped buttons that may not sit flat against the band.