Pair a vintage crochet sweater design with a plaid pleated mini skirt and dark rimmed glasses for a bookish 80s look on library days. Snug mock necks keep the striped crochet 80s sweater warm under the chin and let it layer neatly over a collared shirt on chilly autumn mornings.
Stripes stop just under the bust on this retro sweater, and a long pale grey rib takes over from there down to the hips. Wide blue and cream bands run across the yoke and continue all the way down the flared sleeves, so the eye goes straight to that fitted waist. It starts out like any top down raglan, and the ribbing changes the whole silhouette below it.
Crochet Retro Sweater
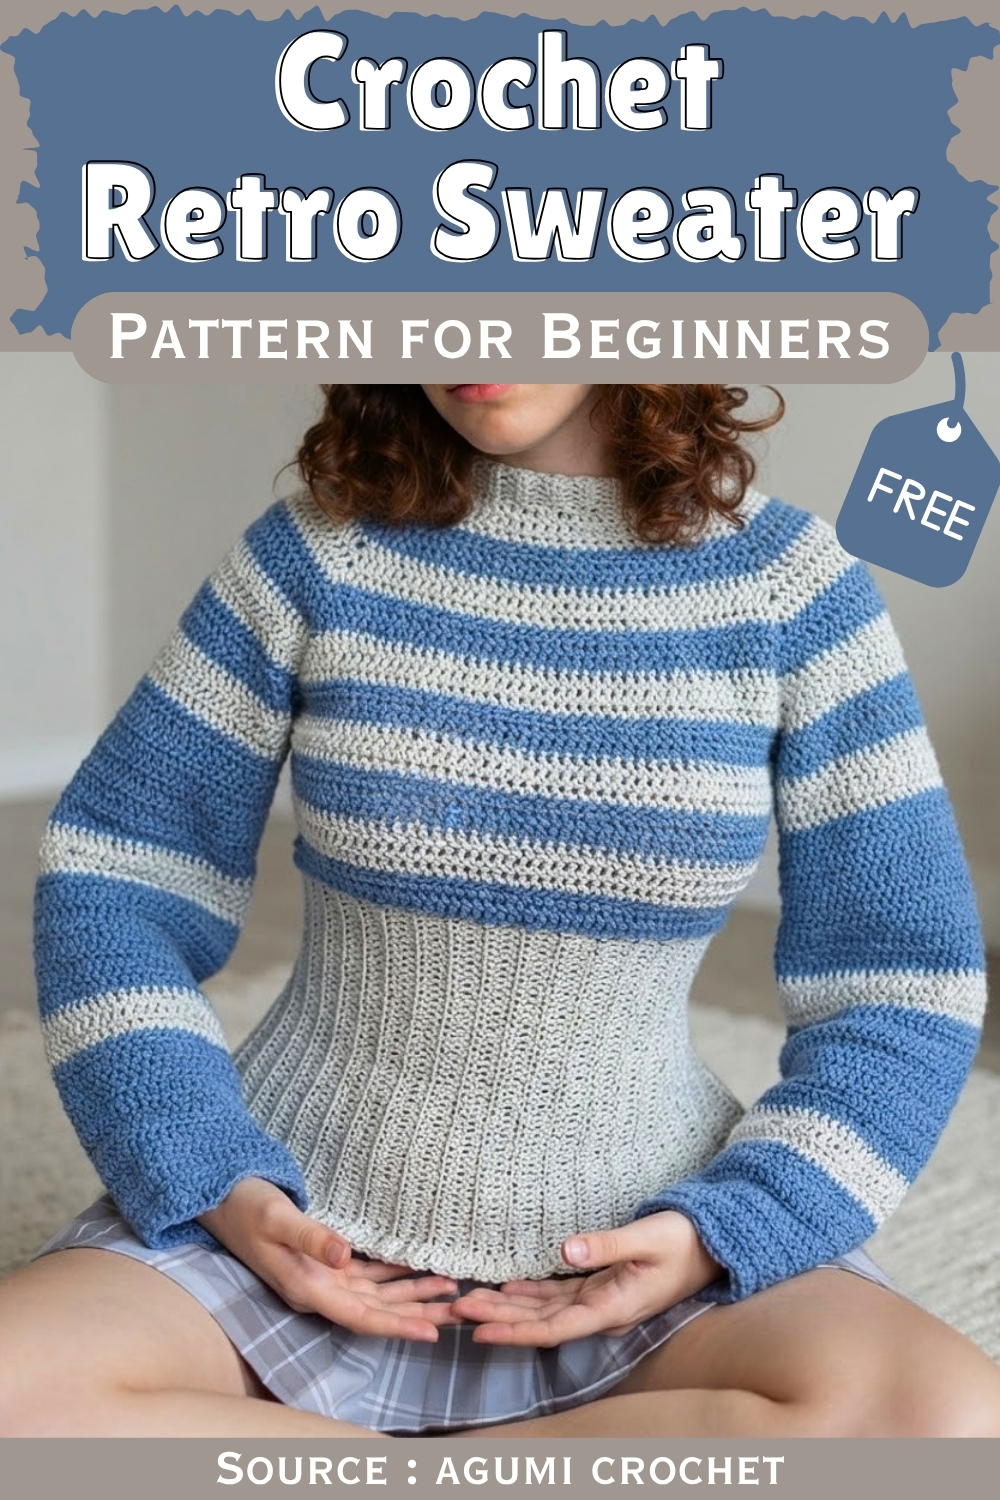
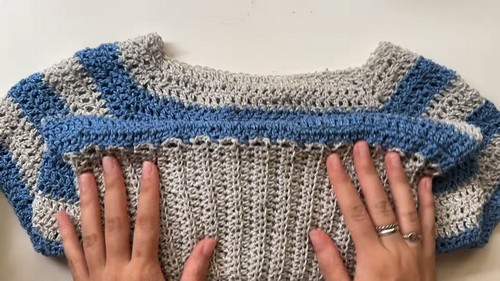
Raglan increases shape the yoke along four diagonal lines, working from the neckline down until the stripes reach the underarm. The sleeves then split off and work separately in rounds, keeping the same color sequence so the bands carry from shoulder to cuff. The ribbed waistband goes on last along the lower edge of the yoke, and its vertical ridges pull the fabric in at the waist before easing out over the hips.
Materials and Tools
Everything here is standard kit, which is part of why I love this design. The body is mostly double crochet, so a smooth yarn with good stitch definition will show off the raglan lines and the ribbing far better than a fuzzy or heavily textured one. Pick a yarn with some stretch and drape, because the waistband needs to cinch without feeling stiff and the ruffles need to fall softly rather than stick out. Buy generously. The ruffles eat more yarn than you expect, and running short on a dye lot halfway down a sleeve is a frustration no maker deserves on a project this size.
- Medium weight (worsted) yarn in your main color, plus extra skeins in contrast colors if you plan stripes
- Crochet hook in the size recommended on your yarn label
- Stitch markers to mark the four raglan corners
- Yarn needle for weaving in ends
- Scissors
- Measuring tape for checking the neckline, yoke depth, and sleeve length as you work
Master the Basics First
Difficulty and Time
I would call this an advanced beginner to intermediate project. The individual stitches are basic: chains, slip stitches, single crochet, half double crochet, and double crochet. What lifts it above a first project is the construction. You need to keep track of raglan increases, separate the sleeves at the right moment, and then attach a sideways ribbed band to the body as you go. None of it is difficult once you see it happening on your hook, but it rewards patience and careful counting. Expect to spend several evenings to a couple of weekends, depending on your speed, the size you make, and your sleeve length.
Beginner Technique Notes
A few techniques in this sweater might be new to you, so here is what is really going on before you start. Turning at the end of every round sounds odd for work in the round, but it alternates the face of the double crochet and stops the joining seam from drifting sideways around the body. The raglan corners are simple increases worked into the same stitch or chain space, and they create the diagonal lines from neck to underarm. The waistband is built in short rows that run vertically and join to the body as you go. Read these notes once and the pattern will make far more sense.
- Turning in the round: Each round is joined with a slip stitch, then you chain 2 and turn before starting the next round. This keeps the seam perfectly straight down the back of the sweater.
- Raglan corner increase: Working (1 dc, ch 1, 1 dc) into one stitch or space adds stitches on both sides of the corner and leaves a small chain space to work into on the next round.
- Separating the sleeves: You chain across the underarm and skip the sleeve stitches entirely, joining the front and back into one tube for the body. The sleeves are worked later from those skipped stitches.
- Sideways ribbing: Half double crochet worked in the back loop only creates a stretchy ridged texture. Each pair of rows is anchored to the body with slip stitches, and those slip stitches are what cinch the waist.
- Seaming with single crochet: Holding two edges together and working single crochet through both creates a firm, neat join. Keep it on the inside so it stays hidden.
- Ruffles: Packing several double crochets into each space forces the fabric to ripple. More stitches per space means a fuller ruffle.
Crochet Retro Sweater Pattern
This pattern is worked top down in one piece, starting at the neckline and growing through a raglan yoke before the sleeves are set aside. The body continues in double crochet to just under the bust, then the ribbed waistband is added sideways, followed by the ruffled hem. The sleeves are picked up from the armholes and finished with matching ruffles, and a ribbed neckband completes the look. Because it is worked from the top, try it on often. That habit is the single best way to get a fit you love, especially at the yoke depth and the length of the upper torso.
Stitch Abbreviations (US Terms)
- ch: chain
- sl st: slip stitch
- sc: single crochet
- hdc: half double crochet
- dc: double crochet
- BLO: back loop only
Neckline
- Foundation: Ch 76, or as many chains as you need for the neckline to slip comfortably over your head. [76 ch]
- Join the last chain to the first with a sl st to form a ring, keeping the chain untwisted.
- Round 1: Ch 2, then work 1 dc in each chain around.
- Join with a sl st to the top of the beginning ch 2.
Raglan Yoke
- From this point on, turn your work at the end of every round so the joining seam runs straight down the back.
Placing the Raglan Markers
- Fold the neckline flat in half.
- Counting inward from each folded edge, count 6 stitches on both the front layer and the back layer and place a stitch marker.
- Check that you have 4 markers in total, with 12 stitches between the markers on each side; these sections become the shoulders and sleeves. [4 markers]
New to crochet and not sure how to read a pattern yet? The video tutorial below will guide you through it step by step, you’ve got this!
First Increase Round
- Round 2: Ch 2 and turn.
- Work 1 dc in each stitch until you reach the first marker.
- In the marked stitch, work (1 dc, ch 1, 1 dc) to form the first yoke corner.
- Continue working 1 dc in each stitch, repeating the (1 dc, ch 1, 1 dc) corner in each of the remaining 3 marked stitches.
- Join with a sl st to the beginning of the round.
Growing the Yoke
- Rounds 3 to 17: Ch 2 and turn.
- Work 1 dc in each stitch around.
- Each time you reach a ch-1 space from the previous round, work (1 dc, ch 1, 1 dc) into that space.
- Join with a sl st at the end of each round.
- If you want stripes, start changing colors from Round 4.
- Stop increasing after Round 17, when the yoke reaches your armpits.
Separating the Sleeves
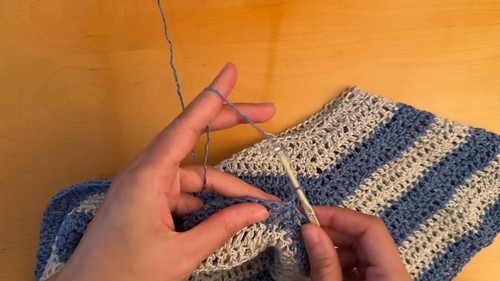
- Round 18: Ch 2 and turn.
- Work 1 dc in each stitch until you reach the first ch-1 increase space.
- Ch 4 to form the underarm; chain more for a roomier armhole or fewer for a snugger one.
- Skip all the sleeve stitches and join the chain into the next increase space with a dc.
- Work 1 dc in each stitch across the torso panel until you reach the next increase space.
- Ch 4, skip the second sleeve section, and join with a dc into the final increase space.
- Work 1 dc in each remaining stitch.
- Join with a sl st.
Upper Torso
- Round 19: Ch 2 and turn.
- Work 1 dc in each stitch around, working 1 dc into each underarm chain as you reach it. [4 dc across each set of 4 underarm chains]
- Join with a sl st.
- Rounds 20 to 30: Ch 2 and turn.
- Work 1 dc in each stitch around.
- Join with a sl st at the end of each round.
- Stop after Round 30, or keep going until the body sits just under your bust or ribcage.
Ribbed Waistband
Starting the Ribbing
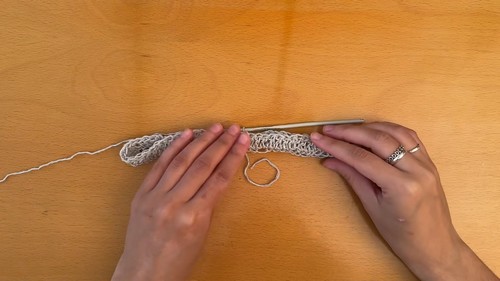
- From where the upper torso ended, ch 51, or the length you want for the ribbing. [51 ch]
- Row 1: Starting in the second chain from the hook, work 1 hdc in each chain back toward the body. [50 hdc]
- Sl st into the next 4 stitches along the edge of the upper torso to attach the ribbing; use 2 or 3 sl sts instead if you want a looser waist.
Ribbing Rows
- Row 2: Turn and skip the 4 sl sts.
- Work 1 hdc in BLO in each stitch going up the ribbing. [50 hdc]
- Row 3: Ch 1 and turn.
- Work 1 hdc in BLO in each stitch back toward the body. [50 hdc]
- Sl st into the next 4 stitches of the upper torso edge.
- Repeat Rows 2 and 3 all the way around the torso until you return to the starting point.
Seaming the Waistband
- Hold the first and last ribbing rows together and join them with sc, matching each stitch exactly.
- Fasten off and keep the seam on the inside of the sweater.
Ruffled Hem
- Join yarn in any space along the bottom edge of the ribbed waistband.
- Ch 2, then work 4 dc into that same space.
- Work 4 dc into every available space around the bottom edge; use 3 dc per space for a softer ruffle.
- Join with a sl st and fasten off.

Sleeves
Sleeve Rounds
- Join yarn at the underarm, in the stitches of the 4 underarm chains.
- Ch 2, then work 1 dc in each stitch around the armhole.
- Count your stitches here so the second sleeve matches exactly.
- Join with a sl st.
- Next rounds: Ch 2 and turn.
- Work 1 dc in each stitch around and join with a sl st.
- Repeat these rounds until the sleeve reaches your desired length; 37 rounds give a full long sleeve.
Cuff Ruffle
- Finish the cuff with the same ruffle as the hem, working 4 dc into each stitch or space around.
- Join with a sl st and fasten off.
- Work the second sleeve the same way, matching your stitch count.
Neckband
- Join yarn to the raw edge of the neckline.
- Ch 5. [5 ch]
- Work the ribbing in hdc in BLO back and forth, using the same method as the waistband.
- Each time a row reaches the neckline, sl st into 3 stitches instead of 4, since the neckline curve is smaller.
- When the ribbing meets the beginning of the collar, seam it closed with sc.
- Weave in all ends.
Tips and Troubleshooting
Most problems with a top down sweater show up early, which is good news, because they are easy to fix while the piece is still small. The yoke is where you set the fit for the whole garment, so give it your full attention before separating the sleeves. The waistband is where the retro shape comes from, and a little testing there pays off enormously. I have learned these lessons through plenty of frogging over the years, and every one of them saves time. Keep them close while you work, and do not be shy about pulling back a few rounds if something looks off.
- Place a marker in the joining stitch of each round and move it up as you go. With all the turning, it is easy to lose your starting point.
- Move your raglan markers up into the ch-1 spaces every few rounds. Those small spaces are easy to miss, and skipping one throws a corner out of line.
- Try the yoke on before Round 18. If it does not reach your armpits yet, add rounds; if it already hangs below them, pull back.
- Write down your armhole stitch count when you start the first sleeve. Memory is not reliable after a full sleeve of double crochet.
- Work a few rows of the waistband, then try the sweater on. If the cinch feels too tight, switch from 4 slip stitches to 3 or 2 before you go any further.
- Keep your ribbing rows straight by always skipping the slip stitches when you turn. Working into them adds height and makes the band wavy.
- Set aside a full skein for the hem and cuff ruffles. Four double crochets per space uses a surprising amount of yarn.
- Keep the single crochet seams on the inside and weave the ends along the seam line so they disappear completely.
Yarn Substitution
Yarn choice matters more in this sweater than in many crochet projects, because three different parts of the garment ask different things of the fiber. The double crochet body wants drape so it hangs softly instead of feeling like a board. The ribbing wants elasticity so it can cinch and recover. The ruffles want enough body to ripple without drooping flat. A soft acrylic or an acrylic and wool blend in medium weight balances all three well and is easy to wash. If you love cotton, choose a cotton blend rather than pure cotton, since pure cotton has little stretch and the waistband will lose its cinched shape.
- Acrylic and wool blends give good drape, stretch, and warmth.
- Soft acrylic is affordable, washable, and comes in plenty of retro shades for stripes.
- Cotton blends suit a lighter spring version, but avoid stiff pure cotton for the ribbing.
- Always check your gauge against your own measurements, since a thicker or thinner yarn changes the neckline size and yoke depth.

Customization Ideas
Because this sweater is built top down and tried on as you go, it adapts beautifully to your own style. You can change the mood completely with color alone, swap the sleeve length for the season, or soften the ruffles for something more everyday. Stripes starting from Round 4 give it that true seventies feel, while a single solid color reads more modern and polished. I like to sketch out a color plan before I start so the stripes land evenly through the yoke. Think about where you will wear it, then shape the length, sleeves, and trim to suit that moment.
- Work stripes through the yoke and body, starting from Round 4, in two or three contrasting colors.
- Make the ruffles in a contrast color so the hem and cuffs pop.
- Stop the sleeves early for elbow length or short puff style sleeves, then add the ruffle.
- Use 3 dc per space on the ruffles for a gentler, more wearable flare.
- Lengthen the upper torso past Round 30 for a longer body before the waistband.
- Chain a longer or shorter strip for the waistband to change how deep the ribbed section sits.
- Skip the cuff ruffles and finish the sleeves with a ribbed band worked the same way as the neckband.
FAQ
Can a beginner make this crochet retro sweater?
Yes, if you are comfortable with basic stitches and willing to count carefully. The stitches are simple; the construction is what takes concentration. Read the beginner notes first and try it on often.
How do I adjust the size?
Start with a foundation chain that fits over your head comfortably, then control the fit by the number of yoke rounds, the length of the upper torso, and the number of slip stitches used to attach the waistband. Trying it on at each stage is the most reliable way to size it.
Why do I turn at the end of every round?
Turning keeps the joining seam running straight down the back. If you work continuously in one direction, double crochet seams tend to slant around the body.
Can I leave out the ruffles?
Absolutely. You can end the body at the waistband and finish the sleeves plainly or with ribbing. The sweater will lose some of its retro flair but becomes a clean, fitted everyday pullover.
How much yarn will I need?
It depends on your size, sleeve length, and how full you make the ruffles. Buy more than you think you need in one dye lot, and keep a full skein in reserve for the hem and cuff ruffles.