Record shops and cold campus walkways suit the 90s crochet sweater, with bands of hot pink, butter yellow and icy blue circling a black crew neck. Straight-leg jeans or a cord skirt keep the retro crochet sweater easy to wear, and long fitted sleeves make it a cozy winter gift.
Colorwork yokes have a way of making a simple black pullover look like a completely different level of project, and this 90s inspired sweater from Rita Crochet lands exactly that effect. The geometric band pattern across the shoulders gives it a vintage Nordic feel that pairs naturally with the vintage sweater if you enjoy retro crochet silhouettes.
90s Crochet Sweater

The solid black body works up quickly in the main stitch, so the colorwork yoke becomes the satisfying focus of the whole make. Multiple yarn colors are carried across the yoke rounds to build the repeating pattern, and the ribbed neckband and cuffs finish the piece with clean structured edges.
Why I love this one: the color work yoke does most of the visual work, so the body can be simple, and the whole thing still reads as something you spent real creative effort on.
Materials and Tools
- 100% acrylic yarn in a base color such as black or natural cream, plus small amounts in additional colors for the yoke color work. Small balls of around 40g to 50g per contrast color work well. Expect to use approximately 250 to 300g total depending on your size.
- 4 mm crochet hook for the collar, cuffs, and bottom ribbing.
- 5 mm crochet hook for the main body and yoke.
- Tapestry needle for weaving in ends.
- Stitch markers.
- Scissors.
Start with This Stitch
Gauge
Using the 5 mm hook: 13 double crochets across 10 cm (4 inches). The stitch pattern alternates 4 rows of single crochet with rows of double and raised stitches, and your gauge should reflect that rhythm before you begin the yoke.
Difficulty and Time
- Skill level: Intermediate to advanced. You need to be comfortable with front-post stitches, color changes, working in the round, and short row shaping. The jacquard patterning is not technically difficult but requires attention to color sequencing across multiple rounds.
- Time to make: This is a multi-session project. The ribbed collar and body work up steadily, but the color work yoke deserves unhurried time. Most makers finish over two to three weeks of regular stitching.
Abbreviations Used
- ch = chain
- sc = single crochet
- dc = double crochet
- BLO = back loop only
- FPdc = front post double crochet
- sl st = slip stitch
- st / sts = stitch / stitches
The Pattern
Step 1: The Neckband (Collar)
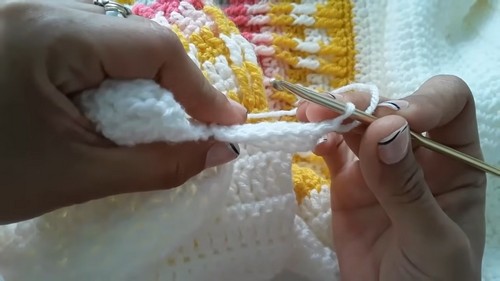
The sweater begins with a ribbed collar worked flat and then joined into a ring. Use the 4 mm hook and your base color throughout.
- Ch 7.
- Row 1: Starting in the 2nd ch from the hook, work 1 sc in each ch across for 6 sc total.
- Row 2 and all following rows: Ch 1, turn, and work 1 sc in the BLO of each stitch across.
- Continue working back and forth until the band reaches 60 rows, or adjust the length until the band fits comfortably around your neck circumference.
- Bring the two short ends of the band together.
- Join them by slip stitching through both the front loop of the working edge and the corresponding loop of the foundation chain to close the collar into a seamless ring.
Step 2: The Yoke and Color Work
Switch to the 5 mm hook. The yoke is worked seamlessly from the top down, building outward from the collar ring. The visual pattern comes from alternating plain single crochet rounds, which carry the increases, with decorative pattern rounds that feature standard double crochets alongside front-post double and treble crochets in rotating colors.
- Round 1 (Color 2, e.g., yellow): Attach the new color, ch 2, and work sc around the collar ring while increasing every 6th stitch by working 2 sc into the same stitch. Continue until you reach 70 stitches total.
- Round 2 (Color 3, e.g., pink): Work sc around with increases spaced every 7 stitches.
- Continuing rounds: Alternate plain sc increase rounds with decorative pattern rounds. In the sc rounds, space your increases progressively further apart as the yoke grows, such as every 8, then 9, then 10, then 11 stitches, and so on, continuing the sequence outward.
- In the decorative pattern rounds, work a combination of standard dc and FPdc stitches in the current color to build the jacquard texture. Change colors as desired between rounds to build the color work yoke design.
- Continue expanding the yoke until it fits comfortably over your shoulders and reaches your underarms. For a size S, this is approximately 180 total stitches.

Step 3: Short Rows for Back Neck Shaping
Before joining the front and back into a body, a small section of short rows raises the back of the sweater to prevent the neckline from sitting too high in front.
- Divide your total stitches into sections: 60 stitches for the back, 30 stitches for each sleeve, and 60 stitches for the front.
- Leaving the sleeve and front stitches unworked, work a few rows of dc and sc back and forth across the 60 back stitches only.
- This raises the back neck level and drops the front neckline into a more comfortable, natural position.
If you’re still learning how to read crochet patterns, no stress! Follow the video tutorial below and use the written pattern below as you get more comfortable!
Step 4: Body Construction
- After completing the back elevation, join the front and back sections by working across the front stitches while leaving the sleeve stitches resting on hold.
- Work in continuous rounds downward, alternating sc rows on the wrong side with double crochet and pattern rows on the right side.
- Continue until the body reaches your desired length, approximately 50 cm from the neckline to the start of the bottom ribbing.
- Bottom ribbing: Switch to the 4 mm hook. Ch 7 and work rows of 6 BLO sc back and forth, attaching each completed row to the bottom edge of the body with a sl st as you go. This creates the same ribbed band as the collar, worked directly onto the body edge.

Step 5: Sleeves (Make 2)
- Reattach yarn at the underarm of one sleeve opening.
- Pick up approximately 40 stitches around the armhole, incorporating stitches from both the body and the back elevation rows to create an even opening.
- Work in rounds, alternating sc rounds and dc rounds as established in the body pattern.
- Decrease 2 stitches per decrease round, one at the beginning and one at the end, every few rounds to taper the sleeve gradually. Continue decreasing until you reach approximately 36 stitches.
- Work straight without further decreases until the sleeve reaches your wrist or your desired length.
- Sleeve cuff: Switch to the 4 mm hook. Work the same 7-chain ribbed band as the collar and bottom hem, attaching it stitch by stitch around the sleeve opening as you complete each row.
- Repeat for the second sleeve.
Step 6: Finishing
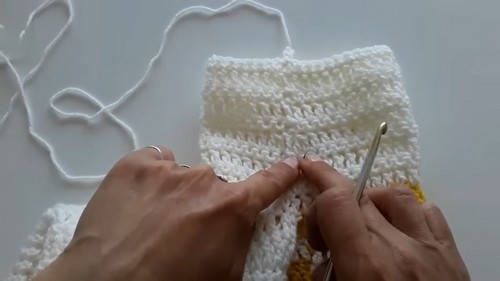
- Cut yarn and pull the tail firmly through the final loop to secure.
- Thread a tapestry needle and weave in every loose end securely on the inside of the sweater.
- Pay particular attention to the color change tails in the yoke, since there will be several.
Tips and Troubleshooting
- Watch the yoke circumference as you increase. The stitch counts given are a guide, not a fixed rule. The yoke needs to fit over your actual shoulders, so try the piece on or hold it against yourself after every few rounds of increases. If the yoke cups upward or feels tight, add another increase round before separating the sleeves. If it ripples and flares, you have gone slightly too far, but this is easily corrected by working one round without increases before dividing.
- Keep your color change tails long and weave them in diagonally. Acrylic can have a tendency to work its way loose over time, and the yoke accumulates a lot of ends. Weave each tail in at least two directions to anchor it, and trim only after you are confident it is secure. This is especially worth doing as you go rather than leaving all the ends for a single finishing session at the end.
- The ribbed bands work best at a slightly firm tension. Because each row of ribbing is attached to the garment edge with a slip stitch as you complete it, overly loose ribbing will buckle and pull. Work the 4 mm hook bands at a tension that feels slightly tighter than comfortable. The firmness relaxes once the band is fully attached and the sweater is worn a few times.

Yarn Substitution
- This pattern was designed with 100% acrylic yarn, and that choice matters more here than it might in a simpler project. Acrylic holds color well over repeated washing, does not bleed between shades when the yoke colors sit next to each other, and keeps its structure after blocking. A wool or wool blend substitute will give you beautiful stitch definition in the jacquard rows, but the color work requires careful washing in cold water to prevent bleeding, and the ribbing will behave differently since wool has more memory than acrylic. Cotton is a workable substitute for a warm weather version but will produce a heavier, drapier sweater with less elasticity in the ribbed bands.
- If you substitute, stay close to the original weight. The gauge of 13 dc per 10 cm using a 5 mm hook is the measurement that makes the pattern work as written. A yarn that comes up significantly denser or airier will shift your yoke circumference calculations before you even get to the body.
Customization Ideas
- The color work yoke is where this sweater earns its personality, and the colors you choose determine entirely whether it reads as vintage, graphic, earthy, or playful. A two color yoke in black and a single warm accent reads closer to a classic 90s skate brand aesthetic. Three or four rotating colors across the decorative rounds push it toward folk or retro sportswear. Neutral tones, such as cream, oatmeal, and rust, land somewhere more Scandinavian and contemporary. The base color choice matters too: a cream body with a dark yoke reads differently than a black body with a bright yoke, even with identical patterning.
- Body length is easily adjusted since you simply work more or fewer rounds before beginning the bottom ribbing. A cropped version that hits above the hip is a quick adjustment and uses meaningfully less yarn. The sleeve length is equally flexible, and a three quarter sleeve with a shorter cuff reads summery and relaxed against the jacquard yoke.
FAQ
- Do I need experience with color work to attempt this pattern? You do not need formal color work experience, but you should be comfortable with joining new colors and managing multiple yarn strands without tangling. The jacquard effect here comes from changing colors between rounds rather than carrying strands across stitches simultaneously, which makes it significantly more approachable than traditional stranded color work. Work with small balls and let the unused color rest until its round comes around again.
- How do the short rows for the back neckline actually work in practice? Short rows in crochet simply mean working back and forth across a portion of your stitches rather than completing a full round. You turn at the end of each partial row instead of joining and continuing in the round. In this pattern, you work a few partial rows across only the back stitches before rejoining the front. The result is that the back of the yoke is physically a few rows taller than the front, which tilts the neckline downward in front and prevents that slightly choking sensation a fully round neck can create on a top-down sweater.
- Can I adjust the sizing beyond what the pattern specifies? Yes. Because the sweater is sized by counting stitches and checking fit against your own body rather than following a fixed size chart, you can make it smaller or larger by continuing or stopping the increase rounds earlier or later. The key measurement to track is the yoke circumference at the point where you plan to separate the sleeves. That measurement should match the circumference of your body just below the armpit, with a little ease added for comfort.
- My yoke is rippling and looks wavy. What went wrong? Rippling means you have added increases faster than the fabric needs them. This usually happens when the spacing between increases is too close for your particular tension. Work one or two plain rounds without any increases and the rippling should relax. If it does not settle, you may need to gently frog back to where the rippling started and work that section with increases spaced slightly further apart.