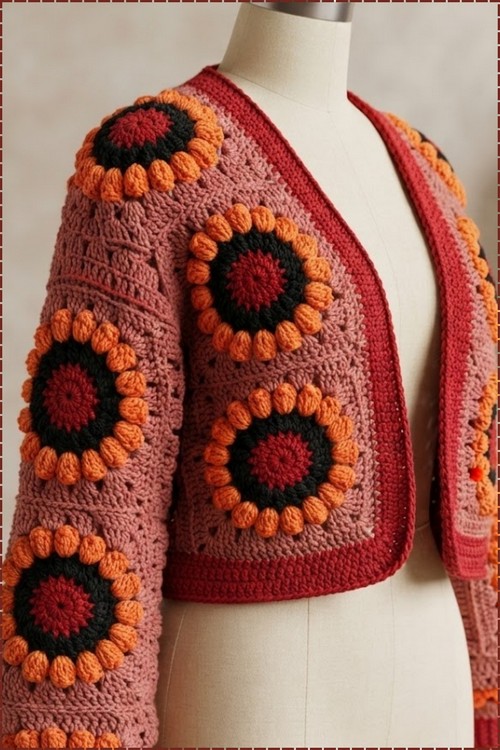
Autumn outfits pop with a retro daisy granny square cardigan in brick red, dotted with orange puff daisies and dark centres. Flower power fans can wear the cropped daisy granny square sweater open over a black top for concerts, brunches, and weekend plans.
Retro daisy motifs have been everywhere lately, and this cropped cardigan from Samantha is one of the most striking versions of the trend. The puff stitch petals and bold color blocking make it a natural companion to the loose off shoulder sweater if you enjoy granny square construction in a statement silhouette.
Crochet Retro Daisy Sweater

The dusty rose granny background frames each daisy in a way that keeps the color palette warm and cohesive across the whole cardigan. Squares are joined and finished with a red border trim that sharpens the open front edges and gives the piece its retro silhouette.
Why I love this one: the pop-out petal round looks technically impressive but is actually just a dropped-loop trick that takes about thirty seconds per petal once you try it twice.
Materials
- Medium weight yarn in your chosen colors — color changes between rounds are optional but bring out the sunburst detail most dramatically
- 5.0 mm crochet hook
- Scissors
- Yarn needle for weaving in ends
Master This Stitch First
Square Layout Reference
Before starting, understand how the 18 squares divide:
- Back panel: 6 squares (3 across, 2 rows deep)
- Left front panel and sleeve: 6 squares
- Right front panel and sleeve: 6 squares
Each front section is configured with 2 squares forming the front body and 2 squares extending outward as the sleeve, joined into an L-shaped arrangement.
The Pattern
Part 1: The 3D Sunburst Square (Make 18)
Round 1 — center ring:
- Start with a magic circle, or chain 4 and slip stitch into the first chain to form a ring.
- Chain 3 — this counts as your first double crochet.
- Work 15 double crochets into the ring for a total of 16 stitches.
- Pull the starting tail to close the ring, then slip stitch into the top of the chain-3.
- If changing colors, chain 1, cut, and fasten off.

Round 2 — cluster round:
- Join your next color with a slip stitch into any double crochet.
- Chain 3 (counts as a double crochet), then place another double crochet into the same stitch.
- Chain 1.
- In the next stitch, work the special cluster stitch: begin a double crochet but stop halfway — pull through 2 loops, leaving 2 on the hook. Yarn over, insert hook back into the same stitch, pull up a loop (4 loops on hook). Pull through 2 loops, then pull through all remaining 3 loops at once.
- Chain 1.
- Repeat this cluster stitch followed by a chain 1 in every stitch around.
- Slip stitch to the top of the first double crochet. Chain 1, cut, and fasten off.

Round 3 — 3D pop-out petal round:
- Join your next color into any chain-1 space.
- Chain 3 (counts as a double crochet), then work 4 more double crochets into the same space — 5 double crochets total.
- To create the pop-out petal: pull up a long loop and take your hook out of the work. Insert your hook into the top of the starting chain-3, reach back and grab the dropped loop, pull it through, and pull tight. The cluster pops forward off the surface into a 3D petal shape.
- Chain 3.
- Repeat — 5 double crochets in the next space, pop-out the petal, chain 3 — in every space around.
- Slip stitch into the first space. Chain 1, cut, and fasten off.
Still getting the hang of reading crochet patterns? That’s completely okay, the video tutorial below breaks everything down in a simple, beginner-friendly way!
Round 4 — square border:
- Join your next color into any chain-3 space.
- Corner: Chain 4 (counts as a treble crochet), then work 2 more treble crochets into the same space.
- Work 3 double crochets into each of the next 3 spaces along the side, with no chains between them.
- Next corner: Work 3 treble crochets, chain 2, and 3 treble crochets into the same corner space.
- Repeat around — 3 groups of 3 double crochets along each side, and the treble-chain 2-treble corner sequence at each corner.
- Slip stitch to the first treble crochet, chain 1, and fasten off.

Part 2: Joining the Squares
Back panel (6 squares):
- Arrange 6 squares into a grid of 3 across and 2 rows deep.
- Connect using the Join-As-You-Go method:
- Work 3 double crochets in the spaces and corners of the active square, leaving the joining edge unworked initially.
- Alternate between working 3 double crochets on the active square and slip-stitching into the corresponding space of the adjoining square in a zigzag motion across the shared edge.
- Complete all 6 squares to form a solid rectangular back panel.
Front panels and sleeves (6 squares each side):
- Each front section is arranged with 2 squares forming the front body panel and 2 squares extending outward as the sleeve, joined into an L-shaped configuration.
- Use single crochets or your preferred joining method to seam the completed front panels to the back panel along the shoulder and side edges.
Part 3: Sleeves
- Turn the joined cardigan right-side out.
- Join yarn to the arm opening.
- Work one round of single crochet decreases evenly around the sleeve opening to taper the cuff edge slightly.
- Slip stitch to join the round.
- Chain 3 and work 3 rounds of regular double crochets around the cuff.
- Repeat for the second sleeve.

Part 4: Cardigan Border
- Join yarn at the bottom corner or neckline edge.
- Work double crochets all the way around the front openings, bottom hem, and neckline for as many rounds as desired.
Tips
- Fasten off each color cleanly between rounds rather than carrying yarn. The pop-out petal round in particular needs a fresh join so the round-3 color sits independently and the petals read as a distinct raised element rather than blending into the Round 2 background.
- Practice the pop-out petal technique on a swatch before starting your first square. The dropped loop step feels uncertain the first time — the long loop wants to unravel while you re-insert your hook. Work it slowly, pull the tail snug, and it becomes automatic by the third or fourth petal.
- Make all 18 squares before beginning any joining. Completed squares can be laid out on a flat surface and rearranged until the color distribution is balanced across the garment. This is much easier to adjust before any joining than after.
Customization Ideas
- Color blocking: The four-round square structure is ideal for a different color on each round. Monochrome works too, but the sunburst detail reads most dramatically when each round contrasts.
- Cardigan vs. pullover: Leave both front panels open as written for a cardigan, or seam them together at the center front for a pullover. Add a neckline border to finish either option.
- Square count: Adding more squares per row increases the width; adding more rows increases the length. The construction scales up or down in full-square increments.
- Sleeve length: The 2-square sleeve extension produces a mid-length sleeve for most sizes. Add a third square to extend to the wrist, or shorten to 1 square for a cap-sleeve version.
FAQ
- What is the Join-As-You-Go method and is it difficult? Join-As-You-Go (JAYG) means you attach each new square to the existing panel as you work its final round, rather than completing all squares and seaming them afterward. The zigzag of working stitches on your active square and slip stitches into the adjoining square sounds fiddly but becomes intuitive quickly. The result is a flat, neat join with no separate seaming required.
- Can I use a single color for the entire cardigan? Yes — the sunburst texture still reads clearly in a single color because the 3D petal round creates physical dimension rather than just color contrast. A tonal approach can look very elegant, particularly in a rich jewel color or a warm neutral.
- How do I know if my squares are the right size before joining? Measure each square after Round 4. All 18 should be consistent — even a small difference in size compounds visually once squares are joined side by side. If some are noticeably larger or smaller than others, identify whether it is a tension issue and adjust your hook size before continuing.
- The pop-out petals are not standing up — what went wrong? The most common cause is pulling the closing loop too loosely. When you re-insert your hook and pull the dropped loop through the chain-3 top, pull it snug and tight. A loose pull leaves the cluster lying flat rather than popping forward. Pulling the starting tail from Round 3 from the wrong side also helps push the petals toward the right side.