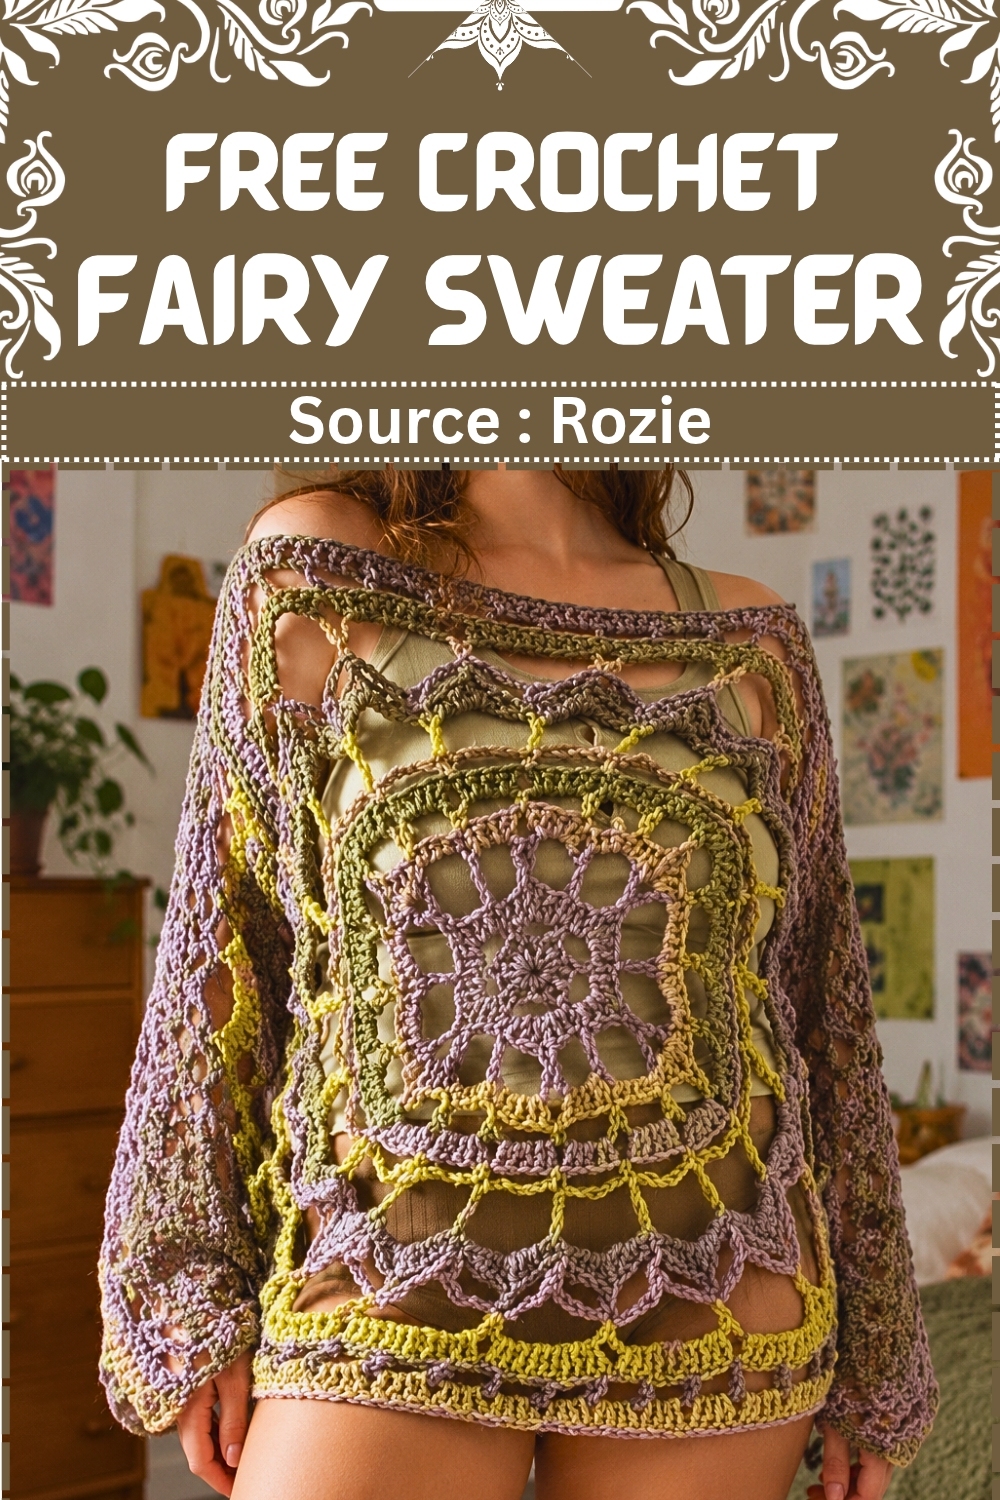
Dusty lilac and chartreuse yarn give this crochet fairy sweater a sheer off-shoulder look that slips easily over a sage cami. Ren Faire crochet fans can wear the oversized fit as a mini dress with balloon sleeves or layer it over leggings for winter fairy outfits.
This is a worked-from-the-center pullover with two square panels, two flat sleeves, and a seamed construction that is more logical than it looks. The design starts at a floral motif, expands outward through petal and mesh rounds, and finishes into a solid square border. Sleeves build in alternating texture rows — half double crochet, wave, open mesh — then get sewn directly to the body.
Crochet Fairy Sweater
If you are comfortable with double crochet, picot stitches, and basic seaming, this is a strong next project. If you have made granny squares or motif-based garments before, you are going to move through this quickly.
Materials and Tools
- 786 yards of worsted weight yarn, size 4, approximately 3 skeins
- 5.5 mm crochet hook
- 8 stitch markers, used throughout both the panel construction and assembly
- Scissors
- Darning needle for weaving in ends
- Measuring tape
Choose a yarn with enough body to hold the petal and picot details clearly. A cotton blend or smooth acrylic works well. Avoid anything too fuzzy or bouclé, since the open mesh sections and petal definition will be lost in a textured fiber.
Difficulty and Time
This is an intermediate project. The stitch vocabulary is mostly standard — double crochet, half double crochet, single crochet, picot, treble — but you will be working motif rounds, reading round structures, and making fit decisions during assembly. Budget one to two sessions per panel and another session per sleeve. Assembly adds time but is not complicated once the pieces are laid flat and marked correctly.
The Pattern

Part 1: Front and Back Panels — Make 2
Round 1 — Center Ring
- Make a slip knot and chain 4.
- Slip stitch into the first chain to create a small ring.
- Chain 2 (this does not count as a double crochet), then work 12 double crochets inside the ring.
- Slip stitch to join the round.
Round 2 — Mesh Loops
- Chain 4.
- Skip the first stitch, then single crochet into the next stitch.
- Work chain 4, skip a stitch, single crochet into the next stitch all the way around until you have 6 loops total.
Round 3 — Petals
- Chain 2 for height.
- Into the first chain-4 space, work 3 double crochets, then a picot stitch by chaining 3 and slip stitching into the first chain, then 3 more double crochets.
- Single crochet over the single crochet from the previous round.
- Repeat this petal sequence in every chain-4 space around for 6 petals total.
- Slip stitch to join the round, then slip stitch up to the top of the picot stitch.
Round 4 — Expansion Spaces
- Chain 2.
- Into the top picot stitch, work: double crochet, chain 1, double crochet.
- Chain 5, then double crochet into the single crochet from the previous round.
- Chain 5, then repeat the double crochet, chain 1, double crochet sequence into the next picot stitch.
- Continue this sequence all the way around.
- Slip stitch to join, then slip stitch into the chain-1 space.
Round 5 — Petal and Half Double Crochet Clusters
- Chain 2, then work 3 double crochets, picot, 3 double crochets into the chain-1 space.
- Single crochet into the chain-5 space.
- Work 9 half double crochets across the next section, with the 5th half double crochet going directly into the double crochet from the previous round.
- Single crochet, then work another petal cluster of 3 double crochets, picot, 3 double crochets into the chain-1 space.
- Single crochet, 3 half double crochets, single crochet, then work 5 double crochets into the next chain-5 space, chain 1, skip over the middle section, and 5 double crochets into the next chain-5 space.
- Mirror the sequence back to the start and slip stitch to join, then slip stitch up to the top picot.

Round 6 — Mesh Foundation
- Chain 1, single crochet into the picot stitch.
- Chain 5, single crochet into the first single crochet.
- Continue working chain 5 followed by a single crochet into designated stitches and spaces all the way around the motif to build a wide mesh foundation.
- Slip stitch to join. Keep your tension relaxed here — the mesh needs to lie flat and open, not pull inward.
Round 7 — Double Crochet Fill
- Slip stitch into the chain-5 space, chain 2.
- Work 5 double crochets into every chain-5 space all the way around.
- Slip stitch to join.
Round 8 — Long Mesh
- Chain into the space, then work chain 7 followed by a single crochet into the next space, all the way around.
Round 9 — Treble Mesh
- Chain 3, work a treble crochet into the single crochet, then chain 7 followed by a treble crochet into each subsequent single crochet all the way around.
Round 10 — Decorative Border
- Slip stitch into the chain-7 space.
- Into that space, work 2 half double crochets, 3 double crochets, picot, 3 double crochets, 2 half double crochets.
- Single crochet into the treble crochet from the previous round.
- Repeat this sequence in every chain-7 space around.
- Slip stitch up to the top picot.
Round 11 — V-Stitch Mesh
- Chain 1, single crochet in the picot stitch.
- Chain 5, then work double crochet, chain 1, double crochet into the single crochet from the previous round.
- Chain 5, single crochet in the next picot.
- Repeat all the way around.
Round 12 — Large Corner Chains
- Single crochet over the single crochet.
- Chain 12, skip the inner section, and single crochet into the next single crochet.
- Repeat all the way around.

Round 13 — Marker Placement and Solid Base
- Place stitch markers at the 4 natural corner single crochets, separated by 5 loop intervals, to designate your square corners. Do not remove these markers yet.
- Slip stitch into the chain-12 space, chain 2, and work 10 double crochets into each chain-12 space.
- When you reach a marked corner stitch, double crochet directly into that marked single crochet.
- Repeat around. Having 8 stitch markers on hand before you begin this round makes it much easier to keep your corner positions secure as you go.
Round 14 — Corner Shaping
- Single crochet across all double crochets and spaces.
- At each of the 4 corners, half double crochet in the stitch just before the marker, double crochet into the marked corner stitch, then half double crochet into the stitch right after.
- Repeat at all 4 corners.
Round 15 — Square Mesh
- Chain 2, double crochet into the first stitch.
- Work chain 3, skip 3 stitches, double crochet in the 4th stitch all the way around.
- Adjust skipping counts — skipping 2 or 4 where necessary — so you land accurately on your corner stitches.
- Remove the stitch markers as you reach each corner.
Round 16 — Double Crochet Clusters
- Slip stitch into the chain-3 space, chain 2.
- Work 4 double crochets into each standard chain-3 space.
- Work 7 double crochets into each of the 4 corner spaces.
- Slip stitch to join.
Round 17 — Final Panel Border
- Chain 1, single crochet into every double crochet across.
- At the 7-double crochet corner sections: single crochet in the first 3 stitches, chain 2, skip 1 stitch, and single crochet in the last 3 stitches.
- Fasten off.
- Repeat all rounds from Round 1 through Round 17 to create your second identical panel.
Part 2: Sleeves — Make 2

Foundation
- Measure your arm length and subtract 2 to 3 inches to account for stretch and garment weight.
- Chain an even number to match that measurement. The original tutorial used a chain of 50 for a 20-inch fit.
Rows 1 and 2
- Chain 2, then work half double crochets all the way along for 2 rows.
Row 3 — V-Mesh
- Chain 2, double crochet in the first stitch, then work chain 1, skip 1, double crochet across the row.
Row 4
- Chain 1, work a row of double crochets into every stitch and chain-1 space.
Row 5
- Chain 1, work a row of half double crochets.
Rows 6 through 8 — Wave Pattern
- Row 6: Chain 1, then work the following sequence repeatedly down the row — 3 single crochets, 1 half double crochet, 1 double crochet, 1 treble crochet, 1 double crochet, 1 half double crochet.
- Rows 7 and 8: Chain and work matching treble crochet and chain-3 mesh structures that mirror the wave heights of the previous row. Keep your tension even through these rows so the wave rhythm stays consistent and the sleeve lies flat.
Rows 9 and 10
- Work 2 rows of half double crochets.
Rows 11 through 18 — Open Mesh Sequence
- Alternate between rows using chain-7 and chain-4 loop structures and rows using double crochet and chain-3 foundations to build a wide, airy sleeve section.
Rows 19 through 21
- Work a row of 3-double crochet clusters in the spaces.
- Follow with 2 rows of half double crochets.
Rows 22 through 26 — Optional Flare and Finish
- If you want wider sleeves, add the extra wave and double crochet expansion rows across Rows 22 through 24.
- End with 2 final rows of half double crochets for Rows 25 and 26.
- Fasten off and make a second identical sleeve.

Part 3: Assembly and Seaming
- Lay your front and back panels together with the wrong sides facing outward.
- Count 13 stitches down from the shoulder corners on both panels and mark those points with stitch markers to define the neck opening. Mark this on both panels before sewing anything.
- Lay the sweater flat or try it on to identify the correct arm placement points, then mark them 24 stitches down from the shoulder and corner seams on each side.
- With the sweater inside out, join yarn at the arm placement marker and single crochet through the front and back loops of the sleeve and body panels together, working down to the cuff. Repeat for the second sleeve. Sewing sleeve to body while everything is inside out gives you a cleaner, hidden seam on the right side.
- Sew the shoulder seams from the neck opening outward on each side.
- Seam the side body panels from the bottom hem up to the underarm on each side.
- Weave in all loose ends.
- Turn the finished pullover right side out.
Yarn Substitution
The 5.5 mm hook and worsted weight pairing gives the panels enough structure to hold the petal and picot details while staying light enough for the mesh sections to open properly. If you substitute, stay within worsted weight and test with the same hook size before committing. A smooth cotton or cotton-acrylic blend is the most reliable choice. Bamboo blends also work and add a soft drape to the body. Avoid heavy or rustic fibers — the motif detailing needs a clean stitch definition to read clearly, especially in Rounds 3 through 5.
Customization Ideas
- Work the panels in two contrasting yarns — one for the floral motif center and one for the outer border rounds — for a color blocked effect.
- Skip the optional sleeve flare rows for a more fitted, narrow sleeve.
- Add a third panel using the same motif and border construction to create a longer, tunic-length version.
- Work the mesh rounds in a thinner yarn held with the main yarn for a subtle color shift in the openwork sections.
FAQ
- Do both panels need to look exactly the same? Yes. The front and back panels are identical, and matching them is important for the seaming to line up. Work each panel from Round 1 through Round 17 in full before starting the sleeves. Blocking both panels to the same dimensions before assembly makes everything fit together more smoothly.
- Can I adjust the neck opening width? Yes. The neck opening is defined during assembly by counting down from the shoulder corners before you seam. Counting fewer stitches makes the opening wider. Counting more makes it narrower. Try the panels on yourself before marking so you can adjust to what feels right.
- What if my sleeve length does not match the pattern? Measure your own arm and chain accordingly. The original chain count is given as a reference for a specific arm length, but the construction stays the same regardless of how many chains you start with. Just use an even number so the stitch patterns across the rows divide cleanly.