A star motif in filet crochet lands differently in royal blue than it would in white or cream, bolder, more graphic, less lace-adjacent. This bralette uses the filled-and-open square grid to render the star across the front panel, anchored by a solid underbust band that gives the top structure without adding bulk. The spaghetti straps keep the silhouette minimal. For another filet bralette approach with a different motif and neckline, the filet halter top with solid bust panel handles the same open-grid logic in a high-neck format.
Filet Crochet Top
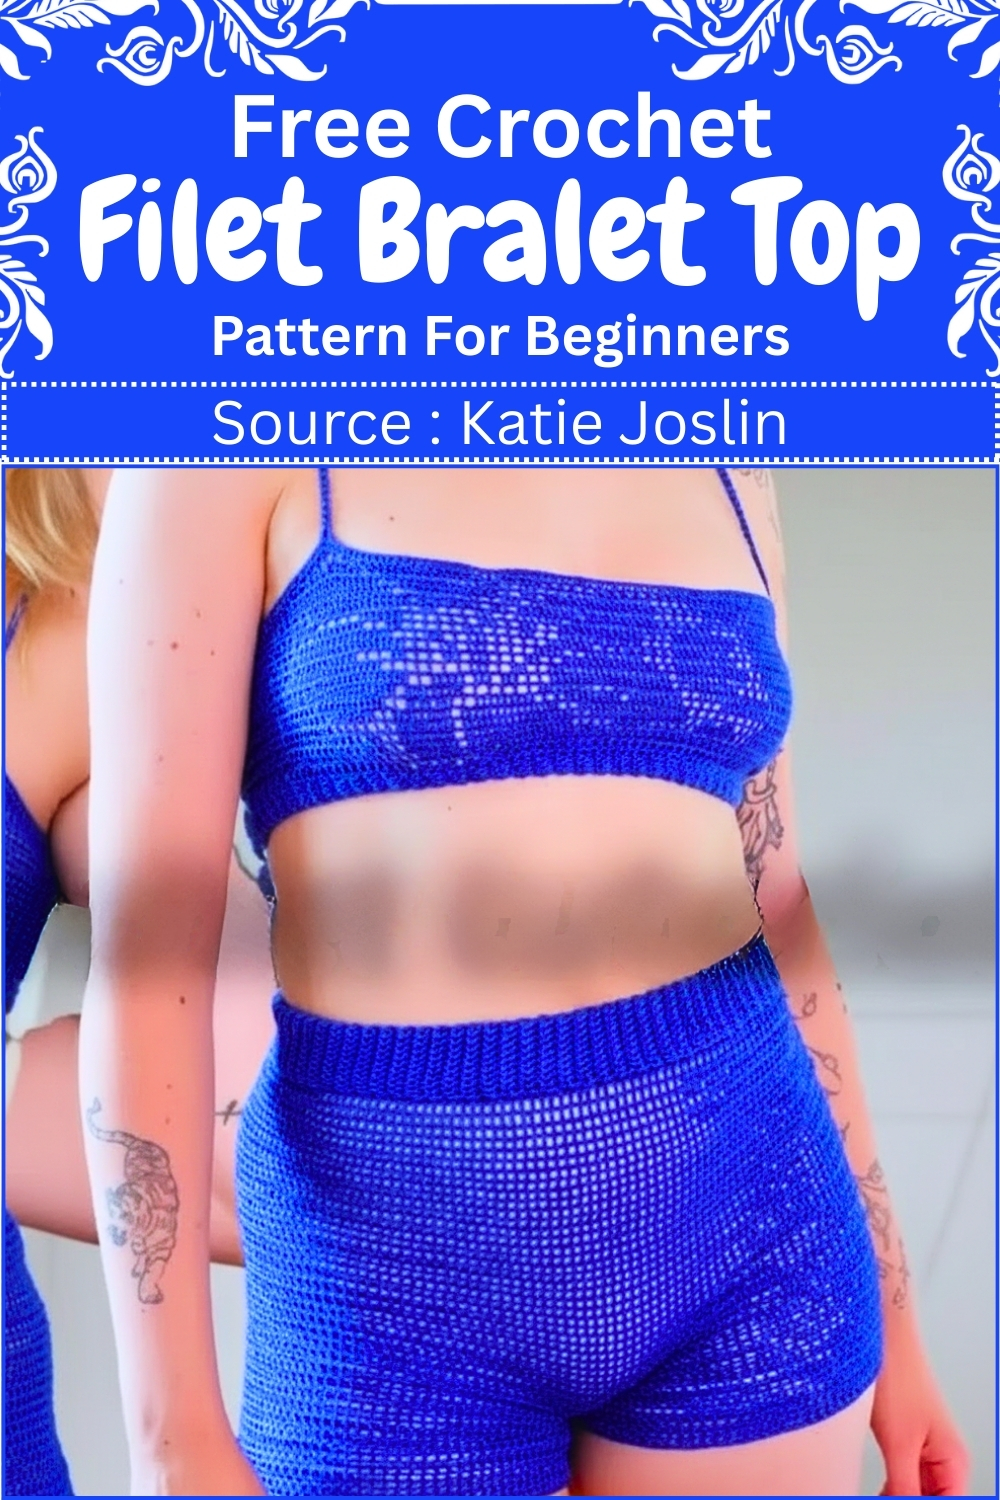
The construction pairs a filet chart panel with a denser foundation band, two different stitch modes in one piece, which means you’re practicing both open and solid crochet in a single project. The blue yarn in the sample is the same shade throughout, so the star reads through contrast in stitch density rather than color, which is a subtler effect than most filet work. If you want to see the bralette silhouette handled without filet, the crochet bralette with cups and mesh trim is a natural comparison.
Pattern Overview
This bralette is worked in five main parts:
- Underbust band made with doubled lace weight yarn and a 3 mm hook, crocheted around elastic for stability.
- Main body filet crochet with a 2 mm hook and a single strand for finer detail.
- Top border and back ties for shaping and adjustability.
- Shoulder straps made after trying on for a custom fit.
- Finishing including weaving in ends and sewing a lining for coverage.
Materials
- Lace weight yarn (two balls or equivalent)
- 3 mm crochet hook
- 2 mm crochet hook
- Elastic to fit underbust
- Sewing thread and needle
- Non fraying fabric for lining
- Stitch markers
- Scissors
Stitch Notes and Clarity Before You Start
Why the band uses doubled yarn and a larger hook
- The underbust band needs structure.
- Doubling the yarn and using the 3 mm hook makes a thicker, firmer fabric that grips the elastic well and holds its shape.
What “back loop only” does in the band
- Single crocheting in the back loop only for the middle stitches creates a subtle ridge and extra flexibility.
- It helps the band curve around the body and makes it easier to fold over the elastic neatly.
How filet crochet is formed here
You will build a mesh of double crochet and chain spaces.
The design is created by alternating:
- Blank squares: double crochet, chain one, double crochet
- Filled squares: two double crochets
In other words, you are either leaving an open space (blank) or filling it in with stitches (filled). The key to clean filet crochet is keeping your stitch placement consistent and your tension steady.
Fit and Sizing Guidance
Underbust band fit
Your elastic determines the size. The crocheted band is built to fit snugly around the elastic loop, not loosely around your body. This matters because the elastic is what gives the garment support and prevents sliding.
A good fit feels:
- snug but comfortable
- secure when you inhale and move
- not digging in or twisting
Front panel width and height

The front panel is customizable.
You will:
- mark where the front panel should sit
- keep the design centered
- crochet until it reaches your desired height
If you want more coverage, you simply continue the filet rows higher before you add the top border.
Back spacing
- You will leave space at the back.
- This is important for comfort and adjustability since your ties will handle the fit rather than forcing the crochet fabric to stretch around your back.
- Never read a crochet pattern before? No problem! The video tutorial below is perfect for beginners, or give the written pattern below a try!
Underbust Band
- Sew the elastic into a loop that fits comfortably around the underbust
- Using doubled yarn and a 3 mm hook, chain 11
- Single crochet into each chain across
- Chain 1 and turn at the end of each row
- Single crochet into the first and last stitch of each row
- Single crochet in the back loop only for all middle stitches
- Repeat rows until the band fits snugly around the elastic

- Slip stitch the first and last rows together to form a loop
- Insert the elastic into the band, fold the band over it, and single crochet the edges together to encase the elastic
Extra clarity for this section
- When you are repeating rows, the goal is a band length that matches the elastic loop without stretching the crochet. If you have to pull the crochet hard to make it meet the elastic, add more rows.
- When you slip stitch the first and last rows together, you are joining short ends to make a continuous ring. Take your time here so the join sits flat.
- When you fold the band over the elastic, keep the elastic centered so it does not twist inside. Stitch markers can help hold the fold in place while you single crochet the edges together.
Main Body Filet Crochet
- Switch to a 2 mm hook and a single strand of yarn
- Mark the front panel placement, leaving space at the back
- Work one foundation row of double crochet mesh by placing one double crochet and chain one into every stitch
- Follow a filet crochet grid pattern using double crochet and chain spaces
- Work blank squares as double crochet, chain one, double crochet
- Work filled squares as two double crochets
- Keep the design centered by adding mesh stitches evenly on both sides
- Continue working rows until the front panel reaches the desired height

Extra clarity for this section
- The foundation mesh row sets up your spacing. Treat it as your “grid” row. If that row is even and consistent, the rest of the filet panel will look much cleaner.
- When you are keeping the design centered, think of the panel as having “extra mesh” on both sides. If you add stitches on one side only, the motif shifts off center as the panel grows.
- If your mesh feels wavy, it is usually a tension issue. Lace weight yarn shows every small change. Slow down and try to keep your chain one spaces the same size each time.
Top Border and Back Ties
- Work one solid row of double crochet across the top edge
- At one end, chain 100 and double crochet back down the chain to form a tie
- Repeat on the opposite side for the second tie
Extra clarity for this section
- The solid double crochet row gives the top edge stability so the filet mesh does not stretch out.
- When you chain 100, keep your chains relaxed but not loose. If your chains are very tight, it becomes hard to double crochet back down the chain.
- Double crocheting back down the chain thickens the ties so they are less likely to cut in or snap.
Shoulder Straps
- Try on the bralette and mark strap placement
- Attach yarn at the front marker and chain to the desired strap length
- Slip stitch to the back edge
- Double crochet back down the chain to thicken the strap
- Repeat for the second strap

Strap placement notes
- Mark placement while wearing it, because the bralette may sit differently once tied.
- When you chain for strap length, aim for a length that holds the bralette up without pulling the underbust band upward. A strap that is too short can distort the front panel and make the band ride up.
Finishing
- Weave in all yarn ends securely
- Cut lining fabric slightly smaller than the front panel
- Sew the lining lightly to the inside of the bralette for coverage
Finishing notes that make a big difference
- Weave in ends more thoroughly than you would on a thicker yarn project.
- Lace weight ends can slip out if they are not anchored well.
- Cutting the lining slightly smaller helps prevent the fabric from peeking out at the edges.
- “Sew lightly” is key. You want coverage, not stiffness.
- Use small stitches and avoid pulling the crochet fabric out of shape.
Beginner Notes and Common Troubleshooting
My band feels loose even with elastic
- Your crochet band may be longer than the elastic loop.
- The crochet should fit snugly around the elastic, not the other way around.
- If it is loose, remove a few rows from the band.
My filet panel is shifting off center
- Make sure you are adding mesh stitches evenly to both sides when adjusting width.
- Centering is a constant habit in filet crochet.
My mesh looks uneven or wavy
- Check your tension on the chain one spaces.
- Try to keep them consistent.
- Also make sure you are not skipping stitches differently from row to row.
My straps pull the top edge inward
- The straps may be too short or attached too far toward the center.
- Mark placement while wearing and adjust before you commit to thickening the strap.
Optional Wear and Care Notes
- Because this is lace weight and includes elastic plus lining, gentle handling will help it last longer.
- Hand wash carefully, reshape, and let it dry flat so the filet fabric keeps its shape and the elastic stays strong.