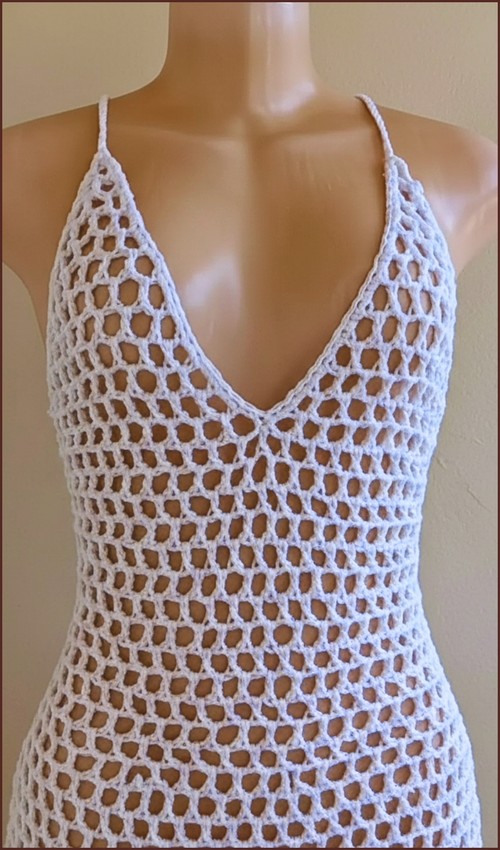
This super cozier crochet racerback bralette is a good option when regular straps feel like they slip, twist, or pull uncomfortably on the shoulders. The racerback shape draws the straps inward, which helps the bralette stay in place and feel more secure during wear. Worked in lightweight cotton, this style sits close to the body, feels breathable against the skin, and layers easily under everyday tops while still working well as a standalone piece in warm weather.
Crochet Racerback Bralette

This design is built in clear, logical sections rather than complex stitch patterns. You shape the front panel from the bottom up, gradually narrowing it to create a soft V neckline and straps, then work a second panel that tapers more sharply to form the racerback. Because each part is shaped as you go, you can stop, measure, and adjust at every stage, which makes this bralette easy to customize for different bodies and comfort levels.
Materials
- 3.5 mm crochet hook
- Lightweight size 3 cotton yarn
- Scissors
- Yarn needle
Sizing Notes
- Measure your bust and under bust before starting
- Adjust chain length and row count to match your body
Why this matters: This bralette relies on shaping rather than fixed stitch counts. Your starting chain determines how wide the bralette sits across your ribs, while your row count controls coverage and support. Taking both bust and underbust measurements helps you avoid a front panel that is either too narrow to be supportive or too wide to sit flat.
Front Panel Bottom Up
- Create a foundation chain that spans the front half of your torso from rib to rib
- Work rows of half double crochet or double crochet until the piece reaches just below the armpits
- Begin neckline shaping by decreasing one stitch at the start and end of each row to form a slanted V shape

Stitch and shaping clarity:
- Half double crochet creates a denser, more supportive fabric. Double crochet gives more stretch and a lighter feel. Choose based on how much structure you want.
- The decreases at both edges are what create the V neckline. Decreasing evenly on both sides keeps the neckline centered and symmetrical.
- Stop occasionally and hold the panel against your body. The fabric should lie flat without pulling inward too sharply at the center.
Neckline and Straps
- Continue decreasing until the panel narrows enough to cover the chest and reach the base of the neck
- Stop decreasing when the top section measures approximately 2 to 3 inches wide
- Work straight rows without decreases to form the shoulder straps
Fit guidance:
- The 2 to 3 inch width is a balance between comfort and stability. Narrower straps look delicate but may dig in, while wider straps feel more supportive.
- Working straight rows after the decreases locks in the strap width and prevents the straps from drifting inward or outward as you build height.
- Try the panel on before finishing the straps. Adjust strap length now, as it directly affects how high the bralette sits on the chest.

Back Panel Racerback Shape
- Make a second panel starting the same width as the bottom of the front panel
- Taper more aggressively toward the center to form the racerback Y shape
- Continue working the center strip upward until it matches the height of the front straps
Why the back is shaped differently:
The racerback needs a stronger inward angle so it can sit between the shoulder blades. Tapering more aggressively pulls the fabric toward the center, which prevents straps from slipping off the shoulders and gives the classic Y shape. Matching the height of the front straps ensures everything lines up cleanly during assembly.

Assembly
- Place front and back panels with right sides facing each other
- Seam the side edges together from the bottom up to the armpits
- Attach the front straps to the top of the back racerback section
Assembly tips:
- Seaming only up to the armpits keeps the armholes open and comfortable.
- Check alignment before fastening the straps permanently. Twisted or uneven straps are easier to fix before ends are woven in.
- Use a yarn needle and small, even stitches to keep seams flat against the body.
Finishing
- Add a round of single crochet around the neckline and armholes for a clean edge
- Weave in all ends and block lightly if needed
Finishing notes:
- The single crochet edging reinforces high-stress areas like straps and armholes, helping the bralette hold its shape over time.
- Keep your edging tension relaxed so the fabric does not pucker.
- Light blocking smooths stitches and helps the racerback sit flat, especially if your tension varies slightly.

Beginner Notes
- If neckline shaping feels confusing, place stitch markers at the first and last stitch of each row to clearly see where decreases happen.
- Cotton yarn has less stretch than acrylic, so accurate measuring is especially important for comfort and fit.
- This pattern is forgiving. Small adjustments in row count will not affect construction as long as both panels stay balanced.
Troubleshooting
- Neckline pulls too sharply: Decrease less frequently or switch to half double crochet for more structure.
- Straps feel too tight: Add a few straight rows before assembly to increase length.
- Back does not sit centered: Re-check that tapering is even on both sides of the racerback panel.
Fit and Wear Notes
- This bralette is best suited for light to moderate support.
- It sits close to the body, with the racerback distributing weight evenly across the shoulders.
- Layer it under loose tanks, wear it as a summer top, or adjust strap width and stitch choice for a more supportive feel.