
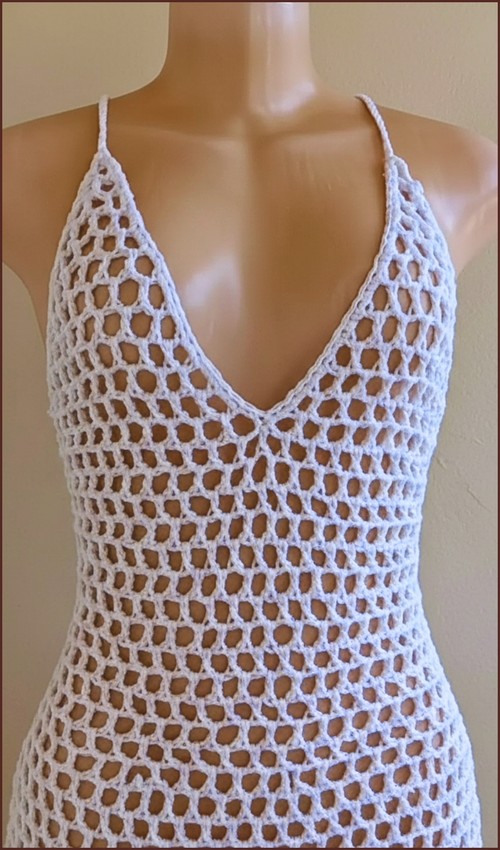
A deep V built from a center-front triangle, spaghetti tie straps, and mesh all the way down this piece reads as a dress on the mannequin, which makes “beach sheer top” in the title a bit of an undersell. The V-neck shaping is worked directly into the mesh construction by increasing from a starting point, so there’s no separate neckline panel to seam in. For a wrap-front mesh coverup with a different neckline approach, the beach cover-up wrap top is a natural companion.
Sheer White Crochet Top

Robin acrylic keeps the yarn cost low and the drape consistent, which matters for a mesh piece this long — the open grid needs even tension to hang well. For a shorter halter version in the same open construction, the seaside V-stitch top uses a similar V-neck approach with a different stitch.
Materials
- Medium weight DK yarn using approximately five 50g balls of acrylic yarn or equivalent
- Crochet hook 5 mm for the main dress
- Crochet hook 4 mm for straps
- Measuring tape
- Scissors
- Tapestry needle
- Stitch marker

Top Triangles Make 2
- Make a slip knot and chain 8
- Double crochet into the very first chain to form the first mesh box
- Chain 5 and turn
- Place one double crochet in the first space
- Chain 2 and place one double crochet into the third chain of the previous row turning chain
- Repeat the mesh pattern by chaining 5 at the start of every row
- Work one double crochet and chain 2 in each space across
- Finish every row with chain 2 and one double crochet into the turning chain
- Continue until the base of the triangle measures bust size divided by four

Stitch and shaping clarity
- Each triangle grows by adding height and width evenly through the mesh structure.
- The chain 5 at the start of every row acts as both height and spacing, creating the open mesh look while also shaping the triangle.
- Ending every row the same way keeps the edges straight and prevents the triangle from leaning.
- The measurement rule is important here.
- Bust size divided by four ensures that when both triangles are joined, the total width supports the bust without pulling or sagging.
- Measure the flat base of the triangle, not the diagonal edge.
Connecting the Triangles
- Place both triangles side by side with the points facing upward
- Join the two bottom corners together using a single crochet at the center
- If you’re new to reading crochet patterns, don’t worry, just follow along with the video tutorial below and use the written pattern as a reference!

Why this step matters
- Joining only the bottom corners leaves the upper edges free to shape naturally around the bust.
- The single crochet join acts as an anchor point and becomes the visual and structural center of the bodice.
Bodice Waist Area
- Work back and forth across both triangles using the mesh stitch
- Place one double crochet in each space followed by chain 2
- Increase one mesh box at the end of each row
- Continue until the bodice reaches the belly button or natural waist
Fit and sizing guidance
- This section controls how the dress transitions from fitted to relaxed.
- Increasing one mesh box at the end of each row gradually widens the fabric so it can sit comfortably over the ribs and stomach.
- Stop at the belly button or natural waist depending on how fitted you want the upper dress to feel.
- If you prefer a closer fit, stop slightly earlier.
- For a looser, more relaxed dress, continue a few extra rows.

Skirt Hip Area
- Measure around the hips
- Chain a length that matches the hip measurement using a multiple of three plus two
- Join the chain to the opposite side of the bodice to form a round
- Mark the center of the chain with a stitch marker
- Work the Mesh stitch continuously around the dress
- Stop increasing to keep the skirt straight
- Join each round with a slip stitch
- Chain four and turn at the start of each new round
- Continue until the desired dress length is reached
Construction and shape explanation
- The skirt is worked straight rather than flared. Matching the chain to the hip measurement allows the skirt to skim the body without stretching or clinging.
- The stitch marker at the center helps you track rounds and maintain symmetry, especially as the dress lengthens.
- Stopping increases here is intentional.
- Adding more mesh boxes would create flare, while keeping the count steady gives a clean, column-style silhouette.
Edging and Straps
- Attach yarn at the top center of the neckline
- Work two single crochets into each mesh box along the neckline and back edge
- Switch to a 4 mm hook for the straps
- Attach yarn at the top point of each triangle
- Chain long cords using three strands of yarn for strength
- Criss cross the straps at the back
- Weave the straps through the waist mesh spaces to create a drawstring effect
- Secure and weave in all ends
Finishing notes
- The single crochet edging stabilizes the mesh and prevents stretching over time.
- Using a smaller hook for the straps creates firmer cords that hold their shape better, especially since they also function as a drawstring at the waist.
- Criss crossing the straps adds support and helps distribute weight evenly across the shoulders and back.
Beginner Notes
- This pattern is approachable if you are comfortable with basic chains and double crochet.
- The mesh stitch is repetitive, which makes it easy to settle into a rhythm.
- Take time to measure as you go rather than relying on row counts, especially in the triangle and bodice sections.
Troubleshooting
- If the triangles curl, check that you are finishing each row correctly into the turning chain.
- If the bodice feels tight, add another increase row before moving to the skirt.
- If the skirt twists, make sure the joining chain is not twisted before forming the round.
Final Thoughts
- This dress relies on thoughtful shaping rather than complicated stitches.
- By measuring carefully and understanding where increases stop and start, you can adjust the fit while keeping the structure intact.
- Take it step by step, and the mesh will do most of the work for you.


