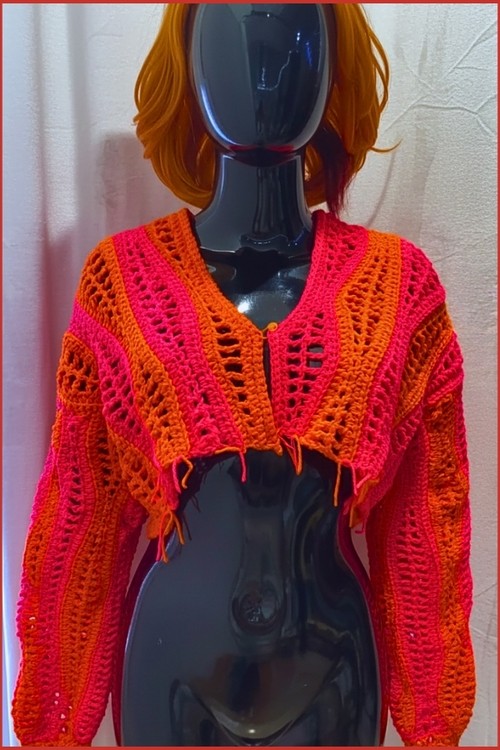
Wide balloon sleeves and a cropped hem are a combination that photographs beautifully and wears even better, the volume at the sleeves balances out a high-waisted bottom half effortlessly. This pink variegated version works alternating panels of open mesh and denser rows that create a striking two-texture fabric without requiring two separate techniques. If the balloon sleeve silhouette is calling to you, the crochet cut-out shoulder balloon sleeve top is another pattern worth adding to your list.
Crochet Relaxed-Fit Top

The construction works flat in panels that are then seamed, keeping the stitch repeat easy to follow even for newer makers. Sizing is generous across the body since the relaxed fit means minimal shaping adjustments are needed. For another open-weave crop with a different construction approach, the sheer crochet crop top makes a good companion project.
Why I love this one:
The alternating mesh and solid rows catch light differently depending on the fabric, and the mixed yarn weights give it a drape that single-weight tops rarely achieve.
Materials and Tools
- 5.5 mm crochet hook (main body)
- 3.5 mm crochet hook (neckline finishing only)
- Sport weight yarn — Color A
- DK weight cotton yarn — Color B
- Stitch markers
- Yarn needle
- Scissors
Abbreviations:
- ch — chain
- sc — single crochet
- hdc — half double crochet
- dc — double crochet
- tr — treble crochet
- st — stitch
Stitches Featured in This Pattern
The Pattern
Foundation and Body Panels
- Create a slip knot and chain an odd number of stitches that matches your shoulder-to-shoulder measurement.
- Chain 5 more to count as one treble crochet plus one chain.
- Skip the 8th chain from the hook and work: tr, ch 1, skip 1 across the row. (Treble mesh row.)
- Chain 3 and work one dc into every stitch and chain space across. (Solid double crochet row.)
- Change to Color B at the end of this row.
- Chain 3 and work: hdc, ch 1, skip 1 across. (Half double crochet mesh row.)
- Chain 1 and work one sc into every stitch and chain space across. (Solid single crochet row.)
- Repeat the treble mesh row.

- Repeat the solid single crochet row.
- Chain 4 and work: dc, ch 1, skip 1 across. (Double crochet mesh row.)
- Chain 4 and work one tr into every stitch and space across. (Solid treble crochet row.)
- Chain 1 and work: sc, ch 1, skip 1 across. (Single crochet mesh row.)
- Chain 2 and work one hdc into every stitch and space across. (Solid half double crochet row.)
- Repeat these rows in order until the panel reaches your desired length.
- Work two panels — one for the front, one for the back — to the same length.
- New to crochet and not sure how to read a pattern yet? The video tutorial below will guide you through it step by step, you’ve got this!
Shoulders and Neckline
- Mark the neckline opening with stitch markers, keeping an odd number of stitches on each shoulder section.
- Working the shoulder sections only (not across the neckline opening):
- Work one row of hdc.
- Work one row of hdc mesh (hdc, ch 1, skip 1).
- Work two more rows of hdc.
- Repeat the same shoulder shaping on both the front and back panels.

Assembly
- Place the front and back panels together with right sides facing.
- Join the shoulders using sc worked through both layers.
- Join the sides using sc, leaving openings sized to your arm measurement for the armholes.
- Attach Color B at the back neckline.
- Work one round of sc evenly around the entire neckline using the 3.5 mm hook for a clean, fitted finish.
Sleeves
- Attach yarn at the armpit and work one round of sc around the armhole, keeping the stitch count odd.
- Work two rounds of hdc mesh (hdc, ch 1, skip 1).
- Work one round of solid tr into every stitch and space.
- Work two rounds of tr mesh (tr, ch 1, skip 1).
- Work one round of solid tr into every stitch and space.
- Repeat this sleeve sequence until the sleeve reaches your desired length.
- Finish with one final round of sc.

Tips
- On the two-hook sizes: The smaller hook for the neckline is intentional — it tightens the stitch tension just enough to keep the neckline from stretching out with wear. Don’t skip the switch; it makes a real difference over time.
- On tracking the stitch panel sequence: The body is worked in a repeating row sequence with alternating mesh and solid rows. Write out the order or mark your place with a sticky note — the rows themselves are simple, but the sequence moves between stitch heights and it’s easy to lose your place after a break.
- On the odd stitch count: The pattern calls for an odd number of stitches consistently through the body, shoulders, and sleeves. Check this before you begin each new section. If you’re off by one after assembly or joining, work a small invisible increase or decrease at a seam where it won’t show.
- On the color change: Switch to Color B cleanly by pulling the new yarn through on the last pull-through of the final stitch in the row before, so the first loop of the new row is already the correct color.
Yarn and Fiber Notes
The two-yarn approach here is part of what makes the finished fabric interesting — sport weight for structural, open rows and DK cotton for the denser, grounding rows creates a subtle shift in weight and texture that reads as intentional design. For the best drape, keep Color B as a cotton or cotton blend rather than substituting acrylic. All-cotton DK breathes well and softens after washing. If you substitute Color A, stay within the sport weight range; going heavier will close the mesh too much and change the proportion of the stitch panels.
Customization Ideas
- Length: Add extra repeats of the stitch panel sequence before shaping the shoulders for a longer tunic.
- Sleeves: The sleeve repeat can be cut short for a cap sleeve or extended to three-quarter length.
- Color: The pattern uses two colors in a defined sequence. A tonal pairing (deep and pale versions of the same hue) reads as sophisticated; high contrast makes each panel pop distinctly.
- Neckline: Work an extra round of sc at the neck for a slightly thicker, more defined collar edge.
FAQ
Is this pattern suitable for an intermediate crocheter?
Yes, comfortably. You’ll need to be familiar with treble crochet and comfortable reading a multi-row stitch sequence, but there’s nothing technically difficult here. The construction is worked flat in panels, seamed together — straightforward for anyone past the absolute beginner stage.
Can I make this top without two different yarn weights?
You can substitute a single yarn weight throughout, but you’ll lose some of the textural contrast that makes the stitch panels interesting. If you use one weight for both colors, choose a smooth DK or light worsted and adjust your hook accordingly.
How do I know when the panel is long enough before shaping the shoulders?
Measure the panel against your body from the top of the shoulder to wherever you want the hem to fall. Hold the panel up or lay it flat and compare against a top you already own for a reference length. The shoulder shaping adds a small amount of height, but most of the length is built during the body panel stage.
What’s the best way to join the side seams cleanly?
Single crochet seaming with right sides held together gives a clean inside seam. Work through both layers consistently and keep your tension even. If the seam pulls or bunches, try going up half a hook size for the joining row only.