The primrose stitch builds a repeating fan pattern with open arch spaces between each cluster — simple enough to find a rhythm with quickly, but with enough texture to make the finished fabric look considered rather than plain. In pink cotton with wide square straps, this crop top lands somewhere between breezy and structured: the stitch gives it visual interest without adding weight. For another square-neck crop top with a different open stitch, the crochet babydoll halter top with lace bodice uses a similar shell-based texture in a different silhouette.
Crochet Sheer Crop Top

The construction works two flat panels separately front and back then joins them at the sides, which keeps each piece manageable and makes sizing adjustments easier than a top-down approach. The wide straps are worked as extensions of the panels rather than added separately, which means the join count stays low. If you want to explore the shell stitch further across different garment types, the crochet peplum top with shell stitch is a natural next project in the same stitch family.
Materials
- Yarn Alize Cotton Gold
- 3.5 mm crochet hook

Before You Start
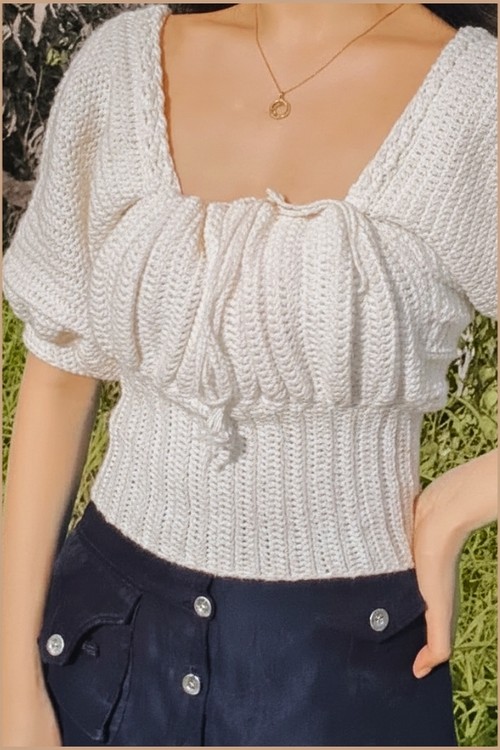
This top is worked flat and does not join in the round. The open back with lace up ties is intentional and should be planned from the first chain. Avoid the instinct to join the foundation chain into a loop.
The stitch pattern alternates between:
- a Primrose style single crochet row with chain spaces
- a double crochet cluster row worked into those spaces
Once you understand how these two rows interact, the body becomes very rhythmic and easy to repeat.
The Foundation Chain
Pattern steps:
- Make a slip knot and crochet a foundation chain that wraps around your back
- Chain 75 for Small size
- Chain 80 to 90 or more for Medium and Large sizes
- Leave space at the back for the lace up opening rather than joining the chain
Why this matters: The foundation chain determines the entire width of the top, excluding the lace up gap. It should wrap comfortably across your back and sides without stretching. Cotton yarn does not rebound much, so avoid pulling the chain tight.

Fit guidance:
- If between sizes, err on the longer chain. The lace up back allows you to pull the top snug later.
- Always lay the chain against your body before continuing. It should sit straight, not curve or buckle.
- Just starting out with crochet? The video tutorial below is a great place to begin, or challenge yourself with the written pattern below!
The Body Primrose Stitch Pattern
This section creates the main texture and structure of the top.
Pattern steps:
- Chain 1 and skip the first 2 loops from the hook
- Work one single crochet into each stitch across the foundation chain
- Chain 2 and turn, skip the first loop
- In the next loop work one single crochet, chain 2, one single crochet
- Skip 2 loops and repeat the same stitch pattern across the row
- Finish the row with one half double crochet in the last stitch
- Chain 3 and turn
- Work three double crochets into each chain 2 space across the row
- Finish with one double crochet in the last loop
- Repeat the previous two rows until you have 9 to 10 rows of double crochet clusters or until the desired height is reached

Stitch and shaping clarity
- The chain 2 spaces are the anchor points for the double crochet clusters. If you miss a space, the texture will shift.
- The half double crochet at the end of the Primrose row helps straighten the edge. Do not replace it with a single crochet.
- The chain 3 at the start of the cluster row counts as height, not a decorative chain.
Height adjustment
- 9 rows of clusters gives a cropped fit
- 10 or more rows add coverage
Stop once the panel reaches the point just under the bust.
Cleaning the Edges
Pattern steps:
- Work one single crochet into each single crochet or chain 2 row along the sides
- Work two single crochets into each double crochet cluster row to create even edges
Why this step matters: Primrose stitch creates uneven edges by nature. This cleanup row makes the sides strong enough to handle lacing, straps, and joining later.
Tip: Keep your tension relaxed but consistent. Tight edge stitches can cause the sides to curl inward.
Straps and Cups

This is where the top becomes wearable rather than decorative.
Pattern steps:
- Count seven rows in from each side toward the center
- Ensure the space between the marked points matches your nipple to nipple measurement
- Attach yarn at each marked point and crochet a long chain for the back ties
- Work single crochets back along the portion of the chain that sits over the shoulder
- Repeat the Primrose stitch pattern for three rows on the shoulder sections to form the cup detail
Fit and placement guidance
- The nipple to nipple measurement is critical. Do not estimate visually.
- If the cups feel too close together, move the attachment points outward by one stitch on each side.
- The single crochet reinforcement on the shoulder section prevents stretching over time.
Beginner notes
- When attaching yarn, use a slip knot and pull snug before starting the chain.
- Keep both strap chains the same length before working back with single crochets.
Finishing

Pattern steps:
- Align the cup sections with the top edge of the body panel
- Slip stitch the sections together fully or partially to create optional cut out details
- Lace the long chains through the side loops at the back to secure and adjust the fit
Finishing options
- Fully slip stitching creates a solid front
- Partial joining leaves small cut outs for a lighter look
- Lace the back loosely at first, then adjust once worn
Troubleshooting
Body flares outward
- Foundation chain may be too loose or edge cleanup too tight. Adjust tension on the next attempt.
Cups sit too low or too high
- Recheck the row count from the bottom. Counting rows, not stitches, gives better placement accuracy.
Uneven texture
- Ensure you are always working clusters into chain 2 spaces, not stitches.
Final Notes
- This design works because it separates structure from fit.
- By building the body first and placing cups last, you can adapt it to many body shapes without changing the stitch pattern itself.
- Take your time with measurements and placement, and the Primrose texture will do the rest of the work for you.