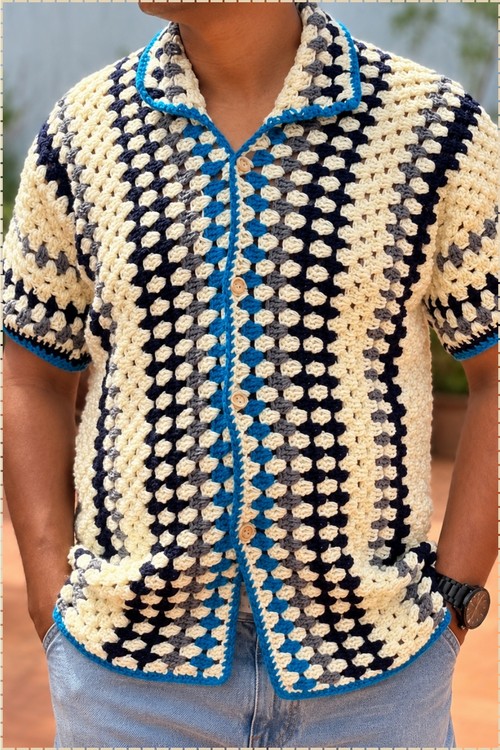
Light wash jeans and an untucked hem turn this crochet grunge sweater for men into a short sleeve shirt for warm evenings, gigs and lazy weekends. Your brother, boyfriend or dad will reach for a homemade sweater in grunge colors, buttoned up alone or worn open over a plain tee.
Cream, navy, charcoal and a sharp blue trim run in vertical bands down this men’s crochet piece. It has a retro resort shirt shape rather than a pullover, with a folded camp collar, wooden buttons down the front and two patch pockets, and the for men fit keeps the shoulders square and the body straight.
Crochet Grunge Sweater Men

Color placement is what carries the whole design. Clusters worked in bands of cream, navy and grey stack into vertical stripes that break up the surface without any motif or shaping to follow, and the blue outline around every edge, collar, cuffs, hem and button band gives it a finished tailored line. Panels are worked flat and seamed, so sizing comes down to panel width rather than complicated increases.
Materials and Tools
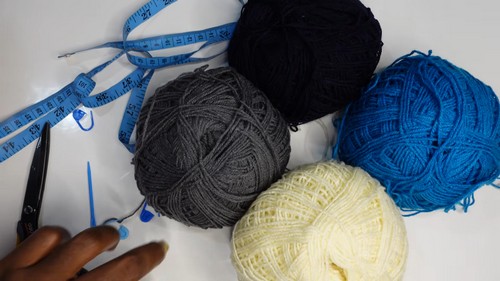
- Medium weight, size 4 acrylic yarn in 4 colors: cream, navy blue, ash or gray, and a fourth accent color of your choice
- 4.5 mm crochet hook
- Stitch markers
- Yarn needle for weaving in ends and seaming
Get to Know This Stitch
The Pattern
Step 1: Front Panel — First Half
- Start with a slip knot and chain 110 chains, which measures approximately 32 inches. This extra length gives you room so the first row finishes at your target width of 26 inches.
Row 1
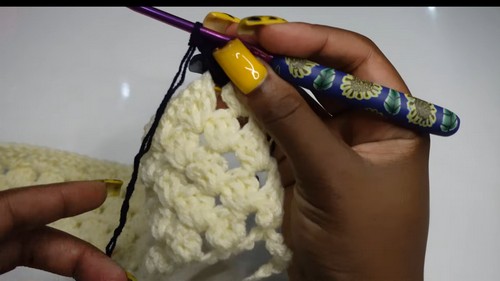
- Yarn over, skip the first 2 chains, and work 3 double crochets into the 3rd chain. The skipped chains count as a double crochet.
- Skip 2 chains, work 3 double crochets into the next stitch.
- Repeat across the row until the work measures 26 inches.
Row 2
- Chain 3 (this counts as a double crochet) and turn your work.
- Work 3 double crochets into each space between the clusters from the previous row, all the way to the end of the row.
- Place a final single double crochet on top of the last stitch.
Row 3
- Chain 3 and turn.
- Work 3 double crochets into each space across the row.
Color Changes and Row Count
- Continue repeating Rows 2 and 3, changing colors as you go. Work 5 rows in cream first, then switch into navy blue and your remaining colors in a structured repeating sequence.
- Complete 21 rows total for a medium to large size. Adjust the row count up or down for other sizes.
- Fasten off at the end of the first half panel.
Step 2: Front Panel — Second Half, and Back Panel
Second Front Half
- Attach yarn and chain 103 chains.
- Work the same row structure as the first half, but use the reverse color sequence so the two halves mirror each other when placed side by side.
- Complete 21 rows and fasten off.
Back Panel
- Work a full, unbroken back panel using the same row structure and total row count as the front panels.
- Continue color changes seamlessly without cutting the yarn at any center division point, so the back reads as one continuous piece.

Step 3: Seaming the Shoulders
- Align the front panels on top of the back panel at the shoulder edges.
- Using cream yarn and working through both layers, join the panels with alternating granny clusters — 3 double crochets worked into the spaces between the panels.
- Fasten off securely on both shoulders.
Step 4: Sleeves and Armholes
Armhole Opening
- Measure 9 inches down from the shoulder seam on each side and place stitch markers to define the armhole opening.
New to crochet and not sure how to read a pattern yet? The video tutorial below will guide you through it step by step, you’ve got this!
Sleeve Construction
- Attach yarn at the armhole marker.
- Work 3 double crochets into each space around the entire armhole opening, joining each round with a slip stitch.
- Continue working in rounds, alternating colors to match your body panel color scheme, for approximately 9 rounds or until the sleeve reaches your desired length.
Cuff Decrease
- On the final rounds, work double crochet decreases across the open spaces to taper the cuff slightly.
- Finish with a round of single crochets around the cuff edge for a clean, tidy finish.

Step 5: Neckline and Borders
Neckline
- Measure and mark the neck opening on the assembled sweater.
- Attach yarn, chain 3, and work 3 double crochets across the neckline spaces.
- Continue for approximately 7 rows, alternating colors to match the body.
- Fasten off.
Bottom Hem Border
- Attach yarn to the bottom hem of the sweater.
- Chain 3 and work 3 double crochets into each space across the entire bottom edge.
- Follow with a final single crochet row along the full bottom border to neaten the edge.
- Weave in all loose ends securely with the yarn needle.
A Few Things Worth Knowing
- Keep both front half panels beside each other as you work the second one. The mirrored color sequence is easy to lose track of mid-row, and catching a mismatch early is far less frustrating than discovering it at the seaming stage. Lay them flat and compare before fastening off.
- When working the sleeves in the round from the armhole opening, the cluster spacing from the body panels becomes your guide. Work into every space consistently and the sleeve will sit evenly. If you find the sleeve pulling or puckering, check that you are not skipping or doubling into any space.
- The neckline border adds 7 rows of structure, which is what gives this sweater its finished, intentional look rather than reading as an unfinished edge. Do not skip it.
FAQ
- How do I adjust the size? Row count controls the length and the starting chain controls the width. The 26-inch width and 21-row count are the medium-to-large reference points. Add rows for a longer body, remove them for a cropped fit, and adjust your foundation chain length for a wider or narrower chest measurement.
- Does the back panel need to be made separately? Yes, but it is worked as a single unbroken piece rather than two halves. The front is split into two mirrored halves with a center division, and the back is one continuous panel that spans the full width. This is what creates the visual symmetry when the panels are seamed at the shoulders.
- Can I use fewer than four colors? Yes. Two or three colors work just as well structurally. Fewer colors simplifies the stripe rhythm and gives a cleaner, more minimal result. The pattern itself does not depend on any specific number of colors — only the visual character of the stripe changes.