A turtleneck collar, a twist cut-out at the chest, and a fitted ribbed waist give this teal top a polished, almost knitwear look far more advanced-seeming than the construction actually is. For another cut-out top with a bolder opening, the cut-out shoulder top pairs the same idea with balloon sleeves.
Crochet Cut-Out Front Top

The body works up in dense rows for a smooth fabric, while the ribbed waistband is added separately to cinch the fit. If you like the fitted long-sleeve silhouette, the front tie long-sleeve top offers a similar body-conscious shape with a different neckline.
Materials
- 4.5 mm hook for the main body
- 2.5 mm hook for the ribbing and collar
- Worsted/aran yarn suited to a 4 mm hook (check your yarn label for the recommended hook range)
- Tape measure for taking body measurements as you go
- Yarn needle for seaming and weaving in ends
Stitch Guide for Easy Crocheting
Sizing & Measurements
This is a made-to-measure pattern rather than a fixed-size one — you build it directly against your own body, so it works for any size. Before starting, take and write down these measurements:
- Shoulder to base of neck (sets the top section width)
- Widest body measurement (bust/hip — you’ll work to half of this per panel)
- Desired finished length (shoulder to where you want the hem to sit)
- Desired ribbing depth (how deep you want the hem band)
- Desired collar height (for the turtleneck)
Pro-Tip — Make a gauge swatch first. Work a small square in single crochet with your 4.5 mm hook, then measure how many stitches and rows fit in 10 cm (4 in). Knowing your stitches-per-inch lets you translate every “measure as you go” instruction into a stitch count you can repeat consistently on both panels.
Front Panel — Top Section

The top section is worked as two shoulder slopes that meet at the neckline.
- Chain a length that runs from the top of your shoulder to the base of your neck.
- Row 1: Single crochet into the back bumps of the chain across.
- Row 2 (increase row): Work two single crochets into the first stitch (this is your increase), then single crochet across the rest of the row.
- Row 3 (plain row): Single crochet across with no increases.
- Continue alternating an increase row and a plain row. This gradual stepping creates the angled shoulder slope, building toward the center neckline.
- Once the slope reaches the center neckline, chain additional stitches to bridge across to the center of your chest.
- Single crochet back across to complete the neckline base.
- If you’re new to reading crochet patterns, don’t worry, just follow along with the video tutorial below and use the written pattern as a reference!
Technique Explainer — Working into the back bumps. The “back bump” is the raised loop on the underside of your starting chain. Crocheting into it gives the foundation edge a clean, braided finish that matches your other rows — a nicer look than working into the front loops.
Creating the Cut-Out
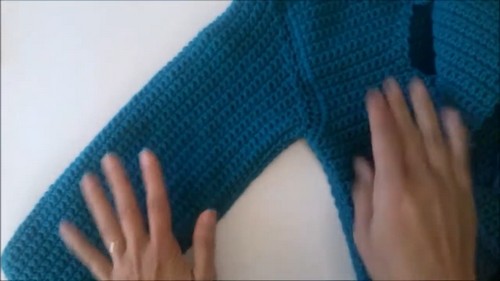
This is the signature keyhole opening at the front.
- Work rows with single crochet decreases at the neckline edge to shape the curve of the opening.
- Continue decreasing evenly to form the front opening, row by row.
- To round the bottom of the cut-out, add a slight increase at the beginning of a row where the curve should soften.
- Chain across to reach the full panel width once the opening is shaped.
- Mirror the shaping on the opposite side so both halves of the neck opening match.
Technique Explainer — Single Crochet Decrease (sc2tog). Insert your hook into the next stitch and pull up a loop (2 loops on hook). Insert into the following stitch and pull up another loop (3 loops on hook). Yarn over and pull through all 3 loops. You’ve turned two stitches into one — that’s what carves the curved edge of the cut-out.
Pro-Tip — Keep the two sides symmetrical. Count the rows and decreases you work on the first side of the opening and jot them down, then repeat the exact same sequence on the second side. Mirroring by count instead of by eye keeps the keyhole even.
Main Body Section
Now the panel grows down from the top section into the full front.
- Attach yarn at the bottom corner of the top section.
- Single crochet across the entire width, including the cut-out chain, so the body reads as one solid panel.
- Increase at the start and end of each row, widening the panel until it reaches half of your widest body measurement.
- Once you hit that width, work straight rows with no shaping until the panel reaches your desired length.
Pro-Tip — Increasing at both edges. Place your edge increase as 2 single crochets into the very first and very last stitch of the row. Working it consistently at both ends keeps the side seams balanced and the widening symmetrical.
Back Panel

The back mirrors the front, minus the cut-out.
- Work two shoulder slopes using the same increase/plain-row method as the front panel.
- Join both slopes with a straight chain across the back neckline.
- Single crochet across the full width.
- Work down to match the body length of the front panel exactly, so the side seams line up.
Pro-Tip — Match by row count, not by tape. Count the total rows in your finished front body and work the back to the same number. Row-matching seams together far more cleanly than measuring each panel separately.
Assembly & Ribbing
- With right sides facing, slip stitch the shoulders together.
- Slip stitch the side seams from underarm down to the hem.

Ribbed Hem
- Attach yarn at the bottom edge and chain your desired ribbing depth.
- Single crochet in back loops only (BLO) along that chain to create the stretchy ribbed texture.
- At the end of each ribbing row, slip stitch into the body edge to anchor the band, then turn and work the next row back. This attaches the ribbing to the hem as you go.
Technique Explainer — Back Loop Only (BLO) ribbing. Working only into the back loop of each stitch leaves the front loops exposed as visible ridges. Stacked row after row, those ridges create the springy, vertical ribbing you want on a hem, cuff, or collar.
Sleeves
- Join yarn around an armhole and single crochet evenly around the opening.
- Work the sleeves horizontally, using increases at the shoulder edge to shape them.
- Repeat for the second armhole.
Turtleneck Collar
- Attach yarn around the neckline and single crochet evenly around the full opening.
- Work back loop single crochet ribbing to build up the turtleneck collar to your desired height.
Pro-Tip — A collar that folds well. Make the collar tall enough to fold over (usually 15–20 cm / 6–8 in worked flat), and check that the starting round is loose enough to slip over your head before you commit to the full height.
Finishing
Weave in all ends with your yarn needle, give the top a gentle steam or wet block to even out the stitches, and try it on to confirm the collar folds and the cut-out sits where you want it.