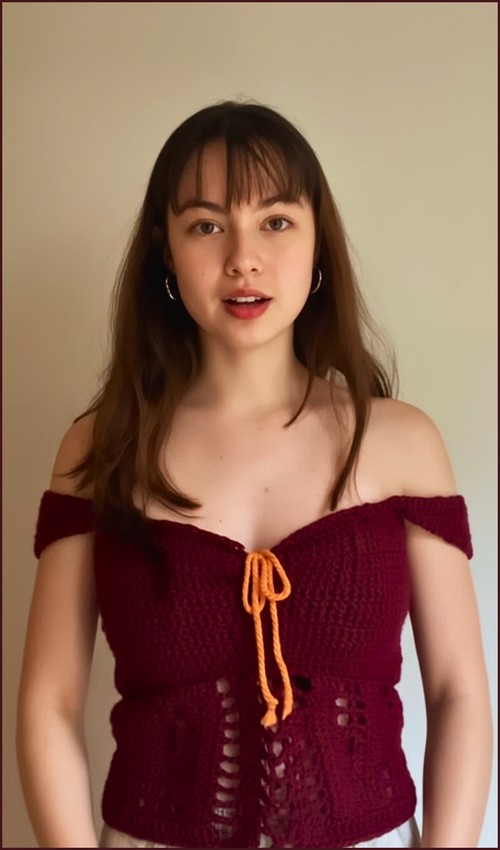
Orange cotton and an open diamond mesh panel make this strapless crop top one of the more visually striking resort-wear pieces in the queue, the solid upper band gives it structure while the lower section opens into a wide triangular mesh that sits over the waistline. The two sections are constructed separately and joined, which means each part is approachable on its own before you bring them together. For another strapless construction with a different open-panel approach, the filet crochet rose tube top handles a similar bandeau-style foundation with a different mesh logic entirely.
Resort Crochet Summer Top

The solid bust band works up first in dense stitches — straightforward rows that give the top its support, then the open mesh triangular panel is built separately and joined at the lower edge. The large diamond cells in the mesh section create an open, airy drape that moves well and keeps the finished top light enough for warm weather. If you want to see the same resort-wear aesthetic in a longer silhouette, the crochet swim cover-up mesh wrap top is a good companion piece.
Materials
- Yarn suitable for summer wear
- Crochet hook appropriate for your yarn
- Scissors
- Tapestry needle
Pattern Instructions
Bra Cups
Make 2
- Create a foundation chain that measures from the side of your breast to the nipple, approximately 18 chains.
- Skip the first 2 chains and work double crochet into each chain across.
- In the last chain, work 2 double crochet, chain 1, and 2 double crochet into the same stitch to form the cup tip.
- Continue double crochet along the opposite side of the foundation chain.
- Chain 2, turn, and double crochet in each stitch until reaching the chain-1 space.
- In the chain-1 space, work 2 double crochet, chain 1, and 2 double crochet.
- Continue working double crochet down the other side.
- Repeat rows until the cup fully covers the breast.

Back Panels
- Attach yarn to the outer edge of each cup.
- Work double crochet into the row spaces along the side edge.
- Decrease on one side only at the start or end of rows to create a diagonal shape.
- Continue until the panel is long enough to allow back tying.
- If you’re a beginner and crochet patterns feel confusing, start with the video tutorial below, it’s the easiest way to learn as you go!
Joining and Edging
- Place the two cups side by side.
- Join the cups at the chain-1 tip spaces using slip stitch or sewing.
- Work single crochet evenly around all outer edges of the top.
- Along the neckline, create shells by skipping 2 stitches, working 5 double crochet in the next stitch, skipping 2 stitches, and single crocheting in the next.

Mesh Bottom
- Attach yarn at the bottom corner of one cup.
- Chain 8, skip 5 stitches, and work 1 double crochet in the next stitch.
- Chain 5, skip 5 stitches, and work 1 double crochet across the bottom.
- At row ends, reduce by chaining 3 and placing a double crochet into the center of the previous chain-5 loop.
- Continue until the mesh forms a point.
- Repeat the same process for the second mesh section, joining it to the first as you work.

Finishing Touches
- Work shell stitches around the lower mesh edge using 5 double crochet in each space.
- Crochet a long chain and lace it through the back panels in a criss-cross style to tie and secure the top.
Deep Guide and Technical Clarity
Understanding the Cup Construction
The cup is worked around both sides of the foundation chain.
This is what creates depth.
- The increase section at the tip
- 2 double crochet, chain 1, 2 double crochet is the shaping engine of the cup.
- That chain 1 space is not decorative. It acts as a pivot point.
- Every row, your increases stack into that space, pushing the fabric outward and forming a natural curve.
- If the cup begins to flare too much, tension is usually the cause.
- If the cup feels tight and flat, check that you are placing all four double crochets into the chain 1 space every row.

Placing a stitch marker in the chain 1 space can prevent confusion as the rows grow.
Fit and Sizing Guidance
- Foundation chain length determines cup width.
- More chains create wider coverage.
- Fewer chains create a narrower cup.
Height is controlled by the number of rows. Continue repeating the increase rows until full coverage is achieved.
The cup should:
- Reach from the underbust to slightly above the nipple
- Sit smoothly without gaping
- Not pull inward at the tip
For fuller bust adjustments:
- Add more foundation chains
- Maintain consistent increases at the tip
For smaller bust adjustments:
- Reduce foundation chain length
- Stop rows earlier once coverage is achieved
The back panels should be long enough to tie comfortably without strain. Always measure while wearing or pinning in place for accuracy.
Back Panel Shaping Explained
The diagonal shaping comes from decreasing on one side only.
This creates:
- A natural angled line toward the center back
- A more flattering silhouette
- Less bulk when tying
Be consistent about which side you decrease on. Switching sides mid-panel will distort the angle.
Working into row spaces instead of stitches helps maintain flexibility and avoids tight edges.
Mesh Bottom Structure
The mesh section creates movement and airflow. The chain spaces form open diamonds that taper into a point.
The reduction step
- Chain 3 and double crochet into the center of the previous chain 5 loop
- gradually narrows the shape without abrupt decreases.
If the mesh begins to curl:
- Loosen chain tension
- Make sure you are placing the double crochet exactly in the center of the loop
Joining the second mesh panel as you work ensures symmetry and avoids bulky seams.
Stitch Clarity
- Double crochet provides structure and moderate drape.
- Single crochet edging stabilizes the entire garment.
- Shell stitches soften the neckline and lower edge, adding visual balance against the geometric mesh.
Even tension throughout is more important than speed. This design relies on clean shaping.
Beginner Notes
This pattern assumes comfort with:
- Working into both sides of a foundation chain
- Identifying chain spaces
- Basic decreasing techniques
- Even edging around corners
If edges ripple, your tension may be uneven. If edges pull tight, consider sizing up your hook for the edging round only.
Troubleshooting
- Cup tip looks too sharp: You may be pulling the chain 1 too tightly.
- Cup looks flat: Check that 2 double crochet, chain 1, 2 double crochet is worked fully into the same chain 1 space each row.
- Back panel twists: Ensure decreases are placed consistently on the same edge.
- Mesh does not taper evenly: Confirm you are reducing at both row ends as instructed.
Finishing Notes
- Blocking lightly can smooth the cup shaping and open the mesh beautifully. Avoid aggressive stretching.
- When crocheting the lacing chain, make it longer than you think you need. A slightly longer tie always looks better than one that just barely fits.
- Weave in ends securely, especially at the cup tips and mesh joins, as these are tension points during wear.