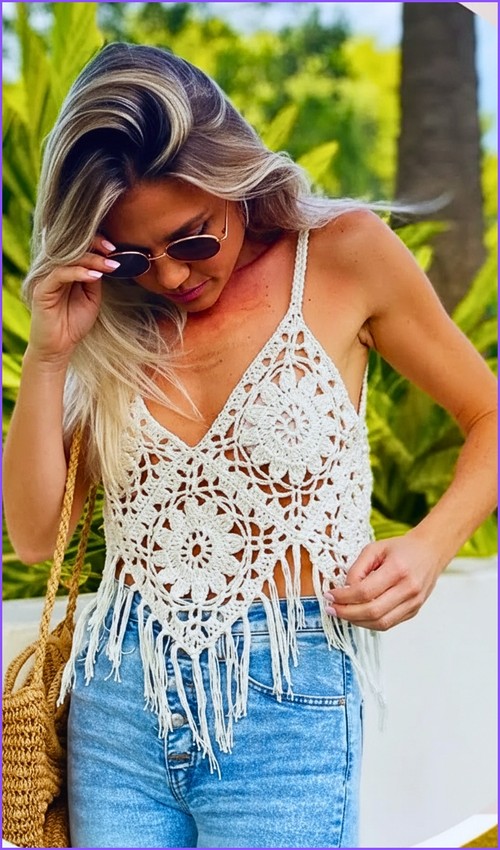
Granny squares joined into a halter top is one of those projects that feels more ambitious than it actually is once the squares are made, the construction is really just arranging and joining, and the fringe hem does the decorative heavy lifting at the end. The two-color layout here, burnt orange borders with white dc clusters, gives each square strong visual definition so the grid reads clearly even at a distance. If you want another take on the granny square top format, this boxy granny square tank uses the same building-block logic with a more relaxed, covered-up silhouette.
Crochet Boho Top Summer

The V-neck shaping comes naturally from how the squares are arranged rather than any complicated decreasing, which keeps this genuinely approachable for someone who’s made a few squares but hasn’t tried garment construction yet. Spaghetti ties at the neck mean fit is adjustable without needing to size precisely. For more fringe-forward summer styling, this fringe crop top is a good companion piece if you’re building out a boho wardrobe.
Materials
- Medium weight DK yarn approximately 1.5 skeins total
- 5.0 mm crochet hook
- Yarn needle
- Scissors
Stitch Guide for This Pattern
Create the Granny Squares
- Start with a magic ring
- Chain 3 to count as the first double crochet
- Work 2 double crochets into the ring
- Chain 1 and work 3 double crochets into the ring
- Repeat chain 1 and 3 double crochets three times to form four clusters
- Chain 1 and slip stitch into the top of the starting chain to close

Stitch clarity
- This round forms a classic four-corner granny square center.
- Each group of three double crochets creates one side, and each chain-1 space becomes a corner.
- Keeping your chain-1 spaces consistent in size helps later rounds sit flat and even.
- If your square starts to twist or pull inward, pause and gently spread the stitches around the ring before closing.
- That small adjustment early on prevents uneven corners later.
- If you’re still learning how to read crochet patterns, no stress! Follow the video tutorial below and use the written pattern below as you get more comfortable!
Second Round of the Square
- Chain 3 and work 2 double crochets into the space directly below
- In each corner space work 3 double crochets, chain 1, and 3 double crochets
- In each side space work 3 double crochets separated by chain 1
Why this round matters
- This round defines the square’s structure.
- The corner increases create the square shape, while the side spaces keep the edges straight.
- Pay attention to placing stitches into the correct spaces rather than individual stitches.
- That keeps the geometry clean as the square grows.
Color Changes and Sizing
- Cut the yarn at the end of a round to change colors
- Join the new color before slip stitching to close the round
- Continue adding rounds until the square reaches the desired size
- Always add rounds in pairs to keep the pattern visually aligned
Color and alignment notes
- Joining the new color before closing the round keeps color changes tidy and avoids visible jumps.
- Adding rounds in pairs helps the square stay visually balanced, especially when using multiple colors or bold contrasts.
- This is a design choice that affects how intentional the finished piece looks, not just how big it becomes.

Layout and Sizing
- Arrange the squares in a diamond layout
- Place one large square for the front and one for the back
- Use smaller squares to fill in the sides
- Measure from peak to peak across the chest to check fit before joining
Fit and sizing guidance
- The diamond layout changes how the top sits on the body.
- Measuring from peak to peak across the chest gives a realistic sense of coverage and width once worn, not just how wide the square looks laid flat.
- If you want more coverage, increase the size of the front and back squares rather than adding more side squares.
- If you want a lighter, more open fit, keep the center squares moderate and let the side squares create shaping.
Joining the Squares
- Align the clusters so stitches match evenly
- Thread yarn onto a needle
- Sew squares together using whip stitch or mattress stitch through the top loops
- Secure and weave in all loose ends on the wrong side

Joining clarity
- Matching clusters instead of just edges keeps the fabric from twisting.
- Whip stitch gives a slightly decorative ridge, while mattress stitch creates a flatter seam.
- Working through the top loops only keeps the join flexible, which is important for a summer garment that needs movement.
Adding the Straps
- Cut six strands of yarn approximately 50 inches long
- Fold strands in half to create equal lengths
- Loop the folded ends through the top front corner and pull tails through to secure
- Divide strands into three sections and braid to desired length
Strap strength and comfort
- Using multiple strands and folding them in half doubles the thickness at the anchor point, which helps prevent stretching over time.
- Braiding adds structure without stiffness, making the straps comfortable while still supportive.
Optional Finishing Touches
- Cut 10 inch yarn pieces for fringe
- Pull loops through the bottom edge and secure tassels
- Criss cross the braided straps at the back
- Tie straps through the back peaks for adjustable fit

Finishing notes
- Fringe adds weight and movement, which helps the top hang nicely instead of riding up.
- Criss-crossing the straps at the back shifts some support away from the neck and allows easy adjustment for different body shapes.
Beginner Notes
- Keep your tension relaxed when working chain spaces so the square stays flat.
- Count clusters, not stitches. Granny squares rely on groups, not exact stitch numbers.
- Lay squares flat after every round to catch curling early.
Troubleshooting
- Square curling or waving: This usually comes from tight chains or missed corner spaces. Check that every corner has a chain-1 between the two clusters.
- Uneven sizing between squares: Use the same hook and yarn for all squares and measure after each pair of rounds.
- Top feels narrow across the chest: Increase the size of the front and back squares rather than pulling the straps tighter.
Final Fit Check
- Before fully securing straps and fringe, try the top on and adjust strap length and back placement.
- Small changes here make a big difference in comfort and how the top sits when worn.
- This approach keeps the pattern flexible while letting the design details do the work.