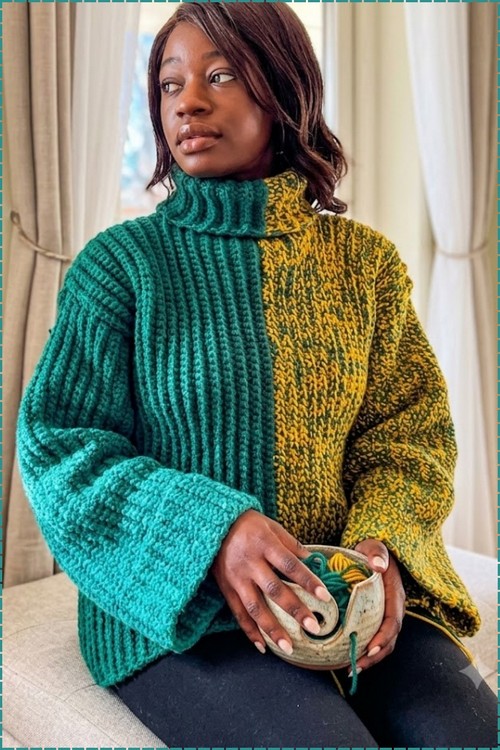
Half and half colour blocking turns a crochet turtleneck sweater into something nobody else in the room is wearing. Working top down means you can stop the sleeves and body exactly where you want them, and two contrasting balls of yarn do the rest.
Top down construction means the turtleneck is the very first thing you work, so the collar shaping is locked in before the body ever begins. Starting there also lets you try the sweater on as you go, which takes most of the guesswork out of fitting a garment this substantial. The color split between solid teal and a green gold marled yarn is doing a lot of the design work here without adding any complexity to the actual stitching.
Top Down Crochet Turtleneck Sweater

The ribbing runs consistently from the neck all the way through the sleeves and body, giving the finished piece that dense knit like texture that reads as considerably more advanced than it is. Bell shaped sleeve hems flare out at the wrist rather than being cuffed, which keeps the silhouette from feeling too boxy despite the generous fit. Wide and oversized with that much vertical rib detail, this lands in the same cozy category as a customizable oversized sweater.
Materials and Tools
- T-yarn (100% acrylic, 100 gram balls) — the original doubles the yarn for extra thickness. You can also use a single strand of chunky or thick yarn to achieve a similar effect.
- A 6 mm crochet hook
- Tapestry needle
- Stitch markers
- Measuring tape
Helpful Crochet Technique
Difficulty and Time
This is a true beginner project. The only stitch is single crochet — both for the body and the sleeves. The back-loop-only technique used on the body and turtleneck is the one new skill, and it’s easy to learn in the first few rows. The most focused steps are the sleeve attachment (which takes a little patience) and the seaming. Everything else is calm, repetitive, and very forgiving.
Beginner Technique Notes
Here’s a close look at every technique before you start:
- Single crochet: The shortest, simplest stitch in crochet. Insert hook, pull up a loop (2 loops on hook), yarn over and pull through both loops. That’s the entire stitch used for this whole project.
- Back loops only (blo): Every stitch has two loops at the top forming a “V.” The back loop is the one farther from you. Working into only that loop leaves the front loop free, which creates the stretchy, ridged ribbing texture you can see running down the body and turtleneck. This is what makes the sweater look knitted.
- Turning chain: At the end of every row, chain 1 and turn your work before starting the next row. The chain 1 lifts the yarn to the right height — it doesn’t count as a stitch here.
- Measuring as you go: This pattern is sized entirely to your own body. Your shoulder-to-shoulder measurement sets the foundation chain length; your preferred width sets the row count. Keep your measuring tape handy throughout.
- The built-in turtleneck: Instead of making a separate collar and attaching it, you simply chain extra stitches at the turtleneck section and work back across both the extension and the main body in the same row. The turtleneck grows naturally out of the panel. Tip: mark the turtleneck section with a stitch marker so you always know where the body ends and the collar begins.
- Doubling the yarn: Working with two strands held together gives extra warmth, thickness, and body without needing a heavier yarn weight. If you do this, thread both strands onto the hook and treat them as one throughout.
- Seaming with a tapestry needle: Threading yarn onto a needle and sewing loop-to-loop through both layers joins the panels at the shoulders and sides. Keep the tension even and the seam will be nearly invisible. You can also use slip stitches with your hook if you prefer a crocheted seam.
- Building the sleeve into the armhole: Instead of making a separate sleeve and sewing it on, this pattern builds the sleeve row-by-row directly onto the armhole opening. You chain the sleeve length, work back toward the body, and attach each row with a slip stitch into the armhole edge. Tip: this feels a little strange at first — just go slowly and the attachment rhythm will click after a few rows.
- Front loops for the sleeve: The body uses back loops only, but the sleeve rows are worked through the normal (front/both) loops. This is intentional — the different texture keeps the sleeve from feeling too stiff.
The Pattern
Two identical front/back panels with built-in turtleneck extensions are seamed together, then sleeves are built directly onto the armhole openings. Everything is single crochet.
If you’re a beginner and crochet patterns feel confusing, start with the video tutorial below, it’s the easiest way to learn as you go!
Step 1: Taking Measurements and the Main Body Panel
- Measure: Take your shoulder-to-shoulder measurement. (The example in the tutorial uses 50 cm.)
- Foundation chain: Make a slip knot and chain long enough to match your shoulder measurement. (Double your yarn here if you want extra thickness.)
- Row 1: Chain 1, skip the first loop, and work a single crochet into the second loop and all the way across the chain.
- Row 2 and onward: Chain 1, turn your work, and continue working single crochets in the back loops only.
- Continue this ribbed pattern until you reach 20 rows, or your preferred width.

Step 2: Incorporating the Turtleneck
- When you reach the turtleneck section, chain extra stitches to extend the length for the neck. (The tutorial uses 21 extra chains.)
- Chain 1, skip the first loop, single crochet back down the chain, and then continue working single crochets in the back loops across the main body as usual.
- Make the turtleneck section slightly longer than the body — roughly 22 to 24 rows — to ensure proper head space.
- Use a stitch marker to track your measurements as the turtleneck grows.
- Complete two identical panels using this method. (You can mix yarn colors between the panels if you like.)
Step 3: Seaming the Body
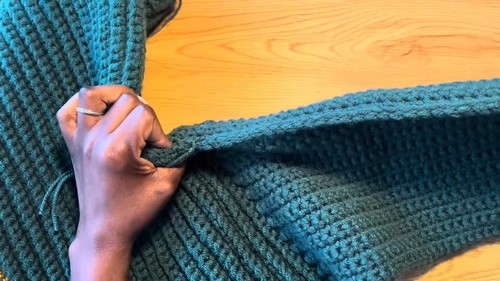
- Lay your two panels together.
- Using a tapestry needle (or slip stitches with your hook), sew the shoulder and side seams together securely, working loop-to-loop and row-to-row to keep the alignment neat.

Step 4: Arm Separation and Sleeves
- Mark off the arm openings using stitch markers along the side seams.
- Attach your yarn at the underarm.
- Chain your desired sleeve length. (The tutorial chains 61 stitches.)
- Chain 1, skip the first loop, and work single crochets back down the chain toward the body.
- At the edge of the body opening, join the row to the body using a slip stitch, then slip stitch into the next loop on the body to start the next row, and turn your work.
- For subsequent sleeve rows, work through the front/normal loops (not back loops only) with single crochets across, joining to the body at the end of each row.
- Continue this back-and-forth row technique, building the sleeve directly onto the armhole until it is fully formed.
- Repeat the entire process for the second sleeve.
Step 5: Finishing
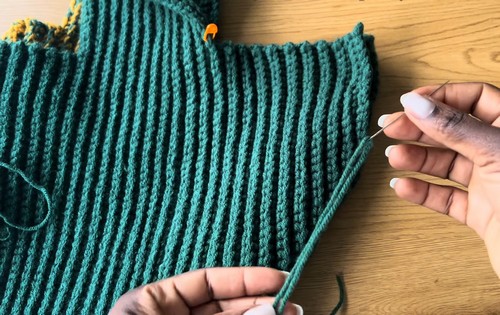
- Seam the bottom of each sleeve closed using a slip stitch or tapestry needle.
- Weave in all loose ends securely.
Tips and Troubleshooting
- Make both panels before seaming. Completing both panels in one session — especially if you’re mixing colors — ensures they come out the same row count. It’s much easier to compare them side by side before you start sewing.
- Go slowly on the sleeve attachment. The first couple of rows attached to the armhole feel unfamiliar. Slip stitch into the body edge deliberately, one stitch at a time, and the rhythm will settle in quickly.
- Use stitch markers generously. Mark the turtleneck start, the armhole openings, and the row-count midpoints on both panels. It takes 30 seconds and prevents a lot of confusion mid-project.
- Check your collar length before finishing the panels. Hold the turtleneck section up against your neck and check that 22 to 24 rows gives you enough room to fold over comfortably. Adjust now rather than after seaming.
- Keep your seaming tension even. Whether you sew with a tapestry needle or use slip stitches, pulling the joins too tight will make the seam pucker and the sweater will pull at the shoulders. Aim for relaxed, consistent tension.
Yarn Substitution
T-yarn is a thick, t-shirt-style yarn that gives this sweater its substantial, casual body. If you don’t have it, any chunky or bulky yarn works — or you can double a worsted weight as the original suggests. The key is matching the gauge to the 6 mm hook so the ribbing stays stretchy. Avoid very stiff fibers, since the back-loop-only ribbing needs a bit of natural give to look right.
Frequently Asked Questions
1. I’ve never made a garment before — will I really be okay with this? Yes. Every stitch is single crochet. You’re making rectangles, seaming them, and attaching rows for the sleeves. Nothing here requires shaping intuition or complex technique — just counting rows and following the steps in order.
2. What does “back loops only” mean and why does it matter? When you look at the top of any stitch, there are two loops. The back loop is the one facing away from you. Working into just that one loop leaves the front loop visible as a little ridge on the right side, which is what creates the soft ribbed texture. If you work into both loops, you get a flat, dense fabric instead of ribbing.
3. How do I know when my turtleneck is long enough? Hold the panel up and fold the turtleneck section over at roughly the halfway point. If it covers the base of your neck and feels comfortable without being tight, it’s the right length. The 22 to 24 row guideline is a starting point — adjust up or down based on your preference.
4. Why are the sleeves built onto the body instead of made separately and sewn on? It’s a construction shortcut that many newer garment crocheters love. Instead of making a separate tube and then trying to fit and seam it into the armhole, you build the sleeve fabric row-by-row directly from the armhole edge. The result is a connected, integrated sleeve with no gap or seam at the join.
5. My two panels came out slightly different sizes — can I still seam them? Yes, usually. If one panel has a row or two more than the other, you can ease the extra slightly when seaming by distributing the slack across the whole seam length. The ribbed fabric is forgiving. If the difference is significant (more than 5 or 6 rows), it’s worth unraveling and remaking the shorter one to match.