Grooms pull on mens crochet sweater vests for rehearsal dinners, then wear them straight through winter. Mens sleeveless sweaters in navy or oatmeal yarn work just as well as grey over a linen shirt on summer evenings.
Grey sweater vest is one of those pieces that layers over almost anything, and this one earns its place through the body texture rather than any decorative detail. The V neck is clean and deep enough to wear over a shirt collar, and the ribbed hem gives it enough structure at the base to sit flat. Anyone who has already worked a sleeveless top for men will find this version more minimal in construction but denser in fabric weight.
Sleeveless crochet Sweater For Men

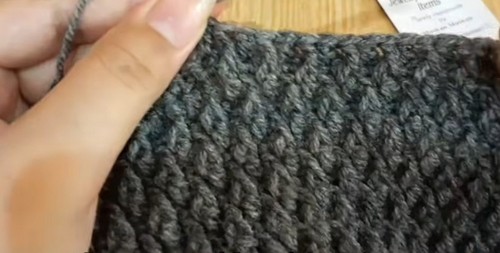
The body stitch runs in an allover pebbled pattern that reads as solid from a distance but has enough surface variation to hold visual interest up close. There are no seams across the shoulders, so the armhole shaping comes entirely from decreases worked into the flat panels. The ribbed hem and armhole edging are worked last and pull everything in cleanly at the edges.
Materials and Tools
- 300 grams of wool yarn
- A 3 mm crochet hook
- Tapestry needle for seaming the cuff
- Stitch markers
Learn the Stitch Before Beginning
Difficulty and Time
This is an intermediate project. The cuff requires patience (92 rows of back-loop single crochet), and the alpine stitch body asks you to track which row you’re on and offset the front post stitches correctly. Neither is technically complex, but they reward consistency. The body grows steadily once the stitch rhythm is established.
The Stitches and Techniques (with tips as you go)
- Back loop only single crochet (cuff): Every cuff row after Row 1 uses only the back loop of each stitch — insert your hook under the back loop only (the loop farther from you). This is what creates the characteristic stretchy ribbed texture. Tip: the first and last stitch of every cuff row are easy to miss — make sure you’re working into them rather than past them, or the cuff strip will gradually narrow.
- The cuff strip construction: The cuff is built as a long flat strip, then seamed at the short ends to form a tube. The 92-row strip is what produces the ribbed band, and picking up stitches around the tube sets your body stitch count. Tip: use a length of contrast yarn or stitch markers to mark every 10 rows as you build the cuff — it’s easy to lose count over 92 rows.
- Front post double crochet (FPdc): Instead of inserting your hook into the top loops of the stitch, you insert it around the vertical post of the stitch below — from front to back to front. This pulls the stitch forward and raises a ridge on the right side of the fabric. Tip: keep your front post stitches slightly looser than your regular double crochets — FPdc stitches naturally want to pull tight, and if they’re too firm the body fabric will bunch.
- The alpine stitch offset: Rows 2 and 6 are identical (front post, double crochet pattern). Row 4 shifts the front post stitches by one position (double crochet, front post pattern), which is what creates the woven diagonal effect rather than simple vertical columns. The single crochet rows between (Rows 3 and 5) act as separators that reset the height between pattern rows. Tip: if your alpine texture isn’t forming diagonal lines, check that Row 4 is genuinely offset from Rows 2 and 6 — the pattern only works if all three alpine rows differ in starting position.
- Armhole shaping: The armholes are created by slip stitching across the armhole position (to anchor and step over that section without adding height), skipping 8 stitches, and continuing the pattern. This is worked on both sides symmetrically. Tip: mark your armhole positions with stitch markers before you start the shaping row so you know exactly where to begin and end the skip on each side.
The Pattern
Note: This pattern covers the cuff and body up to the armhole split. Shoulders, neckline, and sleeve construction are covered in Part 2.
The Cuff (Worked Flat, Then Seamed)
The cuff is a long flat strip worked in back-loop single crochet, then seamed at the short ends to form a ribbed tube.
- Foundation: Chain 15.
- Row 1: Skip 1 stitch, work 1 single crochet into each stitch across.
- Row 2: Chain 1, work 1 single crochet into each stitch through the back loop only.
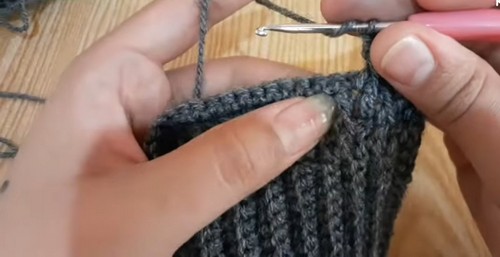
- Row 3: Chain 1, work 1 single crochet into each stitch through the back loop only.
- Row 4: Repeat Row 3.
- Repeat Row 4 a total of 88 more times (92 rows total).
- Seam the completed strip at its short ends to form the ribbed cuff tube.
The Body (Picked Up from the Cuff, Worked in Rounds)
Pick up 92 stitches around the cuff and work the body in rounds.
- Row 1: Chain 3, work 1 double crochet into each stitch across. (92 stitches.)
- Row 2: Chain 3. Work 1 front post double crochet, then 1 double crochet, 1 front post double crochet, and repeat this sequence across the row.
- Row 3: Chain 1, work 1 single crochet into each stitch across.
- Row 4: Chain 3. Work 1 double crochet, then 1 front post double crochet, 1 double crochet, and repeat across (this is offset from Row 2 to create the woven alpine effect).
- Row 5: Chain 1, work 1 single crochet into each stitch across.
- Row 6: Chain 3. Work 1 front post double crochet, then 1 double crochet, 1 front post double crochet, and repeat across (same as Row 2).
- Continue repeating Rows 3 through 6 until the body reaches your desired length to the underarm.
If you’re a beginner and crochet patterns feel confusing, start with the video tutorial below, it’s the easiest way to learn as you go!
Armhole Shaping
When the body reaches your desired underarm length:
- Step 1: Work 8 slip stitches across the armhole position.
- Step 2: Skip 8 stitches to create the first armhole opening.
- Step 3: Continue in pattern across the remaining stitches.
- Step 4: Repeat the same slip stitch and skip sequence on the other side to create the second armhole.
Continue to Part 2 for the body completion above the armholes, shoulder shaping, neckline, and sleeves.

Pattern Notes
- The alpine stitch alternates front post double crochet and regular double crochet columns across rows, creating a ribbed knit-look texture.
- The single crochet rows (Rows 3 and 5) act as separator rows between the post stitch pattern rows.
- Rows 2 and 6 are identical; Row 4 offsets the front post stitches to create the woven alpine effect.
- Stitch count remains 92 throughout the body.

Yarn Substitution
The pattern specifies wool on a 3 mm hook, which gives the alpine stitch its firm, defined structure and the cuff ribbing its stretch and body. Wool is a genuinely good choice here — it holds the front post stitches clearly and the cuff will have natural elasticity. A wool-acrylic blend is a reasonable substitute that keeps most of the structure while being easier to care for. A pure acrylic at the same weight will work but tends to give a slightly softer result where the front post ridges are less defined. Whatever you choose, swatch the alpine repeat at this gauge before committing to the full body.

Frequently Asked Questions
- 1. What is Part 2 and where can I find it? Part 2 covers everything after the armhole split: completing the body panels above the armholes, shaping the shoulders, shaping the neckline, and constructing the sleeves. This is Part 1 only — the original tutorial is a two-part series. Look for Part 2 from the same creator to complete the full sweater.
- 2. Why is the cuff built as a flat strip instead of worked in the round from the start? Working the cuff flat and then seaming it lets the back-loop-only ribbing run perpendicular to the body — which is what produces the classic vertical rib texture on the finished cuff. If you worked it in the round, the ribs would run horizontally. The strip method gives a cleaner visual match to the knit-look body.
- 3. How do I know when the body is long enough to start the armhole shaping? Hold the work up to your body and measure from the cuff top to where you want the underarm to sit. The pattern doesn’t specify a fixed length because arm length and torso proportion vary — use your own body or a well-fitting sweater you already own as the reference.