
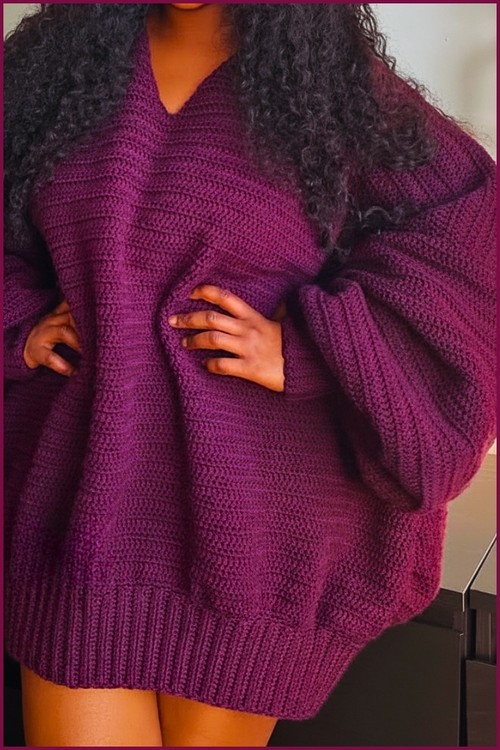
An oversized v-neck sweater in a deep berry tone is the kind of piece that bridges the gap between autumn layering and a statement make, the volume is intentional, and the knit-look texture makes it hard to believe it’s crocheted. The hdc-in-the-third-loop stitch creates those clean horizontal ridges that read as knit ribbing across every row of the body and hem. If you’re building out your crochet sweater collection, the cropped crochet sweater for beginners is a good companion piece at a smaller scale.
Crochet Oversized Knit Top

The set-in sleeve construction gives this top a more tailored fit through the shoulder than a drop-shoulder build, the sleeves sit where they’re supposed to rather than sliding down. It’s a slightly more structured sew-up process, but the payoff is a garment that drapes and wears like a premium knit. For a cozier long-sleeve option with a different construction, the long-sleeve wrap top is worth bookmarking for cooler months.
Materials and Tools
- Medium weight yarn, Weight 4 — amount will vary depending on your finished length
- 3.5 mm crochet hook (main body and sleeves)
- 3 mm crochet hook (sleeve cuffs)
- Measuring tape
- Stitch markers
- Yarn needle
Difficulty and Time
Skill level: Intermediate Estimated time: 10–15 hours depending on yarn choice and working speed Good for: Makers comfortable with half double crochet, double crochet, back-loop-only rows, and basic seaming. V-neck shaping involves simple decrease work but nothing that requires advanced skill.
Beginner Technique Notes
- Back loops only (BLO): When a row says to work in the back loops only, insert your hook into the loop farthest from you rather than through both loops. This is what creates the knit-ribbing effect — do not skip it or the texture disappears.
- Half double crochet (HDC): Yarn over, insert hook, yarn over and pull through, yarn over and pull through all three loops. This stitch sits between a single crochet and a double crochet in height.
- Double crochet (DC): Yarn over, insert hook, yarn over and pull through, yarn over and pull through two loops, yarn over and pull through remaining two loops.
- Seaming with single crochet: Holding the two pieces with right sides facing and edges aligned, work single crochet through both layers at once. This creates a neat, slightly visible seam on the inside that also adds structure.
The Pattern
Bottom Ribbing — Front and Back Panels (Make Two)
- Create a slip knot and chain 21.
- Work half double crochet across for a total of 20 stitches.
- Continue working every following row in half double crochet through the back loops only.
- Repeat rows until the ribbing panel reaches 70 rows, or approximately 24.5 inches wide.
- Make two identical ribbing panels — one for the front and one for the back.

Main Body — Back Panel
- Chain 1 and work single crochet evenly along the long edge of the ribbing to begin the body.
- Use an increase pattern of one single crochet in the first space and two single crochets in the next space, alternating across the row.
- Chain 1, turn, and work double crochet in every stitch.
- Continue working double crochet rows without any further increases until the panel reaches your desired length.
- The sample back panel measures approximately 65 rows or 32 inches in length.
- Reading crochet patterns can be tricky when you’re just starting out, feel free to follow the video tutorial below instead!

Front Panel and V-Neckline
- Work the front panel exactly like the back panel for the first 50 rows.
- Fold the panel in half to locate the center stitch and mark it with a stitch marker.
- Begin shaping the V-neckline by skipping the first stitch at the center edge when you reach that point.
- On return rows, crochet the last two stitches together to create a decrease at the center edge.
- Continue decreasing at the center edge every row for 15 rows.
- Fasten off the first side, then reattach your yarn to the other side of the V and repeat the same shaping steps.
Sleeves — Make Two
- Using the 3 mm hook, chain 21 and work half double crochet in the back loops only across all rows.
- Continue until the cuff fits comfortably around the wrist — approximately 23 rows.
- Slip stitch the two short edges together to form a closed cuff circle.
- Switch to the 3.5 mm hook and work single crochet evenly around the open edge of the cuff.
- Chain 3 and work two double crochets into every stitch around for the first increase round.
- Work the second increase round by alternating one double crochet and two double crochets in each stitch.
- Continue working one double crochet in every stitch without increases until the sleeve reaches your desired length.

Assembly
- Place the front and back panels together with right sides facing each other.
- Single crochet across both shoulder seams to join the panels at the top.
- Measure the width of one sleeve at its top edge and leave that measurement as an open armhole space at the top of each side seam.
- Single crochet the side seams closed below the armhole openings.
- Turn the top inside out and insert each sleeve into the armhole with right sides together.
- Single crochet around the full armhole opening to attach each sleeve.
- Weave in all loose ends with a yarn needle.
Tips and Troubleshooting
- Keep your BLO tension consistent. The ribbing can tighten up if you crochet back-loop-only rows more snugly than your normal tension. Check your gauge after the first 10 rows so both panels match before you commit to 70 rows each.
- Mark your center stitch before you start the V. It sounds obvious, but finding it mid-row is frustrating. Place a locking marker before you even begin row 51 so you know exactly where to split.
- Match your increase rounds on both sleeves. Work both sleeves side by side if possible, so the stitch counts stay identical. It prevents the “one sleeve slightly bigger” problem at assembly.
- Press or block the ribbing panels before seaming. Even a light steam helps the BLO ribbing relax into its final shape and makes seaming far cleaner and more even.
- Single crochet seaming is not decorative here — it is structural. Work it firmly and evenly, especially at the armhole, so the sleeves hang correctly when worn.
Yarn Substitution
This pattern works beautifully in any smooth, medium-weight yarn with a bit of natural drape. Cotton blends and acrylic-cotton mixes tend to give the clearest stitch definition in the BLO ribbing. If you want more stretch and recovery in the ribbing, a yarn with a small percentage of nylon or elastane will help it snap back. Avoid anything too fuzzy or textured — the BLO ribbing effect disappears quickly in bouclé or mohair-type yarns and you will lose the whole look of the piece.
Customization Ideas
- Shorten it to a crop top by reducing the total row count on the front and back panels. Even trimming 15–20 rows shortens the body considerably.
- Make the sleeves long or short — the pattern works the sleeve to any length before fastening off, so a sleeveless or 3/4 version is completely achievable.
- Add a crocheted neckline trim by working a round of single crochet around the V-neck opening after assembly for a cleaner finished edge.
- Try a color-block version by switching colors partway through the body or working the sleeves in a contrasting color.
FAQ
1. What does “work in the back loops only” mean, and why does it matter so much here? When you crochet through only the back loop of each stitch — the loop farthest from you — you leave the front loop exposed, which creates a raised horizontal ridge on the surface. Over many rows, this stacks into a texture that closely resembles knit ribbing. It is the entire reason this top looks knitted rather than crocheted, so it is not a step to skip.
2. The pattern says “work to your desired length.” How do I know what that means for me? Start by measuring a garment you already own and love the length of. For an oversized top, most makers find 26–32 inches from shoulder to hem works well depending on height and preference. The sample measures around 32 inches on the back panel. Hold your work up against your body as you go — this is the most reliable method.
3. My two ribbing panels came out different sizes. What should I do? Block them both before seaming. Wet blocking or steam blocking will allow you to coax them to the same measurement. If the difference is significant, it is worth counting your rows — one panel may have more rows than the other, which will affect how the body hangs after seaming.
4. Can I make this in a different yarn weight? Yes, but adjust your hook size accordingly. If you move to a bulky weight yarn, the fabric will grow faster but the ribbing will be thicker and less fine. A DK or light worsted will give a more refined look and finer ribbing texture. Always swatch first when changing weight, since the increase formula in the body is based on stitch spacing rather than a fixed count.
5. Do I need to block this after finishing? It is strongly recommended. The ribbing and the double crochet body behave differently before and after blocking, and seamed pieces in particular benefit from a good block to help the fabric settle evenly. A light steam press on a flat surface is enough for most acrylic and acrylic-blend yarns.


