
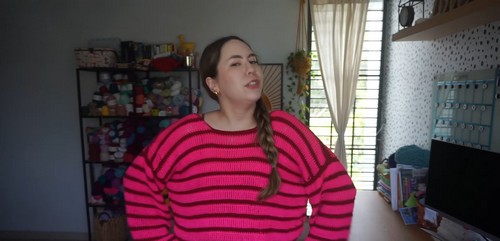
This is a two-panel crochet top built around a repeating stripe of half double crochet rows and extended tall stitches. It works up in two colors, features set-in sleeves with a drawstring cuff detail, and comes together with simple slip-stitch seams.
Crochet Oversized Top 

If you want a relaxed, wearable garment with some visual texture and a bit of structural interest, this is a solid project. It’s suited for makers who are comfortable with tension control and basic garment construction — not a first-project piece, but very manageable if you’ve made a flat panel before.
Materials & Tools
- Worsted weight yarn in two colors (amount depends on your gauge and size; swatch first)
- 4.5 mm crochet hook
- Scissors
- Yarn needle
- Stitch markers

Technique Notes
- The stitch repeat: This top runs on a 3-row cycle — two rows of hdc, then one row of extended tall stitches. The tall stitch is worked by yarning over 4 times before inserting the hook, then working off 2 loops at a time until the stitch is complete. It creates a long, column-like texture that contrasts with the denser hdc rows.
- Color changes: Always change color on the final pull-through of the last stitch in the row — not at the beginning of the next row. This keeps your color lines clean. You’ll alternate between your two colors every time a tall stitch row completes.
- The turning chain on tall stitch rows: After every tall stitch row, your next row begins with a ch 1 and hdc. Don’t forget to work the final hdc of that row into the top of the turning chain from the tall row — it’s easy to miss and will leave a gap at the edge.
- Tension: Keep it even throughout. The tall stitches are naturally looser than hdc, so consciously maintain consistent yarn tension as you work them off. Uneven tension here shows more than in a flat stitch pattern.
- Neckline shaping: This is worked by decreasing one extended tall stitch across two stitches every other row along the neckline edge of each shoulder. Mark your center stitch before you begin — it’s much easier than counting from the edge each time.
- Sleeves: Work these before assembly. They use the same 3-row repeat as the body panels, so your tension and color rhythm should already be established by the time you get to them.
- Drawstring cuffs: The drawstring is a chained cord with a popcorn stitch at each end. Weave the plain end through the sleeve cuff openings before attaching the second popcorn. The finished cuff can be worn gathered or flared — either works structurally.
Pattern Notes
- Make two identical body panels.
- Work two rows of half double crochet followed by one row of extended tall stitches.
- Change colors at the final pull-through of the last stitch.
- Keep tension even throughout.
- Place the final hdc into the top of the turning chain after every tall stitch row.
- Sleeves are worked separately before assembly.
The Pattern
Body Panels — Make 2
Foundation
- Make a slip knot. Chain 93.
Row 1
- Work 1 hdc into the second chain from the hook. Work 1 hdc into every remaining chain across.
Row 2
- Chain 1. Turn. Work 1 hdc into every stitch across. Change to the second color on the final pull-through of the last stitch.
- Reading crochet patterns can be tricky when you’re just starting out, feel free to follow the video tutorial below instead!
Row 3
- Chain 6. Turn. Yarn over 4 times. Insert the hook into the next stitch. Pull up a loop. Yarn over and pull through 2 loops repeatedly until the stitch is complete. Repeat across the row. Change back to the first color on the last stitch.
Repeat Pattern
- Repeat Rows 1 through 3. Continue until you complete 9 tall stitch rows, or your desired length.

Neckline Shaping
- Fold the panel in half to locate the center. Mark the center stitch. Count 8 stitches to the left and 8 stitches to the right. Place stitch markers on the ninth stitch on both sides.
First Shoulder
- Work the stitch pattern to the neckline marker. Decrease by working one extended tall stitch across the next two stitches. Continue working the shoulder. Repeat the decrease every other row. Continue until the shoulder reaches your desired height. Fasten off.
Second Shoulder
- Join yarn on the opposite side. Repeat the same shaping. Decrease every other row along the neckline edge. Fasten off.
Sleeves — Make 2
Foundation
- Make a slip knot. Chain 71.
Sleeve Panel
- Work the same 3-row stitch repeat as the body panels. Continue until you complete 9 tall stitch rows. Fasten off.

Drawstring — Make 2
- Chain until the cord measures approximately 25 inches. Create one popcorn stitch at one end. Fasten off.
- Weave the plain end through the sleeve cuff openings. Attach yarn to the opposite end. Crochet a matching popcorn stitch. Pull the drawstring to create either a bell sleeve or a gathered cuff.
Assembly
- Place the front and back panels together with right sides facing. Slip stitch or single crochet across both shoulder seams. Leave the neckline opening unworked.
- Open the body flat. Match the center of each sleeve with the shoulder seam. Slip stitch each sleeve evenly to the arm opening.
- Fold the garment with wrong sides facing out. Slip stitch from the sleeve cuff through the underarm. Continue slip stitching down each side seam. Turn the garment right side out.
Neckline Border
- Attach yarn to the neckline. Work 1 single crochet into each stitch around the entire neckline. Join the round. Fasten off.
- Weave in all remaining yarn ends.
Customization Ideas
- Sleeve length: The sleeve chain count controls width, not length — length comes from the number of 3-row repeats. Add or remove repeats to adjust.
- Crop vs. full length: Reduce body panel repeat count for a cropped silhouette; add repeats for a longer tunic fit.
- One color version: Skip the color changes entirely for a cleaner, monochrome look. The tall stitch texture still reads clearly in a single color.
- Cuff style: The drawstring can be omitted if you prefer a simple, open sleeve hem — just fasten off after the last row without finishing the cuff opening.

Yarn Substitution
Worsted weight is specified for a reason — the tall stitch structure needs enough body to hold its shape. A bulky substitution will make the stitches sloppy; a DK or light worsted will make the garment drape too thin for the silhouette to work. Stick within the worsted range and choose something with some fiber content (a cotton-acrylic or cotton-blend works well for a wearable top). Pure acrylic in worsted is fine if you want stretch and easy care.
FAQ
Can I make this without doing the neckline shaping? Not recommended — the shoulder shaping is what gives the neckline its opening. Without the decreases, both panels will be identical rectangles and won’t form a wearable neck opening when seamed.
The tall stitches look uneven in my swatch. What am I doing wrong? Usually tension. Yarning over 4 times creates a lot of wraps on the hook, and if you pull the yarn too tight between each “yarn over and pull through 2 loops” step, the stitch compresses unevenly. Try to keep each pull-through at a consistent, slightly relaxed tension.
Do I have to use the drawstring cuffs? No. The drawstring is a design detail, not structural. If you want a clean cuff edge, just finish the sleeve panel with a row of sc and fasten off.


