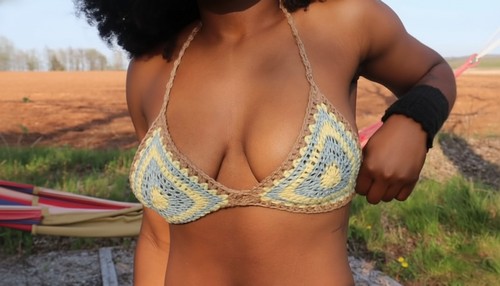
The combination of solid shaped cups and an open filet band below is what gives this bikini top its structure the cups hold their shape while the band stays light and breathable, and the contrast between the two zones is part of what makes it photograph so well. Tassel ends on the halter ties are a small styling choice that lifts the whole thing into beach-ready territory. For another shaped-cup bikini top with a different edging approach, the red bikini top with picot edging makes a nice side-by-side comparison.
Crochet Beach Top

The open band rows use a v-stitch structure that’s beginner-friendly to work but creates that airy horizontal stripe you’d expect from a more complex pattern. It works in both the rust terracotta and the grey-beige shown here two completely different moods from the same construction. If you want to explore the v-stitch further before starting, the v-stitch tutorial walks through the repeat in detail.
What This Pattern Creates
- This pattern builds two shaped cups first, then connects them with a flexible lace-up band.
- The cups are worked flat with a center increase that forms a natural triangle shape, making the fit adjustable and forgiving.
- The mesh band keeps the back lightweight and breathable while allowing easy size adjustments.
This is a made-to-measure design, so accuracy in measuring and consistency in stitch placement matter more than strict stitch counts.
Skill Level and What You Should Know
This pattern is beginner-friendly for crocheters who are comfortable with:
- chaining evenly
- working double crochet
- identifying front loops and back loops
- counting rows
If you have never worked loop-specific rows before, take your time on the first few rows. Once your hands recognize the rhythm, the shaping becomes automatic.
Fit and Sizing Guidance
- The cup size is controlled by row count, not stitch count.
- Stop increasing once the cup fully covers from nipple to under bust and side to side as desired.
- The band width and strap length are fully adjustable, making this suitable for multiple body types.
Always try on the cups before committing to the band rows. Small adjustments early prevent major fit issues later.
Materials
- 100 percent cotton fingering weight yarn
- 3.0 mm crochet hook
- Scissors
- Yarn needle
- Measuring tape
Measurement and Foundation Chain
- Measure from the nipple down to the under bust to determine cup length
- Make a slip knot and chain the required number of stitches based on your measurement
- Use 14 chains as a reference size and adjust as needed
Why This Matters
This measurement ensures the cup grows vertically at the correct rate. Starting too short forces over-increasing later, while starting too long can cause sagging at the bottom edge.
- If you’re still learning how to read crochet patterns, no stress! Follow the video tutorial below and use the written pattern below as you get more comfortable!
First Cup Row One
- Chain 3 to count as the first double crochet
- Skip 3 chains and work one double crochet into each chain until the last stitch
- In the final chain work 3 double crochets, chain 1, and 3 double crochets
- Continue by working one double crochet into the back of each foundation chain

Stitch Clarity
- The 3 dc, ch 1, 3 dc forms the cup’s center point.
- Working back along the foundation chain creates a symmetrical base without turning in the middle of the row.
- Keep the center chain space loose so future increases sit cleanly.
Building the Cup Rows Two to Eight
- Chain 3 and turn to begin each row
- Work one double crochet into the front loop only of each stitch on the wrong side rows
- In the center chain one space work 2 double crochets, chain 1, and 2 double crochets
- Chain 3 and turn to start right side rows
- Work one double crochet into the back loop only of each stitch
- Repeat the center increase in every row
- Continue alternating rows until a total of eight rows is completed or until desired cup size is reached
Why Alternate Front and Back Loops

This technique:
- adds gentle texture
- helps the cup curve naturally instead of laying flat
- prevents stiffness along the increase line
If your cup begins to ripple, check that you are placing the center increase into the chain-one space every time.
Decorative Border Row
- Chain 3 and turn to begin the border
- Work one double crochet then chain 1, skip one stitch, and work one double crochet across
- In the center space work 2 double crochets, chain 1, and 2 double crochets
- Continue the mesh pattern evenly on the opposite side
- Finish the row with two double crochets at the edge
Border Notes

This row visually lightens the cup and creates flexibility at the base. Keep your chains relaxed so the mesh does not pull the cup inward.
Connecting the Cups and Band
- For the right cup chain 25 stitches without cutting the yarn or adjust for size
- For the left cup join yarn at the corner and chain 25 stitches
- Place both cups side by side
- Work single crochet across the chain, along the bottom of the first cup, into the second cup, and across its bottom and chain
- Continue with alternating rows of mesh stitch and solid double crochet
- Work approximately seven rows or until the band reaches the desired width
Fit Tips
- The starting chain determines how wide the band opens before lacing.
- If you want more coverage at the back, add extra band rows rather than lengthening the chains.

Finishing Straps and Assembly
- Join yarn at the top center of each cup
- Chain to the desired strap length
- Work slip stitches back along the chain into the back loops for strength
- Fasten off securely
- Thread the long back strap through the mesh spaces on each side to create a lace up back
- Weave in all loose ends and adjust fit as needed
Strap Strength Note
- Slip stitching back along the chain reinforces the strap without adding bulk.
- Keep tension firm but not tight to avoid stiffness at the shoulders.
Beginner Notes
- Count rows, not stitches, for cup size consistency
- Mark the center chain space if needed
- Try on frequently during the cup stage
Troubleshooting
- Cup curling inward: loosen your chain-one at the center increase
- Uneven edges: check that you are placing edge stitches consistently
- Band feels tight: add rows, not stitches
Final Fit Check
Once laced, adjust the back tension first, then fine-tune strap length. This order ensures the cups sit correctly before locking in strap placement.