
Layering over a long sleeve tee turns this crochet turtleneck top into winter wear rather than autumn only. The open front square shows whatever sits underneath, and one contrast skein covers both sleeves and the side stripes.
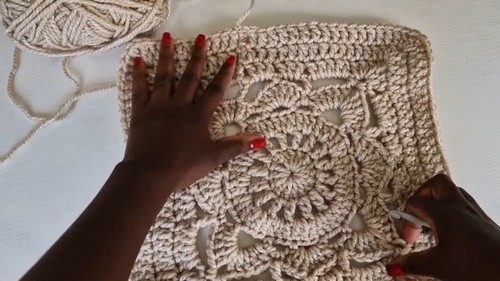
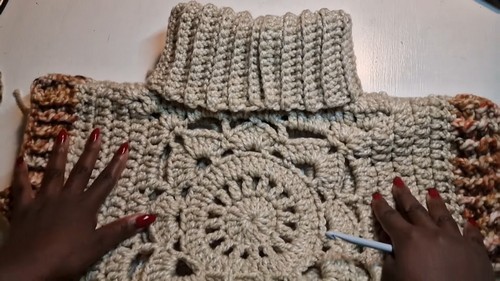
A single openwork square fills the entire front of this crochet granny square turtleneck top, with a spoked wheel motif at its centre and gaps left open around it. Cream yarn carries the body and the folded ribbed collar, orange variegated yarn makes the short cap sleeves and a stripe down each side, and thick ribbing closes the cropped hem. Block the front square flat before assembly, since the open sections pull out of shape as you join.
Crochet Turtle Neck Sweater

One large granny square does the work of an entire sweater front here, with a radiating circular motif that fills the panel from center to edge. The turtleneck collar and ribbed hem are worked in the same cream yarn so the structure frames the lace without competing with it, while rust contrast sleeves add the color pop. Anyone who has already worked through a granny square top knows how satisfying that motif assembly moment is, and this takes it a step further into a full garment.
The oversized square is worked in the round from the center outward before the collar and hem ribbing are added directly to the edges. Short sleeves in a contrasting rust tone slot in at the sides and keep the build cool enough to wear year round. Sizing adjusts by working more or fewer rounds on the central motif before finishing the border.
Why I love this one: the Willow granny square has a distinct, layered elegance — shells, arches, and diamond chains all working together before the square border rows settle everything into a clean edge you can actually seam.
Materials and Tools
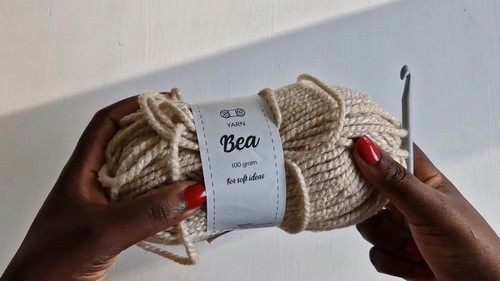
- 100 gram acrylic yarn (approximately 100 meters, using a bear or multi-color blend as in the original)
- A 7 mm crochet hook (the yarn label may suggest 8 to 9 mm, but the 7 mm gives a firmer stitch definition)
- Stitch markers
- Tapestry needle or hook for joining
Key Stitch to Learn
Difficulty and Time
This is an advanced intermediate project. The granny square requires 9 rounds of increasingly varied stitch work before the shaping and assembly begin. Rounds 4 through 7 are the most detailed — read each one through before you work it. Once both squares are complete, the assembly and ribbing are satisfying and straightforward.
The Pattern
Two identical Willow granny squares form the front and back of the cardigan. Extra rows on two sides of each square create the proportions needed for a panel shape. The squares are seamed at the shoulders and sides, the turtleneck collar is made separately and attached, and post-stitch ribbing finishes the hem and cuffs.
Step 1: The Willow Granny Square (Make 2)
Row 1
- Make a slip loop, chain 3, and slip stitch into the very first loop to form a ring.
- Chain 3 (counts as your first double crochet). Work an additional 15 double crochets into the ring for a total of 16 double crochets. Slip stitch on top of the starting chain-3 to close.
Row 2
- Chain 4 (counts as 1 double crochet plus 1 chain space).
- Working into the next loop without turning, work double crochet, chain 1 all the way around for a total of 16 double crochets separated by chain-1 spaces. Slip stitch to close.
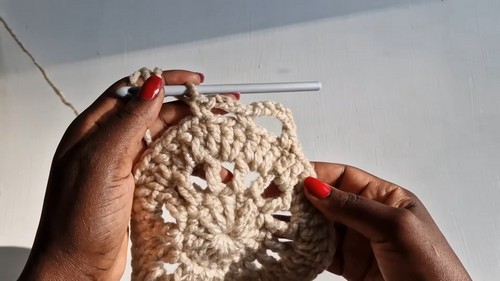
Row 3
- Chain 3 (counts as first double crochet). Work 2 double crochets in the chain space, then 1 double crochet in the top of the previous double crochet stitch. Repeat this all the way around and slip stitch to close.
Reading crochet patterns can be tricky when you’re just starting out, feel free to follow the video tutorial below instead!
Row 4 — Setting Up Corners
- Chain 1, single crochet into the next stitch.
- Chain 5, skip 2 loops, and single crochet into the 3rd loop.
- Work chain 3, skip 2 loops, single crochet into the 3rd loop twice more. (This forms your first corner sequence.)
- Repeat this corner and side sequence around until you have 4 corners established. Slip stitch to close.
Row 5
- Slip stitch into the space, chain 3, and add 4 more double crochets (5 double crochets total).
- Chain 3 for the corner, then work 5 more double crochets into the same space.
- In the next chain-3 space, work a single crochet. In the following chain-3 space, work 7 double crochets. In the next chain-3 space, work a single crochet.
- Repeat the corner pattern (5 double crochets, chain 3, 5 double crochets) and side arches all the way around. Slip stitch to close.
Row 6
- Slip stitch into the next space, chain 3, and add 5 more double crochets (6 double crochets total).
- Chain 5, single crochet into the chain-3 space, chain 3, single crochet back into the same space, then chain 5 to form the corner.
- Work across the sides using double crochet, chain 3, skip 3 stitches, single crochet into the 4th stitch, chain 3, double crochet patterns over the previous shells. Complete all sides and slip stitch to close.
Row 7
- Slip stitch into the space, chain 3, and add 4 more double crochets (5 double crochets total).
- In the corner chain space, work 3 double crochets, chain 3, 3 double crochets.
- Along the sides, work 5 double crochets in the chain-5 spaces and 3 double crochets in the chain-3 spaces. Slip stitch to close.
Rows 8 and 9 — Border Rows
- Chain 3, then work a row of standard double crochets all the way around.
- At the four corners, work 2 double crochets, chain 1, 2 double crochets.
- Repeat for another row of double crochets with the same corner increases. Fasten off.
Step 2: Shaping into Panels
- Attach yarn to one of the top corners and work 2 extra rows of double crochets along one parallel side only (not all the way around) to create a slight rectangular shape. Fasten off.
- Repeat on the opposite parallel side of the square.
- Do this for both squares (front and back).
Step 3: Joining the Shoulders and Sides
- Shoulder seams: Place the front and back panels together. Count approximately 8 stitches inward from the outer edge to mark the shoulder width and place stitch markers. Join the shoulders together using single crochets across the marked section, leaving the middle open for the neck opening.
- Underarm seams: Measure down from the shoulder for your armhole opening, leaving approximately 18 double crochets open for the armhole. Stitch the side seams closed from the bottom up to the armhole marker using single crochets.
Step 4: Making and Attaching the Turtleneck
- Measure first: Measure your head circumference before starting the chain, adding a little extra for stretch.
- Collar band foundation: Chain your required length plus 1 extra turning chain.
- Row 1: Single crochet down the chain.
- Rows 2 onward: Chain 1, turn, and work single crochets in the back loops only to create a stretchy ribbed texture. Continue repeating rows until the strip is long enough to fit comfortably around your neck opening when stretched. (The creator worked approximately 50 rows.)
- Joining the collar: Slip stitch or single crochet the short ends of the ribbed band together to form a tube.
- Attaching: Sew or single crochet the collar evenly around the neck opening of the cardigan.
Step 5: Bottom Hem and Sleeve Cuffs
Bottom waistband
- Attach yarn to the bottom corner of the cardigan.
- Work a foundation row of double crochets along the bottom edge.
- For subsequent rows, alternate front post double crochet and back post double crochet for an elastic ribbing effect. Continue for 2 to 3 rows (or as desired) and fasten off.
Sleeve cuffs
- Attach yarn to the underarm opening of the sleeve.
- Work a round of basic double crochets around the arm opening.
- Follow with 3 rows of alternating front post and back post double crochet ribbing to match the bottom hem.
- Repeat for both sleeves.
Optional finishing: Add a final single crochet border around any raw edges to clean up the look. Weave in all loose ends.
Tips and Troubleshooting
- Read each round of the granny square fully before you work it. Rounds 4 through 7 introduce new stitch sequences — skimming ahead keeps you from having to pause mid-round to figure out what comes next.
- Mark your corner chain spaces on every round. The 4 corners must stay consistent round by round. Placing a stitch marker in each chain-3 or chain-5 corner space before you start the round makes them easy to find.
- Measure your head before chaining the collar. The collar is worked to your specific head circumference — the chain length isn’t fixed. Take the measurement first, add a little ease, and chain to that length.
- Add the shaping rows before seaming. The two extra rows on each side of the squares that create the panel shape must be done before joining — they’re much harder to add cleanly once the pieces are connected.
Yarn Substitution
The original uses a chunky acrylic multi-color blend at approximately 100 grams, with a 7 mm hook to give good stitch definition without overly dense fabric. Any similarly bulky acrylic or wool-blend yarn at that weight will work on the same hook. Avoid anything too fluffy or textured — the Willow square’s intricate stitch sequences need a smooth yarn so the shell and arch details stay visible in the finished piece.

Customization Ideas
- Adjust the collar height. More rows on the ribbed collar band give a taller, more dramatic fold; fewer rows make a shallower, mock-neck style collar.
- Extend the armhole. Leaving more than 18 double crochets open for the armhole gives a wider, drop-shoulder sleeve opening.
- Add more shaping rows. The 2 extra rows per side of the square are a minimum — adding 3 to 4 rows gives a more rectangular panel if your body proportions need it.
- Change the ribbing depth. More rows on the hem and cuffs give a wider ribbed band; fewer keep it minimal.
- Try a solid color. A single-color yarn makes the Willow square stitch structure more visible; a multi-color or self-striping yarn gives a spontaneous, painterly effect.
Frequently Asked Questions
1. Why are the granny squares shaped before seaming rather than used as-is? A square doesn’t naturally fit the proportions of a sweater panel — it’s usually too wide and too short. The extra rows worked along two parallel sides of each square add the length needed to turn the square into a roughly rectangular shape that seams cleanly into a body.
2. The turtleneck is worked separately and sewn on — why not pick up stitches directly? Working the collar as a separate ribbed strip gives you complete control over its length and fit before committing to the join. You can hold it against your neck, adjust the row count, and join the ends before attaching — much easier than trying to work in-the-round at the neckline of an assembled cardigan.
3. What are the extra shaping rows on the sides of the square for? They add height to just one axis of the square — extending the vertical proportion without adding width. This lets the panel fit a human torso shape more naturally than a symmetrical square would.
4. Can I make this smaller or larger without redoing the squares? The panel size is largely determined by how large you make the granny squares — more rounds make larger squares. You can also add more shaping rows per side to increase the panel height. For a wider fit, increase the armhole opening and leave more stitches unjoined on the sides.


