
Autumn layering starts with a crochet cardigan you can throw over a black turtleneck and jeans. The cropped length sits at the natural waist, so the crochet cardigan pattern works over high waisted trousers as well as a dress.
Diamond lattice openwork sits in a useful middle ground between a solid fabric and full lace, letting the turtleneck underneath show through while still adding real warmth when worn over it. The gray yarn keeps the geometry clean and structural rather than decorative, which is why this reads more like tailoring than the usual crochet cardigan. Anyone who enjoyed making the open weave fan stitch top will recognise the same principle of letting negative space do the design work.
Layering Crochet Sweater

Lapels and a single front button give the cardigan a finished silhouette that holds its shape even in an open front carry. The ribbed hem and cuffs anchor the lace body and prevent the edges from curling outward after blocking. Images 3 and 4 show the piece being worked flat in panels rather than in the round, so the construction stays accessible throughout even with the repeating stitch pattern.
Quick Facts
- Skill level: Advanced
- Construction style: Freestyle, worked in one continuous piece with no seaming — no separate panels cut and joined
- Key technique: Using a well-fitting sweater from your wardrobe as a shape template
- Hook and yarn: Your choice, matched to a custom lacy diamond stitch pattern that creates open holes — plan your underlayers accordingly
- Estimated time: Multiple sessions; the continuous one-piece construction saves seaming time but requires sustained attention to shaping
Customization Ideas (Before You Begin)
This pattern is built entirely around your personal measurements and reference garments — so every creative decision belongs to you from the start:
- Choose your reference sweaters carefully. The creator uses two: a green/black sweater for the neckline shape and a well-fitting black sweater for armhole placement. Choosing garments whose fit you trust in those specific areas will give the most accurate results.
- Adjust the neckline curve. The original uses a steep V-shaped neckline that then straightens. You can use a shallower V, a rounder neck, or a more dramatic plunge depending on what you trace.
- Change the button count. Buttonhole placement is marked by stitch markers and adjusted to your preference — more buttons for a more structured, formal look, fewer for a relaxed open cardigan feel.
- Adapt the stitch pattern. The diamond lace creates an open, layered fabric — ideal for autumn over shirts or blouses. A denser stitch would give more warmth and opacity for wearing alone.
- Play with sleeve length. The sleeve is worked to your own arm measurement, so long, three-quarter, or short sleeves are all simply a matter of stopping earlier.
Materials and Tools
- Yarn of your choice suited to a lacy diamond stitch (the open holes in the stitch pattern make fiber choice and weight relevant — consider how the fabric will drape and what you’ll layer underneath)
- A crochet hook matched to your yarn
- A well-fitting neckline reference sweater (the creator uses a green/black sweater)
- A well-fitting armhole reference sweater (the creator uses a black sweater)
- Stitch markers
- Buttons with matching thread for hand-sewing
Useful Crochet Stitch
The Pattern
This cardigan is worked in one continuous piece starting from the button band. Because it’s a freestyle construction, the shaping is done by comparison to reference garments rather than fixed stitch counts. Work slowly and compare your piece to your reference sweater often.
1. Concept and Planning
- Design this as a form-fitting, work-appropriate cardigan rather than a standard boxy rectangle. The goal is elegant and wearable, with a custom lacy diamond stitch pattern that gives a light, flowing drape.
- The fabric is open-work, which means underlayers will show through — plan your layering combinations before committing to a yarn color.
New to crochet and not sure how to read a pattern yet? The video tutorial below will guide you through it step by step, you’ve got this!
2. Button Band and Front Neckline Shape
- Begin in the middle of the piece with the button band.
- Follow the steep neckline curve of your reference sweater at first, then transition to working straight upward to prevent the neckline from growing too wide.

3. Armholes and Shoulders
- Use a well-fitting sweater as a physical template to measure and mark where the armholes should sit.
- Work the front portion upward and create gradual decreases along the armhole edge until you arrive at the side seam.
4. Working the Sleeves
- Follow the bottom side of the sleeve direction first to determine the required length, then switch to following the top side to match the grain of the fabric.
- Once the sleeve reaches the desired width and curve, connect the edges to form a continuous tube.
v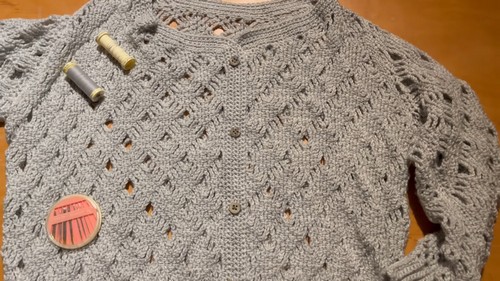
5. The Back Panel
- Transition into working the back panel downward from the shoulder and top portion.
- Mirror the front armhole decreases symmetrically on the back to match the other side.
- Repeat the same one-piece sleeve construction process for the second arm.

6. Finishing Touches and Details
- Buttonholes: Plan the spacing, place stitch markers at each intended button position, and create buttonholes by working a single chain stitch in place of a regular stitch at each marker. When pulled closed, the buttonholes sit neat and compact.
- Neckline band: Add a clean finishing border along the completed neckline edge.
- Buttons: Hand-sew your chosen buttons onto the band using a matching thread. The creator uses multi-tone gray, white, and greenish buttons with gray thread.

Tips and Troubleshooting
- Have both reference sweaters within reach throughout. The armhole-template sweater and the neckline-template sweater are tools you’ll return to repeatedly — keep them on your work surface, not across the room.
- Go slowly at the neckline curve. The transition from following the steep curve to going straight upward is the most judgment-dependent moment in the construction. Work a few rows, hold it against the reference, and adjust before continuing.
- Mark your buttonholes before you reach them. Place all your stitch markers at the intended buttonhole positions before you start that section of the button band — spacing is much easier to visualize when the whole band is already laid out in front of you.

Frequently Asked Questions
1. This is called a freestyle pattern — how do I follow it without stitch counts? You use a well-fitting garment from your wardrobe as a physical template at each decision point. Hold the growing crochet piece up against your reference sweater to check armhole depth, neckline curve, and sleeve length as you work. The pattern gives you the sequence of construction decisions; your reference garments supply the measurements.
2. Do I need to know the lacy diamond stitch before I start? The specific stitch pattern isn’t charted in this source — the creator designed it as a custom open-work pattern. If you’re working from this guide, you’ll need to either find a lacy diamond stitch you like (search for “crochet lacy diamond stitch” for options) or use any open-work stitch that gives similar drape. The construction method works with any stitch.
3. Why is this worked in one continuous piece instead of separate panels? The single-piece construction eliminates all shoulder and side seaming. For an intermediate or advanced crocheter, the result is a more seamless garment with a cleaner drape and no seam ridges. The trade-off is that it requires holding the overall shape in your head and using the reference sweater more actively than a panel-based pattern.
4. The stitch pattern has open holes — won’t it be too cold for autumn? The open-work is intentional — this cardigan is designed as a layering piece, worn over a blouse, shirt, or knit underneath. In autumn, that layering combination provides warmth while the lacy cardigan adds visual texture and elegance. If you want a denser, warmer fabric, substitute a tighter stitch pattern using the same construction method.
