
The contrast between the solid body and the open lace sleeves is what makes this pullover stand out the two textures work together so the top feels lightweight without losing its shape in the bodice. It’s a good step up from single-texture makes, and if you’ve worked the V-stitch lace top already, the sleeve construction here uses a similar open repeat in a more structured format.
Lace Ribbed Crochet Pullover Top

Bell sleeves add a lot of visual drama for very little extra work the flare is just the natural result of increasing at the cuff edge rather than any complicated shaping technique. For another pullover that plays with mixed texture panels, the mixed stitch panel top takes the same idea into a two-color version.
Materials
- Lightweight size 3 or medium size 4 cotton or acrylic blend yarn
- 5.0 mm crochet hook or size needed for gauge
- Scissors
- Yarn needle
- Stitch markers

Stitch tutorial links:
Foundation and Ribbing
- Create a foundation chain that matches the width of your desired fit
- Work back and forth rows of single crochet in the back loops only to form the ribbed hem
- Turn the ribbing sideways and work one row of single crochet evenly across the long edge
Ribbing clarity and fit notes
- The ribbing is worked lengthwise, not upward.
- The number of chains you start with determines how tall the ribbing will be from bottom edge to body, not the circumference.
- This is why the ribbing is turned sideways before continuing.
- When crocheting single crochet in the back loops only, the fabric gains stretch and elasticity.
- This helps the hem sit comfortably against the body instead of flaring or riding up.
- When working single crochet evenly across the long edge, place one stitch into the end of each row.
- If the edge begins to ripple, skip an occasional row end. If it pulls in, add an extra stitch where needed.
- Even tension here makes the lace body sit smoothly.
- Still getting the hang of reading crochet patterns? That’s completely okay, the video tutorial below breaks everything down in a simple, beginner-friendly way!

Lace Body Pattern
- Chain 3 and skip one stitch
- Work double crochet, chain 1, double crochet into the next stitch
- Repeat across the row and finish with one double crochet in the last stitch
- Chain 3 and work three double crochets into each chain space from the previous row
- Repeat these two rows until the panel reaches underarm height
Lace stitch explanation
- This body is worked as a two row repeat. The first row creates open chain spaces, while the second row fills those spaces with clusters of double crochet.
- Together, they form a balanced lace that is airy but still structured.
- The chain 3 at the beginning of the row functions as height, not a stitch space.
- When working across, focus on placing stitches consistently into the correct stitches or chain spaces rather than counting every stitch.
- Stop the lace panel when it reaches your underarm.
- This measurement matters more than row count, especially if you are adjusting for different body lengths.

Neckline Shaping
- Divide the front panel into three sections
- Leave the center section unworked to create the neckline opening
- Continue working the left and right shoulder sections separately to form a gentle U shape
- Work the back panel straight without shaping until it matches the front panel height
Neckline shaping guidance
- Marking the panel into three sections helps keep the neckline centered.
- The middle section remains open, which naturally forms a soft U shape without sharp angles.
- When working the shoulder sections separately, attach your yarn cleanly at the edge of each section.
- Maintain the same lace pattern so the stitch texture stays consistent across the garment.
- The back panel is intentionally left unshaped.
- This provides structure and prevents the neckline from dipping too low at the back.

Sleeves
- Join the front and back panels at the shoulders
- Attach yarn at the armhole and work the lace pattern in rounds
- Continue until the sleeve reaches the desired length
- Finish with several rows of single crochet in the back loops only for the cuff
Sleeve construction notes
- Working sleeves directly into the armhole allows the lace pattern to flow naturally from the body.
- Make sure to distribute stitches evenly around the armhole to avoid puckering.
- The ribbed cuff mirrors the hem, giving the pullover a cohesive finish.
- Back loop single crochet keeps the cuff flexible and comfortable around the wrist or forearm.
Assembly and Finishing
- Seam the sides of the pullover using slip stitch or a yarn needle
- Work one or two rounds of single crochet evenly around the neckline
- Weave in all ends and lightly block if needed
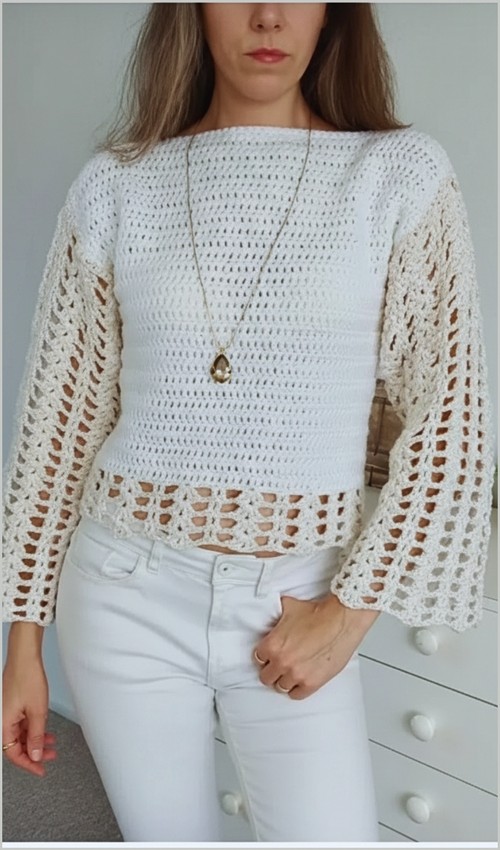
Finishing tips
- Side seams should align the lace rows as closely as possible for a clean look. Slip stitch creates a flatter seam, while sewing with a yarn needle gives slightly more flexibility.
- The single crochet edging around the neckline stabilizes the opening and prevents stretching over time. Keep your tension relaxed so the neckline stays comfortable.
- Light blocking helps the lace open up and smooths the ribbing. Shape the garment to measurements and allow it to dry fully before wearing.
Beginner notes
- If this is your first lace garment, practice the two row lace repeat on a swatch before starting the body.
- Use stitch markers generously at armholes and neckline sections to stay organized.
- Focus on measurements rather than stitch counts for best fit.
Troubleshooting
- Hem feels tight: Try a larger hook for the ribbing only.
- Lace looks uneven: Check that stitches are consistently placed into chain spaces on the cluster rows.
- Neckline too wide: Reduce the width of the center section slightly next time, keeping the shoulders balanced.
Fit and sizing guidance
- This pullover is easy to customize because width, length, and sleeve size are all adjustable as you crochet.
- Try the body on before shaping the neckline and again before finishing the sleeves to confirm comfort and coverage.


