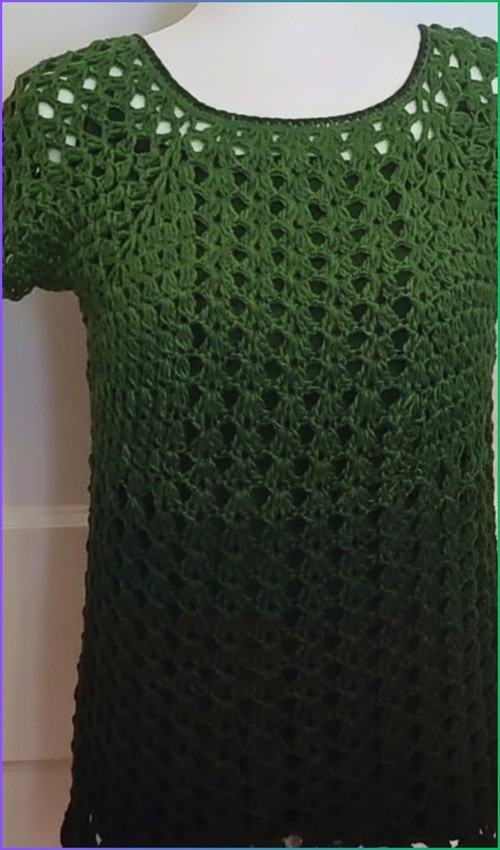
This lavender V-stitch crop top is the kind of make that photographs beautifully at every stage — the open lace fabric looks impressive while you’re still working the foundation rows. The V-neck shaping is built into the stitch repeat itself rather than added with separate decreases, which keeps the construction much simpler than the finished piece suggests. For a similar open-weave silhouette in a slightly more structured build, the mesh cowl halter is a natural companion.
Crochet Lace Top Pattern Free Tunics

The two-panel flat construction (front and back worked separately, then seamed) makes it easy to try on as you go and adjust length before you finish. If you love the relaxed cropped drape here, the seaside cover-up uses V-stitch in the same lightweight spirit but opens out into a fuller beach layer.
Materials
- 100 percent cotton yarn size 3 light weight
- 3.50 mm crochet hook
- Scissors
- Yarn needle
Sizing and Foundation Guidance
Stitch pattern multiple: multiple of 6 plus 4
- For size small to medium, chain 142 stitches total.
- This foundation chain determines the finished width of each panel, not the full circumference. Because the panels are folded and joined, you can safely adjust the chain length to control how loose or fitted the top feels across the body.
Adjustment tip: If you want a looser drape, add full repeats of 6 stitches. If you want a narrower fit, remove full repeats. Always keep the “plus 4” intact so the stitch pattern stays aligned.
Before You Start: Stitches
Main Panel Pattern
Make 2 panels
Row 1 Square Mesh
- Skip 5 chains and work one double crochet in the sixth chain
- Chain 1 skip 1 stitch and work one double crochet in the next stitch
- Repeat across the row

Clarity note: This row establishes the open square mesh. Skipping stitches creates airflow and flexibility in the fabric, which is important for cotton yarn that does not stretch much on its own.
- If you’re still learning how to read crochet patterns, no stress! Follow the video tutorial below and use the written pattern below as you get more comfortable!
Row 2 Square Mesh
- Chain 4 and turn
- Work one double crochet in each double crochet from the previous row with chain 1 between stitches
Why this matters: Working into the double crochets (not the chain spaces) keeps the mesh aligned vertically and prevents the fabric from shifting sideways as it grows.
Row 3 V Stitch Row
- Chain 8 and turn
- Skip 2 double crochets and work one double crochet chain 2 and one double crochet in the next stitch
- Chain 5 skip 2 stitches and repeat the V stitch across
- End with chain 5 and one double crochet in the turning chain
Stitch clarity: The long chain spaces in this row create the arches that will later be anchored in the next row. The turning chain is taller here to match the height of the decorative stitches.
Row 4 Connected V Stitches
- Chain 5 and turn
- Work one single crochet into the chain 5 space
- Chain 2 work one double crochet chain 2 and one double crochet into the V stitch
- Chain 2 and work one single crochet into the next chain 5 space
- Repeat across the row

Teaching tip: The single crochets act as anchors, keeping the V stitches stable. If your fabric starts to ripple, check that you are placing the single crochet into the center of each chain-5 space, not into a stitch.
Row 5 Arch Row
- Chain 8 and turn
- Work one single crochet into the center of the V stitch
- Chain 5 and work one single crochet into the next V stitch
- Repeat across and end with chain 5 and one double crochet in the turning chain
Fabric behavior: This row creates soft arches that give the top its decorative rhythm. The chains may feel loose while working, but they will firm up during edging.
Panel Repeat
- Repeat rows 1 through 5 until the panel reaches your desired width
- Make a second identical panel
Consistency note: Both panels must match exactly in row count to ensure clean alignment during assembly.
Assembly
- Fold each rectangular panel vertically in half
- Join the side edges using slip stitches or sewing, leaving an arm opening of approximately 18 cm
- Join the two panels at the center front and back, leaving a neckline opening about 20 cm deep

Fit guidance: Before permanently joining, it helps to pin or clip the panels and try the piece on. Cotton has minimal stretch, so checking arm and neckline depth now prevents tightness later.
Edging Hem and Sleeves
Hem Edging
- Attach yarn to the bottom edge
- Work two rounds of square mesh
- Work one round of V stitches
- Work one round of arches using chain 5 and single crochet
Why repeat the stitch pattern: Using the same motifs at the hem creates visual balance and keeps the garment cohesive from top to bottom.
Finishing Round
- Work four single crochets into each chain 5 space
- Work one single crochet into each single crochet stitch
Stability tip: This round tightens the open arches and gives the hem weight, helping the top hang straight instead of flaring.
Sleeve Edging
- Repeat the same V stitch and arch edging around each arm opening
- Beginner note: Rotate the garment as needed so you are always working comfortably with the right side facing you.

Neckline Finish
- Work one round of single crochet evenly around the entire neckline
- Neckline control: Even single crochet placement prevents gaping. If the neckline feels loose, slightly reduce hook size just for this round.
Finished Size
- Approximate finished width is 48 cm
- Approximate finished length is 38 cm
Troubleshooting and Helpful Notes
- Uneven edges: Count stitches at the end of each row, especially after long chain sections.
- Fabric feels stiff: Try a looser tension or move up half a hook size while keeping stitch placement identical.
- Panels don’t align during assembly: Lay both panels flat and confirm row counts before joining.