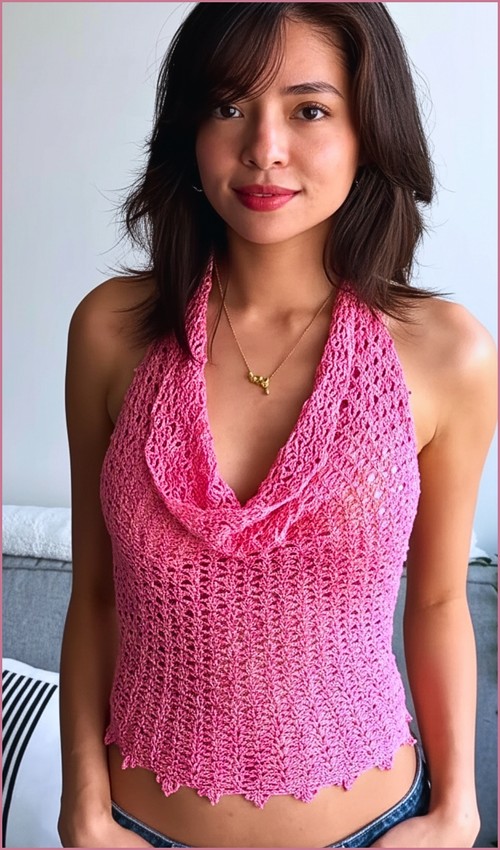
A draped cowl neck on a halter top is the kind of detail that tips a crochet make from casual into going-out territory and this pink shell stitch version earns that label. The fan repeats keep it light while the cowl adds just enough coverage to make it work as a night-out piece. For a halter that keeps a more open feel, the cut-out halter top takes the backless approach instead.
Crochet Going-Out Top

Shell stitch fans carry through the entire body and feed directly into the scalloped hem, so the pattern is a single stitch rhythm from cast-on to finish, no mid-row stitch switches. The cowl drape is shaped by working the neckline rounds in a wider arc, which is simpler to execute than it reads. If you like the shell peplum silhouette in a different style, the backless top with bow uses the same stitch family with an open back.
Materials & Tools
- Lace weight yarn or size 10 crochet thread (see yarn notes below)
- 2.75 mm crochet hook (main lace work)
- 4.5 mm crochet hook (cowl section)
- Measuring tape
- Scissors
- Tapestry needle
- 4 buttons of your choice
Core Crochet Stitches
A note on yarn: The pattern calls for lace weight yarn or size 10 crochet thread, and these will produce different results. Size 10 thread gives a crisper, more structured lace with excellent drape without stretch. True lace weight yarn (wool, bamboo, or a silk blend) gives a slightly softer hand and more fluidity. Either works beautifully for this top — your choice should come down to the look you want and how you feel about blocking. Thread doesn’t need much; lace weight yarn may benefit from a light wet block to open up the shell pattern.
Difficulty & Time
- Difficulty: Intermediate
Best for: Makers comfortable with shell stitches and V-stitches who don’t mind measurement-based construction. The lace pattern itself is a two-row repeat that becomes intuitive quickly, but the fit-as-you-go process requires patience and willingness to try the piece on as you go.
Time estimate: 10–18 hours depending on your gauge, chosen yarn, and sizing. The cowl and lace sections work up faster than they look.
Technique Notes
Foundation single crochet (FSC): This pattern uses a foundation row based on your actual waist measurement. If you’ve never done this, a foundation single crochet creates a starting row that’s more flexible than a chain — much better for garments. Alternatively, you can chain and single crochet across, which the pattern also accommodates.
The stitch multiple: Your stitch count needs to be a multiple of 8 plus 1 (or if chaining, a multiple of 8 plus 2). Measure your front waist panel, swatch for gauge, do the math, and adjust to the nearest multiple of 8 before you start. Getting this right at the beginning saves you from ripping back later.
Shell stitch used here: The shell in this pattern is a three-double-crochet shell with chain-1 spaces between each double crochet — worked into a single stitch. This creates an open, lacy shell rather than a dense one. Keep your tension relaxed through the chain spaces so the lace stays light.
V-stitch: A double crochet, chain 1, double crochet all into the same stitch. The pattern uses these at the edges as part of the increase logic and as a decorative element in the first row of the lace repeat.
Switching hooks: When you move to the cowl section, you’ll switch from your 2.75 mm to your 4.5 mm hook. This is intentional — the larger hook on the same yarn/thread creates natural flare and drape without any additional increases. Don’t skip this step. The cowl effect depends on it.
The Pattern
Foundation and Sizing
- Measure the front of your waist from side to side. Create a foundation single crochet row that matches this measurement, making sure your stitch count works out to a multiple of 8 plus 1. Alternatively, chain a multiple of 8 plus 2 and work single crochet across to create your starting row.

Main Lace Panel
- Row 1 (right side): Chain 4, turn. Work 1 double crochet into the first stitch. Chain 2, skip 3 stitches, work 1 single crochet into the next stitch. Chain 2, skip 3 stitches, work a shell stitch (double crochet, chain 1, double crochet, chain 1, double crochet) into the next stitch. Repeat from * across. Finish the row with a V-stitch (double crochet, chain 1, double crochet) into the final stitch.
- Row 2: Chain 1, turn. Work 1 single crochet into the first stitch. Chain 2, work a shell stitch into the single crochet from the previous row. Chain 2, work 1 single crochet into the center double crochet of the previous shell. Repeat from * across. Finish with a single crochet into the turning chain.
- Repeat Rows 1 and 2 to build the lace panel.
- If you’re a beginner and crochet patterns feel confusing, start with the video tutorial below, it’s the easiest way to learn as you go!
Bust Increases
- Continue working the two-row lace repeat, adding increases at both the beginning and end of rows as you go. To increase, replace the ending V-stitches with full shell stitches — this widens the panel without disrupting the lace structure.
- Follow a consistent increase rhythm while keeping the lace pattern intact across the middle of the panel. Continue working increases until the panel covers the bust fully and extends to approximately 2.5 inches above the nipple line.
Cowl Portion
- Switch to your 4.5 mm crochet hook. Continue working increase rows in the same lace pattern. The larger hook causes the fabric to flare naturally, creating the cowl drape — no extra shaping needed. Continue until the cowl section reaches your desired depth.
Side and Back Panels
- Subtract your front panel width from your total waist measurement, then divide that remaining measurement in half — this is the width for each side panel.
- Join yarn at the bottom corner of the front panel. Work double crochet stitches along the side edge, adjusting your stitch count to a multiple of 6. Continue upward for approximately 4 inches.
- Work the mesh and shell lace pattern across the back section to match the front. End each back panel with a double crochet row along the top edge — this creates a clean, stable edge for button attachment.
Finishing
- Sew four buttons evenly spaced onto one back panel. On the opposite back panel, create chain loops positioned to align with each button, forming the buttonholes.
- Work a lacy clover-style edging along the bottom edge of the entire piece. Add picot stitches along the side edges for a polished finish.
- At the top corners of the front panel, create long chain straps. Before attaching each strap, fold the top corner of the front panel inward — this enhances the natural cowl drape and gives the neckline its draped shape.
Tips & Troubleshooting
- Swatch on both hook sizes before you start. Your lace gauge with the 2.75 mm and the drape you get with the 4.5 mm will both affect the finished fit. Even a small swatch will tell you if your tension is running tight or loose.
- The stitch multiple is non-negotiable. If your measured stitch count doesn’t hit a multiple of 8 plus 1, adjust — even adding or removing a stitch or two from your foundation can affect how the lace pattern lines up across rows. Always recount before starting Row 1.
- Try on early and often. This top is built from measurements, not standard sizing, and your fabric will behave differently as it grows. Hold it up or try it on after the bust increase section and again before you end the cowl. It’s much easier to adjust length while you’re still working than after you’ve finished.
- Don’t pull the chain spaces tight. The openness of the lace comes from relaxed chain tension. If your chain-2 spaces look pinched, loosen your grip slightly — or try going up half a hook size for just the chains.
- Match your buttons to the yarn weight. Chunky or heavy buttons will drag on lace weight fabric. Choose lightweight buttons — shell, resin, or thin acrylic — that won’t distort the back panel over time.

Yarn Substitution Ideas
If size 10 cotton thread isn’t your thing, here’s what works well with this pattern:
- Bamboo or bamboo-blend lace weight: Beautiful drape, slightly silkier finish. Great for warm weather.
- Silk or silk-merino lace weight: Luxurious hand, holds the lace pattern well, and blocks beautifully. More expensive but worth it for a piece you’ll wear repeatedly.
- Fine cotton lace weight: Stays closer to the thread experience. Slightly more structured than bamboo.
Avoid anything with a halo (mohair, angora) — the open mesh of the lace pattern disappears into fuzzy yarn, and you’ll lose the visual effect that makes this top special.
Customization Ideas
- Adjust the cowl depth. The pattern lets you stop the cowl whenever you like. A shorter cowl reads as a scooped neck; a deeper one creates more dramatic drape. Try it on as you go and stop where it looks right to you.
- Play with the strap length. Longer chains create a halter effect; shorter ones sit more like traditional straps. You could also make two sets of chains per corner and tie them at the neck for a more adjustable fit.
- Swap the edging. The clover edging along the bottom is lovely, but a simple picot-all-around works just as well if you want a cleaner finish. A crab stitch edging gives a sturdier, sportier feel.
- Use a contrast color for the edging and straps. Even a single accent color on the bottom edge and straps makes the finished piece look intentional and designer-made.
FAQ
Do I need both hook sizes, or can I use just one?
You need both. The 2.75 mm builds the structured lace panel and bust section. The 4.5 mm is specifically for the cowl — the jump in hook size on the same yarn is what creates the flare and drape. Using a single hook size throughout won’t give you the cowl effect.
What if my waist measurement doesn’t land on the right multiple of 8?
Round to the nearest multiple of 8 plus 1. A stitch or two in either direction won’t change the fit noticeably — the fabric has enough give in the lace pattern to adjust slightly. What matters is that the pattern repeat lines up cleanly across the row.
Can I make this longer — more of a tunic or cropped top length?
Yes, easily. The lace pattern is a two-row repeat, so you can add as many extra rows as you want before starting the bust increases to lengthen the body. Just keep the repeat consistent and try it on as you go.
I’ve never done fit-as-you-go construction before. Is this pattern manageable?
Yes, with patience. The key is measuring accurately before you start and checking your work against your body as you go. The pattern gives you landmarks (bust coverage, 2.5 inches above nipple line, desired cowl depth) rather than fixed row counts, which actually makes it more forgiving — you’re adjusting to your shape, not trying to match someone else’s.
How do I keep the back panels symmetrical?
When you subtract the front panel width and divide the remainder in half, write those numbers down. Work both side panels to the same stitch count and row count — don’t eyeball it. Lay both panels flat next to each other before finishing to confirm they match before you start the button band.