
Getting clean shape and reliable coverage in a Crochet Bralette Cup depends far more on technique than on stitch count. The way increases are placed, how tension is controlled, and how the fabric is turned all affect whether the cup curves smoothly or collapses, bends, or twists. This design relies on simple single crochet worked with deliberate center increases, creating structure without bulk and shape without gaps. Once you understand how the cup grows and why the increases sit where they do, adjusting size and fit becomes straightforward rather than guesswork.
Crochet Bralette Cup

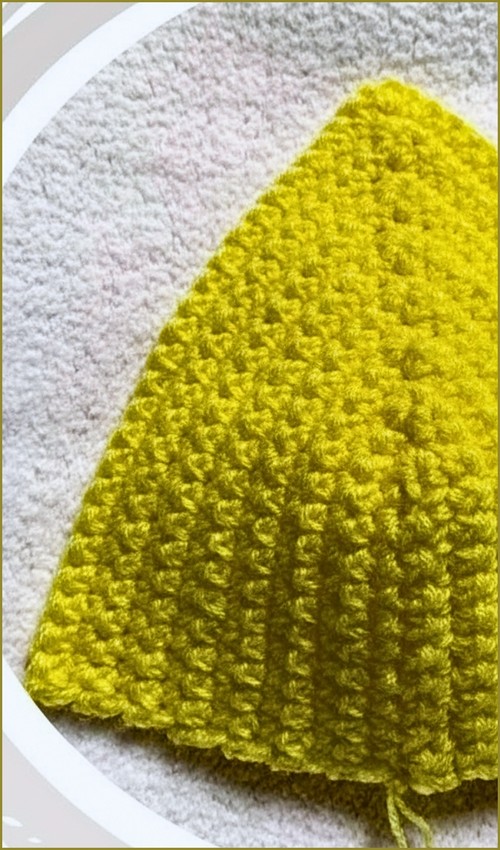
A single crochet cup may look simple, but the shaping is doing a lot of quiet work. This cup is built by placing increases at a precise center point, allowing the fabric to curve naturally instead of folding or flaring. Understanding how and why that increase works will help you control coverage, firmness, and symmetry no matter what size you are making.
Materials
- Regular yarn doubled for thickness
- 4.0 mm crochet hook
- Scissors
- Measuring tape
- Stitch marker
Foundation and Setup
- Measure from the nipple to the underside of the bust to determine the starting length
- Make a slip knot and chain the number of stitches that match your measurement

Why this matters
- This measurement determines the height of the cup, not the width.
- Starting here ensures the cup grows upward and outward in a way that follows the natural curve of the bust instead of riding too high or sitting flat.
- Because this is a made-to-measure start, stitch count is less important than physical length.
Always measure the chain itself, not the number of stitches.
Base Rows
- Chain 1 and work one single crochet into each chain across
- Chain 1, turn, and work one single crochet into each stitch across
Stitch clarity
- These two rows create a firm base that stabilizes the cup.
- Single crochet is used intentionally here because it creates a dense fabric that holds shape well once increases begin.
- Keep your tension even and avoid tightening the first and last stitches, as this will affect the curve later.

Arc and Increase Setup
- Continue working around the top edge of the two rows to form an arc
- At the center top point, work three single crochets into the same stitch
- Place a stitch marker into the second stitch of the three single crochets
- Continue working one single crochet into each stitch down the opposite side
What is happening here
- This step turns a flat strip into a curved cup.
- The arc forms because the fabric is now being worked around instead of straight across.
- The three single crochets at the center create the peak of the cup.
- The middle stitch of those three marks the true center and becomes the anchor point for every future increase.

Placing the stitch marker correctly is essential for even shaping.
Building the Cup
- Chain 1 and turn the work
- Crochet one single crochet into each stitch until reaching the stitch marker
- Remove the marker and work three single crochets into that marked stitch
- Place the stitch marker back into the second stitch of the three just made
- Continue with one single crochet into each stitch to the end of the row
- Repeat this row until the cup reaches your desired width
Shaping explanation
- Each row adds width by increasing only at the center point.
- This controlled increase allows the cup to expand outward while maintaining a smooth curve.
- Always increase into the same center stitch. If the marker shifts even by one stitch, the cup will twist or lean.
Turning the work at the start of each row keeps both sides balanced.
Fit and Sizing Guidance
- Continue working until the cup covers the bust comfortably from center to outer edge.
- The finished width should reach the side of the bust without pulling.
- If you prefer fuller coverage, continue for additional rows.
- For lighter coverage, stop earlier.
- The density of single crochet means the cup will not stretch much after finishing, so aim for full coverage during construction.
Beginner Notes
- Count stitches only to locate the marker, not to control size
- Measure the actual fabric against your body as you go
- Keep the turning chain loose so edges stay straight
- Always replace the stitch marker immediately after increasing
Troubleshooting
- Cup bends or curls inward: This usually means the last stitch of the row is being skipped. Make sure you work into every stitch, including the final one.
- Cup twists or looks uneven: The stitch marker may be misplaced. It must always sit in the second stitch of the three single crochets at the center.
- Gaps or loose fabric”: Tension may be too loose or the hook may be too large for doubled yarn. A firm single crochet fabric is key for structure.
Finishing Notes
- The finished cup should look solid, even, and hold its shape without gaps.
- Light blocking can help smooth edges, but avoid stretching the center.
- When making a second cup, count rows rather than stitches to ensure both sides match perfectly.


