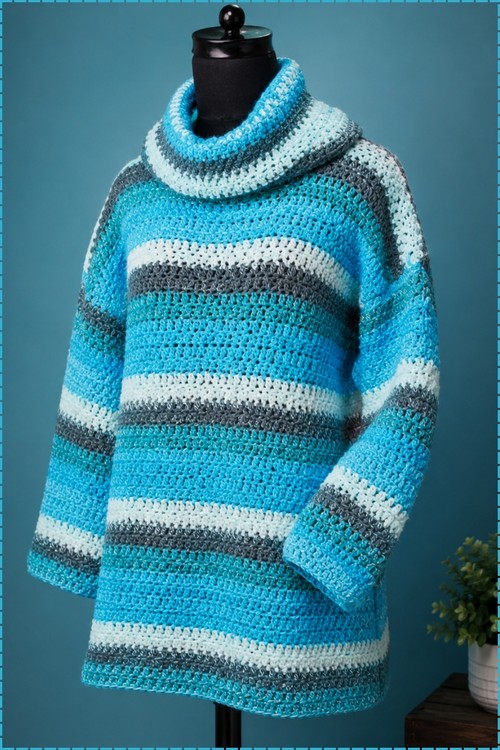
Leftover skeins in odd amounts turn into a crochet roll neck sweater once stripes do the planning. Written in size large with an oversized drop shoulder fit, and the collar rolls down on its own without shaping.
Horizontal stripes in blue, grey and white run the full length of this crochet roll neck sweater, changing width from narrow single rows to wide blocks. A thick collar rolls over at the neck, drop shoulders give the body an oversized fit, and the sleeves run long to the wrist. Carry your colours up the side rather than cutting each one, since a stripe pattern this frequent leaves a mass of ends otherwise.
Crochet Roll Neck Sweater

Stripes are one of the fastest ways to use up multiple colors without committing to a full colorwork pattern, and this roll neck sweater leans into that completely. Teal, gray, and white cycle through the body in wide horizontal bands while the collar stays a single cool tone to anchor the whole piece. The relaxed tunic length gives it the same easy fit as a slouchy oversized sweater but with a lot more color going on.
The construction is rectangular panels joined at the sides and shoulders, so there is no shaping math to track while the stripes keep rotating. Fluffy yarn is used throughout, which softens the stitch definition and gives the finished piece a cozy, almost textured hand feel. The roll neck is worked separately and folds over naturally once it is attached.
Materials and Tools
- Fluffy yarn (such as Cloudy Delight or similar), blended with a secondary matching acrylic yarn (such as Spotlight Senco 100% acrylic in Seafoam). Holding both strands together makes the stitches visible enough to work with fluffy yarn without fighting the fibers on every row.
- A 9 mm hook for the starting base chains and the roll neck
- An 8 mm hook for the main body and sleeves
- Tapestry needle
- Scissors
- Stitch markers
- Tape measure
Must-Know Stitch
Why Two Yarns?
The fluffy yarn alone makes it genuinely difficult to see the stitches as you work, which is a common frustration. Blending it with a smooth, matching acrylic shows you exactly where to insert your hook without changing the look of the finished fabric — the smooth yarn disappears into the fluff. This is the one yarn substitution note worth paying attention to: whatever fluffy yarn you choose, pair it with a matching smooth strand.
Difficulty and Time
This is an easy-to-intermediate project. The stitch is half double crochet throughout, the construction is logical, and the only real focus points are matching the front and back row counts and the gradual sleeve decrease. Fluffy yarn does slow things down a little — you can’t work as quickly — but the texture more than compensates. Budget a few comfortable sessions.
Beginner Technique Notes
A couple of techniques appear here that are worth knowing before you start:
- Working into back bumps: On Row 1 of each panel, you insert your hook into the back bumps (the little loops on the underside of the chain) rather than the front loops. This gives a neat, tidy starting edge on both sides.
- The chained neck bridge: When you transition from the back panel to the front, you chain across the center neck opening instead of working stitches there. This creates the neck gap in a single motion — the chain sits cleanly across and is then worked into on the following row just like regular stitches.
- Spiral roll neck rounds: The neck is worked in continuous rounds without joining at the end of each round. A stitch marker placed in the first stitch of each round tells you when you’ve completed a full circle. This method avoids the visible “jog” that appears at seamed round joins.
- Sleeve decreases: The sleeve narrows by skipping the first stitch on every row (a passive decrease) and working a more intentional decrease on every 5th row, gradually tapering the sleeve from the armhole down to the wrist.
The Pattern
The jumper starts at the back, transitions into the front as one connected piece, is seamed at the sides (with side slits left open at the bottom), then sleeves are picked up from the armholes and the roll neck is crocheted last.
Step 1: Back Panel
- Starting chain: Using the 9 mm hook, leave a very long yarn tail (for sewing the seams later). Make a slip knot and chain 50.
- Row 1: Switch to the 8 mm hook, chain 1, and work half double crochet into the back bumps of the chain across the entire row. (50 stitches total.)
- Rows 2 to 55: Chain 1, turn, and continue working half double crochet all the way across. Complete 55 rows total for the back panel.

Step 2: Back Neckline Shaping
- Marking the neck opening: Lay the back panel flat. For a size large, count in 17 stitches from each outer edge and place a stitch marker on the 18th stitch on each side, leaving 16 stitches in the center unworked.
- Neck Side 1: Working from the outer edge to the stitch marker, half double crochet across 17 stitches. Chain 1, turn, and complete a second row of 17 stitches. Fasten off.
- Neck Side 2: Attach a new ball of yarn at the opposite stitch marker. Work 17 half double crochet across to the outer edge. Chain 1, turn, and work a second row of 17 stitches. Fasten off and cut the yarn.
New to crochet and not sure how to read a pattern yet? The video tutorial below will guide you through it step by step, you’ve got this!
Step 3: Front Panel
- Rejoining: Return to the outer side where you left off. Insert your hook and work half double crochet up to the neck opening.
- Bridging the neck: Chain 16 across the front neckline gap to match the center unworked stitches of the back. Continue half double crochet along the remaining stitches to the end of the row.
- Rows 2 to 50: Chain 1, turn, and work half double crochet across the entire row — when you reach the chained bridge, work into the back loops of the chain stitches. Complete 50 rows total for the front panel.

Step 4: Seaming the Body
- Lay the front and back panels flat together with edges aligned.
- Side seams: Count 12 rows up from the bottom on both sides and place stitch markers (leave the bottom 12 rows unsewn to create a side-slit flap). Measure a 22 cm armhole opening from the top shoulder downward and place upper stitch markers.
- Using your long yarn tail, sew the side edges together from the bottom stitch marker up to the top armhole marker. Repeat on the other side.
Step 5: Sleeves (Worked in Rows, Joined with Slip Stitches)
- Base round: Turn the jumper right-side out. Attach your yarn near the underarm seam. Work half double crochet around the armhole opening, placing 1 stitch into the top of every alternate row. Note your total stitch count so the second sleeve matches exactly.
- Joining: Join the round with a slip stitch into the top of the first stitch, chain 1, and turn. (Do not work continuously in the round — this maintains texture consistency.)
- Sleeve body and decreases: Work 4 rows of even half double crochet, skipping the very first stitch next to the chain on each row. On the 5th row, work a decrease: skip the first stitch, yarn over, insert into the next stitch, pull up a loop, insert into the following stitch, pull up a loop, and pull through all loops to decrease by 1 stitch. Repeat this 5-row cycle (4 even rows, 1 decrease) approximately 6 times until you reach roughly 26 stitches at the wrist.
- Repeat the exact same process for the second sleeve, matching your initial stitch count.
Step 6: Roll Neck
- Base round: With the jumper right-side out and the back facing you, switch to the 9 mm hook. Attach your yarn at the corner of the neck opening and work one round of half double crochet evenly around the entire neckline.
- Spiral rounds: From here, work continuously in spiral rounds without joining. Place a stitch marker in the first stitch of the round to track your progress.
- Height: Crochet in half double crochet around and around for approximately 15 rows — more for a taller roll, fewer for a lower one.
- Finishing: Slip stitch into the next stitch to level off, cut the yarn, pull through, and weave in all remaining loose ends.

Tips and Troubleshooting
- Hold both yarns together from the very first stitch. The fluffy yarn and smooth acrylic are treated as one throughout. Starting a new ball of either without the other mid-row will show as a visible difference in the fabric.
- Note your armhole stitch count immediately. The moment you finish the base round of the first sleeve, write down the stitch count. Building both sleeves from the same starting number is the most reliable way to ensure they come out the same length.
- Leave a very long starting tail. The 9 mm chain starting tail is used later for seaming the sides. Too-short a tail means running out mid-seam — make it at least 18 to 20 inches longer than you think you’ll need.
- Track your 5-row decrease cycle. The sleeve decreases follow a 4-even, 1-decrease pattern repeated 6 times. A simple tally mark on paper (one mark per cycle) prevents losing track — it’s easy to forget whether you’re on row 3 or row 4 of the current cycle.
- Work the roll neck with the back of the jumper facing you. The source specifies this orientation to ensure the right side of the spiral rounds faces outward when the collar is folded down.

Yarn Substitution
Fluffy yarn on its own is difficult to work with — the fibers catch your hook and make it nearly impossible to find your stitches. The solution here (blending with a smooth acrylic strand) is the key to making this pattern workable rather than frustrating. Any fluffy, bouclé, or eyelash yarn works for the main strand, and any smooth worsted or DK weight acrylic in a similar color works for the secondary strand. The secondary yarn shows just enough to guide the hook without dominating the finished look.
Customization Ideas
- Adjust the roll neck height. More spiral rounds give a dramatic oversized roll; stopping at 10 rows gives a lower, softer fold.
- Change the side slit length. The 12-row side slit can be shortened for less movement at the hem, or lengthened for more.
- Adjust the sleeve taper. More or fewer cycles of the 5-row decrease pattern changes how fitted the wrist section is.
- Resize. The 50-stitch foundation is for a size large — subtract or add stitches (keeping the same row counts) to scale up or down.
- Add width at the shoulders. More rows before the neck shaping widens the shoulder span.
Frequently Asked Questions
1. Why blend fluffy yarn with a smooth acrylic strand? Fluffy yarns obscure the stitches — when the fibers fan out, it’s genuinely difficult to find the top loops to insert your hook. A smooth acrylic blended in at the same time gives you a visible stitch structure to follow without changing the appearance of the finished fabric.
2. Why is the front panel 5 rows shorter than the back? The back has 55 rows and the front has 50, which keeps the back hem slightly longer than the front — a standard fit detail that makes the jumper hang better when worn rather than pulling forward.
3. Why are the sleeves worked in joined rows rather than continuous rounds? Working in joined rows (turning at the end of each round) keeps the half double crochet texture consistent throughout the sleeve. Continuous rounds can shift the texture slightly at the point where rounds transition, which would create a visible line in the finished sleeve.
4. How do I know when the roll neck is tall enough? The pattern recommends approximately 15 rounds, but the best test is to fold the collar over while the jumper is on and check where it sits. If it doesn’t fold with enough height to stay put, add a few more rounds before fastening off.
5. My armhole stitch counts came out different on each sleeve — what do I do? Pick the count you’re most confident in (typically the first sleeve) and use that same number for the second — work more or fewer stitches in the base round until you hit the matching count. Both sleeves should start from the same number so the decrease cycle brings them to the same wrist width.