
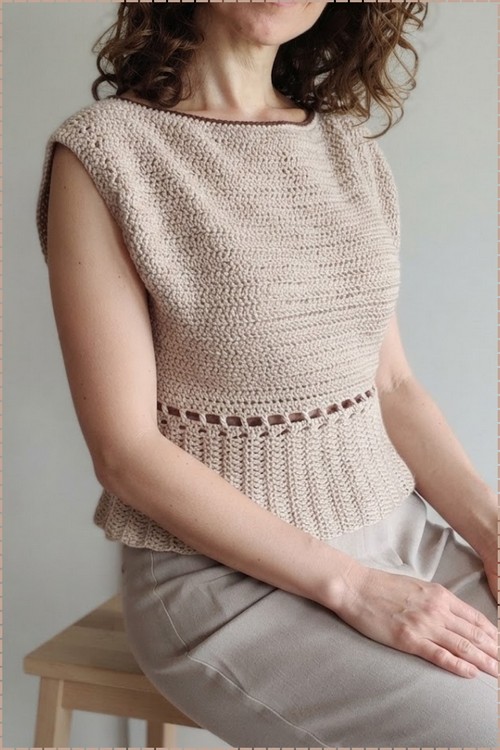
Drops Belle cotton linen yarn in beige and brown gives this boat neck crochet top pattern its summer weight. Intermediate makers work a horizontal bottom panel, a vertical front and two diagonal back panels before threading a contrast tie through the waist eyelets.
Three distinct zones make this top more interesting than it reads at first glance. The upper body is solid and structured, a single mesh row at the waist draws the eye before the ribbing fans out below, and the boat neck sits flat without any extra edging to bulk it up. It pairs naturally with the linen shorts post if you want the full warm weather outfit in a matching yarn weight.
Boat Neck Crochet Top

Construction is two rectangles seamed at the shoulders and sides, which makes sizing straightforward. The waist mesh row and the ribbed hem are worked as part of the main body rather than added on afterward, so the transitions are clean and there is no risk of a gathered or puckered join.
Why I love this one: every technical detail in this pattern has a reason — the eyelet row for the tie, the graduated armhole decreases, the back panel diagonal shaping. Nothing is decorative filler.
Materials and Tools
- Drops Belle yarn (53% cotton, 33% viscose, 14% linen; 50 grams / 120 meters per skein)
- For a size small: approximately 5 skeins of beige yarn and less than 1 skein of brown yarn for the contrast details and ties
- A 4.5 mm hook for the main panels, armholes, and base edging
- A 4 mm hook for the ties (tighter, stronger)
- Scissors
- Tapestry needle
Before you start: Make a 10 × 10 cm gauge swatch with your yarn and hook to verify your sizing — this pattern’s dimensions are built on specific row and stitch counts.

Useful Stitch to Learn
Difficulty and Time
This is a confident intermediate project across two parts. The basic stitch is double crochet, but the construction is genuinely involved: a horizontal bottom panel, a vertical front panel, diagonal back panels with decreases, armhole shaping with graduated decreases, and multiple contrast yarn details. Read through the full pattern before starting and give each stage its own session.
The Pattern
Part 1: Making the Panels
Step 1: The Bottom Body Panel
This panel is worked horizontally — rows go vertically rather than side to side, and the panel grows in length to wrap around your body.
- Sizing: Measure from under your bust to where you want the top to end. For a size small, start with a foundation chain of 17 chains.
- Row 1: Yarn over, insert your hook into the 3rd chain from the hook, and work a double crochet. Continue with double crochets in each chain across.
- Row 2 and onward: Chain 2 to turn. Work 1 double crochet into every stitch across — do not skip the very first stitch. Repeat until the panel wraps around your body. (Size small: 72 rows total.)

Adding the tie casing to the bottom panel
- Single crochet base row: Chain 1, then work 2 single crochets into the side of each row along the entire length of the bottom panel, weaving in any loose tails as you go.
- Eyelet row for the tie: Chain 2 and turn. Work 1 double crochet in the first stitch, chain 1, skip 1 stitch, double crochet in the next stitch. Repeat this sequence across the row to form the eyelet holes.
- Clean-up row: Chain 1 and turn. Work 1 single crochet into every double crochet and every chain space across the row.
Never read a crochet pattern before? No problem! The video tutorial below is perfect for beginners, or give the written pattern below a try!
Step 2: Making the Bottom Contrast Tie
Switch to the 4 mm hook for a tighter, stronger finish.
- Chain 250 stitches (or longer if needed for wrapping and tying into a bow).
- Work slip stitches into every chain across the entire length to strengthen the tie.
- Thread the completed tie through the eyelet holes in the bottom panel.
Step 3: The Front Top Panel
This panel is worked vertically — rows grow upward.
- Sizing: Chain as wide as your shoulders, or slightly wider for a looser fit. (Size small: 72 chains.)
- Row 1: Insert your hook into the 3rd chain from the hook and work double crochets across.
- Following rows: Chain 2 to turn at the end of every row, then work double crochets across. (Size small: 23 rows total.)
Step 4: The Back Panels with Diagonal Necklines
The back features a deep open V-neckline worked as two separate symmetrical panels.
- Sizing: Fold your front panel in half to count stitches. Leave a small gap of approximately 2 stitches for the back center. Calculate the chain length for each back panel. (Size small: 32 chains plus 2 turning chains.)
- Shaping and decreases: Keep one outer edge completely straight. On the neckline edge, work double crochet two together (dc2tog) decreases to slope the fabric inward. Alternate which end of the row receives the decrease depending on the direction of the slant, continuing until a small shoulder strap section remains.
- Make two mirror-image panels.
Step 5: Initial Assembly
- Sew the short ends of the bottom panel together to form the lower loop.
- Sew the front and back panels onto the upper edge of the bottom panel.
- Seam the top shoulders together.
Part 2: Sleeves, Neckline, and Finishing
Step 6: Seaming the Panels
- Turn the top inside out (wrong side facing out).
- Join yarn and seam the small open side sections together by working slip stitches underneath all four loops for a softer, less visible seam.
- Turn the top right side out when finished.

Step 7: Armhole Edging and Coverage
Using the 4.5 mm hook:
- Round 1: Chain 1, then work around the armhole opening — approximately 2 half double crochets per row on average. For the first 6 rows under the arm, work slightly fewer stitches or skip a space in every other row to curve and tighten the underarm opening. Join with a slip stitch. (Size small ended with approximately 96 half double crochets total.)
- Round 2 (decreases): Chain 1. Work 6 half double crochets, then 1 half double crochet decrease (hdc2tog). Repeat all the way around and join with a slip stitch.
- Round 3 (decreases): Chain 1. Work 5 half double crochets, then 1 hdc2tog. Repeat around and join with a slip stitch.
- Round 4 (final edging): Chain 1. Work 8 half double crochets, then 1 hdc2tog. Repeat around. Fasten off and weave in ends.
Step 8: Neckline Contrast Edging
- Transition round (beige): Attach beige yarn at the neckline, chain 1, and work 1 single crochet into each stitch all the way around to create a clean foundation row. Join with a slip stitch.
- Contrast round (brown): When making the slip stitch join, drop the beige yarn and pull through the brown yarn instead. Fasten off the beige yarn. Using the brown yarn, work single crochets into the back loop only all the way around the neckline. Fasten off and weave the tail in on the wrong side.
Step 9: Back Neckline Ties
Make two ties using brown yarn:
- Chain 110 stitches.
- Work slip stitches into every chain across to make the strap sturdy and clean.
- Attach one tie securely to each side on the inside of the back neckline so they can wrap and tie around the neck.
Step 10: Optional Bra Coverage Insert
For extra coverage at the front neckline:
- Crochet a small rectangular panel measuring 12 half double crochets wide by 5 rows tall.
- Sew this rectangle into place on the inside of the front neckline.
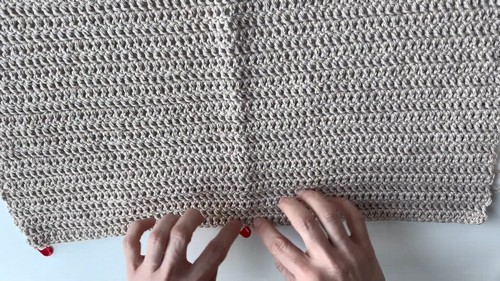
Tips and Troubleshooting
- Work the armhole decreases in all four rounds without skipping. The armhole shaping is progressive — each round removes stitches at a different interval to curve the opening. Skipping a round leaves the armhole too wide and uncomfortable.
- Match your two back panels precisely. The diagonal decreases on each back panel must mirror each other exactly or the open V won’t sit symmetrically at center back. Count your decreases and your final shoulder strap width before seaming.
- Keep the tie chains loose. Both ties — the waist tie and the back neckline ties — use slip stitches to strengthen the chain. Slip stitches naturally want to tighten; work them as loosely as you can to keep the ties flexible and comfortable to wear.
- Swatch before you start. The entire top is sized by row and stitch counts. A gauge difference of even half a stitch per inch will change the finished dimensions. A small 10 × 10 cm swatch protects you from discovering the fit issue after 72 body rows.
Yarn Substitution
Drops Belle’s 53% cotton / 33% viscose / 14% linen blend is the right call here — the viscose gives it drape, the cotton gives structure, and the linen adds a slightly crisp hand that makes the double crochet fabric look intentional rather than soft and drapey. If you substitute, stay with a natural fiber blend in the same weight. Pure cotton will give a stiffer result; a cotton-viscose blend in a similar weight will behave most like the original. Avoid 100% acrylic, which won’t hang or drape the same way against the skin.
Customization Ideas
- Adjust the waist length. The bottom panel chain count (17 for size small) sets the panel height — more chains make a longer body; fewer make it more cropped.
- Widen or narrow the front panel. Chain more stitches for a looser front fit; fewer for a closer one.
- Change the open back depth. Starting the back panel decreases earlier or later adjusts how deep the V sits.
- Skip the bra insert. The coverage insert is genuinely optional — the top is complete without it.
- Change the tie color. Any contrast color works for the waist tie, neckline detail, and back ties — they don’t have to match.
Frequently Asked Questions
1. Why is the bottom panel worked horizontally instead of vertically like the other panels? The bottom panel is worked in rows that grow in length (rather than height) to wrap around the body as a tube. Working it horizontally means the panel’s row ends become its circumference, which lets you keep adding rows until it fits your exact body measurement rather than relying on a fixed stitch count.
2. Why use a different hook size for the ties? The ties need to be firm and hold their shape when tied — a tighter hook creates denser, more structured slip stitches that feel like cord rather than floppy chain. The main body uses the larger hook for a softer, more open double crochet fabric.
3. How do the two back panels create the open back neckline? Each back panel is worked with one straight outer edge (the side seam) and one diagonal edge (the neckline), produced by decreasing at the neckline end on alternating rows. When the two panels are placed side by side, their diagonal edges naturally form the open V of the back neckline.
4. Can I make this without the contrast brown yarn? Yes, though you’ll lose the tie-through eyelet waist, the contrast neckline round, and the back ties — which are the details that give it a finished, intentional look. A simpler version without contrast yarn would use the same beige throughout and could skip the eyelet row on the bottom panel.


