A dense wrap body and open-mesh sleeves give this purple top an interesting contrast — structured where it needs coverage, airy where it doesn’t. For a similar V-wrap silhouette with a lace fabric throughout, the wrap-up lace top takes the same front style in a completely different direction.
Crochet Mandala Wrap Top

The body works up as a simple rectangle — no complex shaping — which keeps the construction approachable even if the finished piece looks elaborate. If you prefer the wrap look without the sleeve volume, the summer wrap top strips it back to just the essential front tie.
Pattern Essentials
Materials
Yarn: Weight 4 (Medium/Aran) acrylic yarn (Approx. 800–1200 yards depending on size).
Hook: 4.0 mm (US G/6) crochet hook.
Tools: Scissors, yarn needle for weaving in ends, and a measuring tape.
Stitch Basics You’ll Use
Sizing & Measurements
Size: This pattern is highly customizable. The back panel square should be worked until it reaches from shoulder blade to shoulder blade.
Armholes: The side seam leaves an opening of 9 to 11 rows, which creates a comfortable, standard armhole.
The Pattern

Back Panel Mandala Square
Pro-Tip: Managing Tension
Mandalas tend to ruffle if your tension is too loose or bunch up if it’s too tight. Keep your stitches relaxed, especially during the treble crochet rounds.
Round 1: Chain 6 and slip stitch into the first chain to form a ring. Chain 3 (counts as your first double crochet), then work 15 double crochets into the center of the ring. Slip stitch to the top of the beginning chain-3 to join. (Total: 16 stitches)
Round 2: Chain 5 (counts as 1 treble crochet plus a chain-1 space). Treble crochet in the next stitch, chain 1. Repeat from * to * in each stitch around. Slip stitch into the fourth chain of the beginning chain-5 to close the round.
Round 3: Slip stitch into the first chain-1 space. Chain 4 (counts as your first treble crochet), then work 2 treble crochets into that same space. Work 3 treble crochets in every chain-1 space around. Slip stitch to the top of the beginning chain-4 to join.
Round 4: Chain 5, skip one stitch, slip stitch into the next stitch. Chain 5, skip one stitch, slip stitch into the next stitch. Repeat from * to * all the way around.
Round 5: Slip stitch into the first chain-5 loop space. Chain 4 (counts as your first treble crochet), then work 3 treble crochets into that same loop space. Work 4 treble crochets into each chain-5 loop space around. Slip stitch to the top of the beginning chain-4 to join.
Round 6 (Squaring Off): Chain 3 (counts as your first double crochet). Double crochet in the next 23 stitches. Chain 2, double crochet in the next stitch, double crochet in the next 23 stitches. Repeat this sequence to create four distinct corners for your square.
Rounds 7 to 11: Chain 3, double crochet in every stitch across to the corner. In the chain-2 corner space, work (2 double crochets, chain 2, 2 double crochets). Double crochet in every stitch across to the next corner. Repeat this sequence around. Continue repeating this round until your square reaches your exact shoulder blade width.
- If you’re still learning how to read crochet patterns, no stress! Follow the video tutorial below and use the written pattern below as you get more comfortable!
Front Panels (Make Two)

Technique Explainer: The Increase Row
To create the flattering wrap effect, you will be increasing on one side only. Make sure your increases always happen on the exact same edge (e.g., the inner neck edge) to maintain a straight outer side seam.
Foundation Row: Chain 17.
Rows 1 to 9 (Base Rows): Double crochet in the fourth chain from your hook and in each chain across. Chain 3 and turn at the end of each row. (The chain 3 counts as your first double crochet here and throughout).
The Row Sequence (Rows 10 to 23): You will now alternate between an Increase Row and a Straight Row on the same designated side until you reach 23 total rows.
- Increase Row: Chain 3, work 1 double crochet directly into the very first stitch (this creates your increase). Double crochet in each remaining stitch across. Chain 3 and turn.
- Straight Row: Double crochet in each stitch across without adding any extra stitches. Chain 3 and turn.
Ties: At the end of row 23, do not fasten off. Chain 100. Half double crochet back down the length of the chain. Slip stitch into the base of the final row to secure. Fasten off and weave in ends.
Assembly

Shoulder Seams: Lay your back panel flat. Place the two front panels on top of the back panel, ensuring the increased angled edges are facing inward toward each other. Align the top edges and use a yarn needle to sew (or slip stitch) the shoulder seams together.
Side Seams: Align the sides of the front and back panels. Sew the sides together from the bottom hem upwards, leaving an opening of 9 to 11 rows at the top for the armholes.
Bell Sleeves
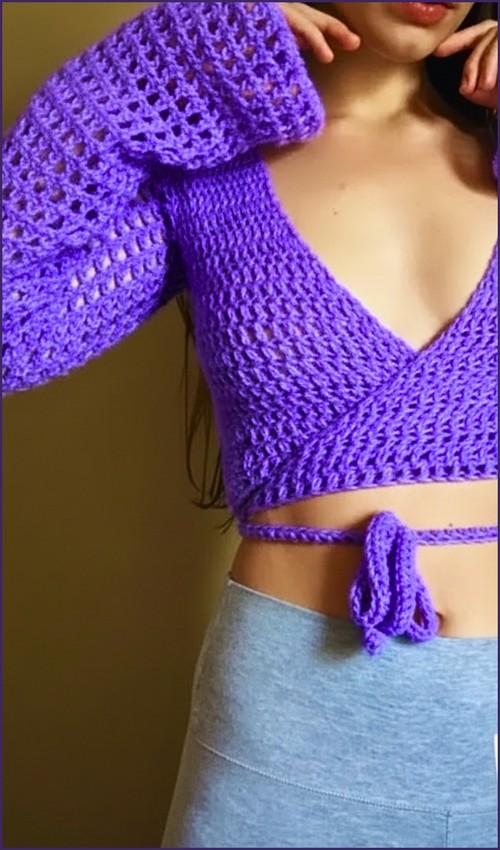
Pro-Tip: Stitch Placement in Mesh
When working the mesh rows, ensure you stack your double crochets directly on top of the double crochets from the previous round to keep your grid lines perfectly straight and clean.
Mesh Setup Round: Attach your yarn at the armpit join. Chain 4 (counts as 1 double crochet plus a chain-1 space). Skip one stitch/row space, double crochet into the next space, chain 1. Repeat from * to * all the way around the armhole opening. Slip stitch to the third chain of your beginning chain-4 to join.
Rounds 1 to 30: Chain 4. Double crochet into the next double crochet stitch, chain 1. Repeat from * to * around. Slip stitch to join.
Bell Increase Rounds (Rounds 31 to 35): To flare the sleeve, work (1 double crochet, chain 1, 1 double crochet) into the first stitch of the round. Continue the standard mesh pattern (double crochet, chain 1) for the rest of the round. Repeat this increase sequence for 5 total rounds.
Edging Round: Chain 1. Work 1 single crochet into every double crochet stitch and 1 single crochet into every chain-1 space around the entire sleeve cuff. Slip stitch to the first single crochet to join. Fasten off.
Repeat the entire sleeve process for the second armhole.