Fringe can feel intimidating to add to a crochet garment, especially when you want it to look intentional rather than messy or uneven. A crochet top with fringe works best when the base fabric is simple and stable, and the fringe is added in a controlled way that follows the stitch structure instead of fighting it. In this design, the fringe is not an afterthought. It is planned into specific rows so it moves naturally with the fabric, adds texture without extra bulk, and stays balanced as the top is worn and laced at the sides.
Crochet Top With Fringe

Some crochet tops look great in photos, but feel confusing once you start making them because there are “fabric parts” and “decoration parts” happening at the same time. This design is easier when you treat it as three simple jobs: make a solid front panel, add fringe in tidy rows, then build the shaping with mesh sides, a smaller back panel, and straps. Once you know what each section is doing, you can crochet steadily without second guessing your stitch placement.
Materials
- DK weight yarn
- 2.5 mm crochet hook
- Scissors
- Power bank or small box for measuring fringe length
- Stitch markers

Before You Start
What you are making
- The front panel is a tall rectangle made in double crochet rows.
- The fringe is added directly into stitches on specific rows of that panel.
- The side mesh panels add width and create spaces for lacing.
- The back panel is a smaller rectangle, then edged in single crochet for a neat finish.
- Straps connect the back panel corners to marked points on the front panel.
- Finishing adds lacing, tidies the bottom edge, and secures ends.
Helpful checks so your top comes out even
- Count your stitches across the front panel early. If you start with chain 40, you should have the same number of double crochets across each row once you establish the first row.
- Keep your turning chains consistent. Your pattern uses chain 2 for height. Try to make those chains the same tension every time so your edges stay straight.
- Use stitch markers at corners and strap points. Marking now prevents guesswork later.
Pattern

Front Panel
- Create a slip knot and chain 40
- Chain 2 more for height
- Work one double crochet into the 3rd loop from the hook
- Work one double crochet into every chain across
- Chain 2, turn, and work one double crochet into every stitch across
- Repeat the double crochet rows until you complete 35 rows for size small
- Chain 1 and cut yarn
Stitch clarity for the front panel
- “3rd loop from the hook” means you do not count the loop already on your hook. Count chains away from the hook until you reach the third one, then place your first double crochet there.
- After that first double crochet is placed correctly, the rest of the row becomes simple: one double crochet in every chain.
- When you turn, you’ll be working into the tops of the double crochets from the previous row. If you ever feel unsure, look for the small “V” at the top of each stitch.
Row count note
- The pattern says 35 rows for size small. The important habit is to count rows the same way every time (each completed row of double crochet counts as one row). If you want to adjust length later, keep your row count change consistent so fringe placement still makes sense visually.
Fringes
- Wrap yarn evenly around a power bank or small box
- Cut one side to create equal-length strands
- Attach two folded strands into every double crochet along the first row of the panel
- Skip two rows above the first fringe row
- Attach another row of fringes into every double crochet of the fourth row
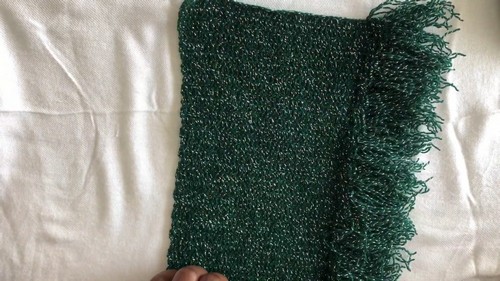
How to make the fringe look neat
- Wrapping around a box gives you consistent length, which is what makes fringe look intentional instead of uneven.
- When you “attach two folded strands,” you are essentially adding two strands folded in half (so you end up with four hanging ends).
- Attaching fringe into every double crochet creates a full look. If it feels too dense with your yarn, keep the step the same for now and assess after the second fringe row is added.
Where to place fringe rows without confusion
- Your first fringe row goes along the first row of the panel.
- Then you skip two rows above that.
- The second fringe row is attached into every double crochet of the fourth row.
- A simple way to stay accurate is to lay the panel flat and count rows from the bottom edge before you begin attaching.
Side Mesh Panels
- Attach yarn at one side corner of the front panel
- Chain 3, skip one stitch, and work one double crochet into the next stitch
- Chain 1, skip one stitch, and work one double crochet into the next stitch
- Repeat the mesh pattern across the side
- Continue the same mesh pattern for a total of 8 rows
- Work one row of half double crochet into every stitch and chain space
- Cut yarn
- Repeat the same steps on the opposite side
What this mesh pattern is doing
- This section creates a flexible side panel with open spaces for lacing later.
- The repeated “chain, skip, stitch” rhythm forms a clean mesh. The goal is even spacing, not tightness.
Stitch placement tips
- “Attach yarn at one side corner” works best if you start right on the edge stitch so your mesh rows stack neatly.
- In the mesh rows, your double crochets land in stitches that are separated by skipped stitches, which is what creates the open look.
On the final row of half double crochet, work carefully into:
- each stitch top you see, and
- each chain space from the mesh.
That last half double crochet row stabilizes the mesh edge so it does not stretch too much during wear.

Back Panel
- Chain 12 and add 2 extra chains
- Work 8 rows of double crochet
- Rotate the piece and work single crochet evenly around all edges
Understanding the back panel
- This is a smaller rectangle that balances the front panel without adding bulk.
The single crochet border gives the back panel:
- cleaner edges
- more structure for strap attachment
- a finished look that matches the lacing and fringe styling
Even edging guidance
“Single crochet evenly around all edges” means aim for consistent spacing:
- one single crochet per stitch across the top and bottom edges where stitches are clear
- along the side edges, place single crochet in a way that looks smooth and flat (avoid bunching or pulling)
Straps
- Mark the 8th row from the top on both sides of the front panel
- Attach doubled yarn to the top corner of the back panel
- Chain 50
- Slip stitch the chain to the marked stitch on the front panel
- Repeat for the second strap
Why the strap marking matters
- Marking the 8th row from the top gives you a consistent strap angle so the top sits correctly instead of pulling forward or slipping off the shoulders.
- Using doubled yarn adds strength. Straps take stress, and doubling helps them hold up better over time.
Strap attachment tips
- When you slip stitch the chain to the marked stitch, do it snugly but not tight. You want a secure join without puckering.
- Make sure both straps are attached at the same height by double-checking your row count before joining the second strap.
Finishing
- Create two long crochet chains for lacing
- Thread the chains through the side mesh spaces in a criss-cross pattern
- Work one final row of half double crochet along the bottom edge of the top
- Weave in all ends and trim excess yarn
Lacing guidance
- Criss-cross lacing is easiest if you start at the bottom and work upward, keeping tension even on both sides.
- If the mesh feels like it’s pulling, loosen the lacing slightly. The top should shape gently, not cinch sharply.
Final bottom edge

That last half double crochet row helps:
- smooth the hem
- add weight so the top hangs nicely
- reduce curling along the bottom edge
Weaving in ends
- Weave ends in along the direction of stitches and through multiple stitches so fringe movement and lacing tension do not pull tails loose.
- Trim only after you tug lightly on the fabric to make sure nothing shifts.
Fit and Sizing Guidance
- The pattern gives 35 rows for size small on the front panel. This controls overall length.
Width is influenced by:
- the starting chain (front panel width)
- the side mesh panels (added shaping and adjustability through lacing)
If your top feels too loose or too snug, you can often correct the fit by adjusting how tightly you lace the sides, since the mesh is designed for that purpose.
Beginner Notes and Confidence Builders
- If your edges look wavy, it is usually from inconsistent turning chain tension. Slow down on your chain 2 and keep it the same each row.
- If your mesh looks uneven, count your “skip one stitch” consistently and keep your chain spaces relaxed.
- If fringe feels intimidating, do a small test on a swatch first to get comfortable with folding strands and pulling through.
Troubleshooting
My front panel is getting wider or narrower
- Double check that you are placing one double crochet in every stitch and not skipping the first or last stitch of the row.
- Make sure you are not accidentally adding extra stitches into turning chains unless your stitch count requires it.
My fringe rows don’t look straight
- Recount your rows from the bottom edge before attaching the second fringe row.
- Make sure you are attaching into the same part of each double crochet consistently.
My side mesh feels too tight
- Relax your chain stitches slightly.
- When working into the final half double crochet row, avoid pulling the yarn tight across chain spaces.
My straps feel uneven
- Confirm both strap points are truly on the 8th row from the top on each side.
- Count your chain 50 carefully for both straps.
Finishing Notes
- Try the top on before trimming yarn ends completely. A small adjustment to lacing tension can change the fit a lot.
- Once you like the fit, weave in ends securely, especially near strap joins and side mesh, since those spots take the most wear.