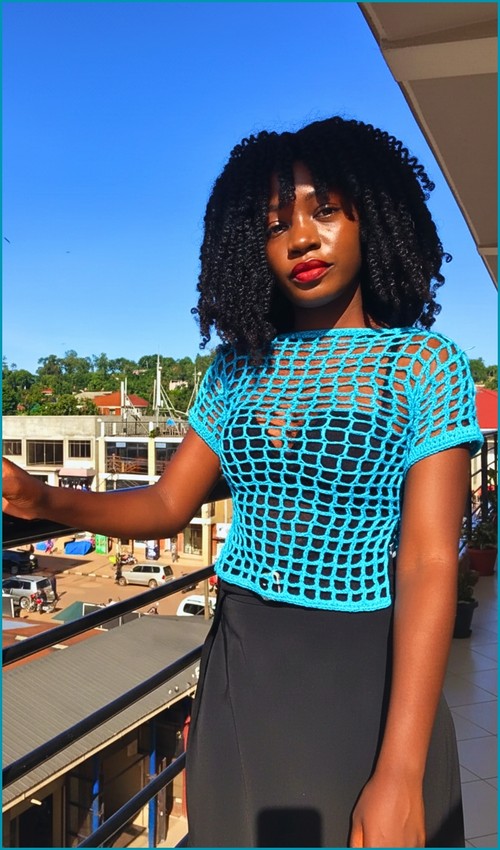
A crochet collar changes the whole character of a sleeveless top this red version pairs a structured cowl neck with horizontal eyelet bands that run the length of the body, giving it a polished finish that doesn’t demand advanced skills. The alternating solid and open rows create a light stripe effect that works in any solid yarn color. If you’re also drawn to garments with built-in texture detail, the free crochet bamboo yarn shell stitch ruffle top is another beginner-friendly make worth adding to your queue.
Crochet Sleeveless Top With Collar

The eyelet stripe repeat is simple to memorize once you’ve worked the first two rows the pattern locks in quickly and the length works up steadily from there. The collar is crocheted separately and attached at the neckline, making it easy to adjust the fit independently of the body. For a sleeveless garment that takes a different approach to texture, the free crochet sleeveless summer shell stitch top gives you shell clusters in place of eyelet stripes.
Before You Start Reading the Pattern
This design is made from two identical flat panels that are joined at the shoulders and sides. The fabric relies on a balance between solid rows for stability and mesh rows for airflow and drape. Nothing in the pattern is difficult, but a few steps benefit from understanding why they are done a certain way.
Important things to keep in mind as you work:
- The foundation chain loops replace a traditional long starting chain and define the shoulder width.
- The side edging is structural, not decorative. It stabilizes the fabric and makes seaming cleaner.
- The collar is worked last, after assembly, so you can adjust the height without affecting the body fit.
Materials
- 5.50 mm crochet hook
- Yarn suitable for the hook size
- Measuring tape
Techniques You’ll Work With
Foundation Chain Loops
- Chain 4 to begin
- Skip 3 chains and work 1 double crochet into the 4th chain from the hook
- Chain 3, yarn over, insert the hook between the chain and the previous double crochet, and work 1 double crochet
- Repeat the loop sequence until the foundation matches your shoulder to shoulder measurement

Why this foundation matters
This looped foundation replaces a long starting chain, which can easily become too tight or uneven. Each loop acts as a flexible anchor point for the first solid row, helping the top sit smoothly across the shoulders without pulling or buckling. Measuring shoulder to shoulder here ensures the neckline width is correct before any body length is added.
Body Panel Pattern
Row 1 Solid
- Chain 3
- Work 3 double crochets into each loop across
Row 2 Solid
- Chain 2 and turn
- Work 1 double crochet in every stitch across
- Reading crochet patterns can be tricky when you’re just starting out, feel free to follow the video tutorial below instead!

Row 3 Mesh
- Chain 2 and turn
- Work 1 double crochet in the first stitch
- Chain 1, skip 1 stitch, work 1 double crochet in the next stitch
- Repeat across the row
Row 4 Solid
- Chain 2 and turn
- Work 1 double crochet in the first stitch
- Work 1 double crochet into each chain space and each double crochet from the previous row
Row 5 Solid
- Chain 2 and turn
- Work 1 double crochet in every stitch across
- Repeat Rows 3, 4, and 5 until the panel reaches your desired length
- Make two identical panels
Stitch and shaping clarity
- Row 1 is intentionally dense. Working three double crochets into each loop creates a stable base so the mesh rows do not distort the neckline.
- The mesh row is always followed by solid rows to lock the structure back in place.
- When working Row 4, make sure you place a double crochet into every chain space and every stitch. Missing chain spaces is the most common mistake and can cause the fabric to narrow unintentionally.

Side Edging
- Chain 3 at the top of the panel
- Work 2 double crochets evenly into each side row down the length
- Repeat on both sides of each panel
Why the edging is important
Crochet fabric worked in rows naturally creates softer edges that can stretch or ripple when seamed.
This side edging creates a firm, evenly spaced edge that:
- Makes side seams easier to align
- Prevents gaping at the armholes
- Gives the finished garment a more tailored look
Work slowly here and focus on even spacing rather than exact stitch counts.
Assembly and Finishing
- Place the two panels together with right sides facing
- Join the shoulders using single crochet through both layers, leaving an opening for the neck
- Join the sides with single crochet from the armhole down to the desired slit height
- Work around each armhole using front post and back post double crochet for a ribbed edge
- Finish the armholes with one round of single crochet
- Work a round of single crochet around the bottom edge and slit openings
Fit and assembly guidance
- Leaving the neck opening during shoulder joining controls how wide and how high the collar will sit later.
- Side slits are optional but help the top move comfortably at the hips.
- The front post and back post armhole edging adds stretch and structure at the same time, helping the armholes keep their shape with wear.

High Neck
- Attach yarn at the neck opening
- Work 3 double crochets into each loop around the neckline
- Work one round of double crochet in every stitch
- Work one mesh round by repeating 1 double crochet, chain 1, skip 1 stitch
- Continue repeating the mesh round followed by two solid double crochet rounds until the neck reaches your preferred height
Collar Control Tips
Because the collar is added after assembly, you can try the top on as you go. If you want:
- More structure: add extra solid rounds
- More airflow: add additional mesh rounds
- A softer fold: stop earlier and leave the collar shorter
The initial round of three double crochets per loop ensures the collar stands evenly without flaring.
Beginner Notes
- Turning chains count as stitches only where specified by the pattern flow.
- Use stitch markers at the beginning of rows if you tend to lose track of your first stitch.
- Blocking lightly before assembly can help panels align more easily.
Troubleshooting
- Neckline feels too wide: Double-check your shoulder-to-shoulder measurement in the foundation loops.
- Mesh looks uneven: Make sure your chain-1 spaces are consistent and not pulled tight.
- Fabric feels stiff: Try a yarn with better drape or relax your tension slightly.
Finishing Notes
- Weave in all ends securely, especially around the collar and armholes where there is more movement.
- A gentle steam or light blocking will help the mesh settle and the collar stand cleanly.