Grey days call for a crochet poncho you can pull on over anything without thinking about sleeves. One size fits nearly everyone, so this fringed poncho makes a safe handmade gift when you don’t know someone’s measurements.
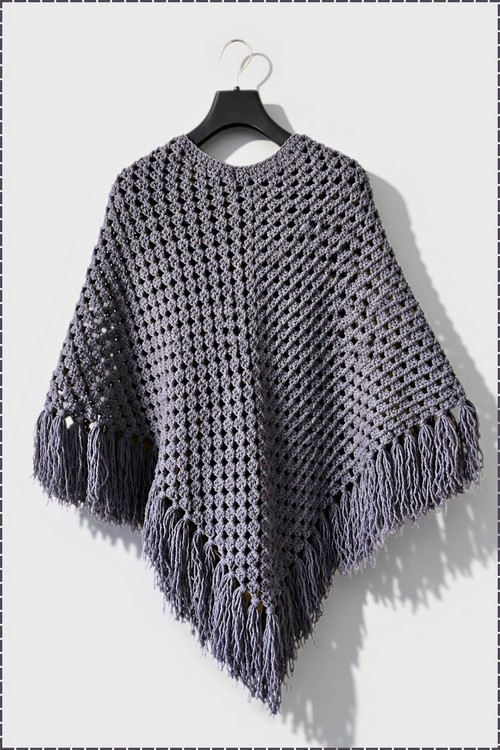
Two front panels meet in a V at the hem of this free crochet poncho sweater pattern, and knotted fringe hangs from every sloping edge. Rows of small clustered stitches leave regular holes across the grey fabric, so the poncho drapes rather than holds its shape. A simple round neck opening needs no fastening at all. Add the fringe last, and cut all the strands together, since uneven lengths stand out along a long diagonal edge.
Crochet Amelia Poncho Sweater

Soft grey worked in open clusters, falling to a point at the front and back with long fringe along every edge. The neckline is round and finished plain, so the whole shape comes from how two rectangles meet at the shoulder rather than from any shaping. Anyone who has made a granny square already knows every stitch this poncho needs. Rows of clusters and chain spaces build the fabric and the drape at the same time. Working in straight rows keeps the repeat identical from the neck down, and the points at the hem come from where the two panels are joined rather than from decreasing, which means there is nothing to count and nothing to shape. Fringe is cut and knotted on at the end, and the length of it is what decides how dramatically the poncho hangs.
Why This Poncho Works So Well
The Amelia starts from a single long chain that you shape into two points before you ever join it into a ring. Once that first row sits flat, every round afterward follows the same logic: three double crochets into each space along the sides and a small increase cluster in each peak. Because the increases only happen at the front and back points, the poncho grows longer and wider in a natural V shape without any complicated counting. The neckline gets its own three short rounds of single crochet that pull the opening in just enough to rest comfortably on your shoulders, so the fit feels closer to a sweater than a loose wrap.
Difficulty and Time
- Skill level: Easy and beginner friendly
- Time: Roughly 12 to 18 hours for the body, trim, and fringe, depending on your pace and how many rounds you work in one sitting
Materials and Tools
- 4.0 mm crochet hook
- 4 skeins of Pingouin yarn, 100 g each
- Scissors
- A small notebook or piece of cardboard to use as a fringe template
- Tapestry needle for weaving in ends
Beginner Technique Notes
Everything in this poncho comes down to three moves: the 3 dc cluster, the ch-1 space between clusters, and the corner shell of (3 dc, ch 2, 3 dc). If you can place three double crochets into one space and keep them snug together, you already have the main skill. Work each cluster into the chain space itself rather than into the tops of the stitches below; this keeps the granny texture open and the fabric soft. When you reach a peak, the ch-2 space is where the shaping happens, so give it a quick look before each round to make sure you are working into the right gap. The alternating round starts in Rounds 2 and 3 keep your join lines from building up in one visible spot.
Amelia Poncho Sweater Pattern
Abbreviations (US Terms)
- ch: chain
- dc: double crochet
- sc: single crochet
- sl st: slip stitch
- sp: space
- sk: skip
Foundation and Row 1: Building the Pointed V Shape
Foundation Chain
- Chain 92. [92 ch]
First Block
- Chain 4 more.
- Work 1 dc into the 5th chain from your hook.
- Work 1 dc into the next chain to complete your first 3 dc block.

Side 1 (Granny Blocks)
- Ch 1, sk 1 ch, then work 1 dc into each of the next 3 chains.
- Repeat this sequence across until you have 6 blocks of 3 dc in total. [6 blocks]
Front Peak (Corner 1)
- Ch 2 without skipping any chains.
- Work 1 dc into each of the next 3 chains to form the front point.
Back Section
- Ch 1, sk 1 ch, then work 3 dc across the next 3 chains.
- Repeat this sequence until this section holds 18 blocks in total. [18 blocks]
Don’t let crochet patterns intimidate you! If you’re a beginner, the video tutorial below makes it super easy to follow along!
Back Peak (Corner 2)
- Ch 2 without skipping any chains.
- Work 1 dc into each of the next 3 chains to form the back point.
Side 2
- Ch 1, sk 1 ch, then work 3 dc across the next 3 chains.
- Repeat for the remaining 6 blocks to reach the end of the row. [6 blocks]
Joining into the Round
- Check that your chain is not twisted anywhere along its length.
- Join with a sl st into the 3rd chain of the starting loop; the work now forms a ring with one point at the front and one at the back.
Body Rounds
Round 2
- Ch 4.
- Work 3 dc into the first ch-1 space.
- Ch 1, then work 3 dc into the next ch-1 space; repeat along the side until you reach the corner peak.
- In each ch-2 corner space, work (3 dc, ch 2, 3 dc) to shape the point.
- At the end of the round, work 2 dc into the starting space, then sl st into the 3rd chain of the opening ch-4 to close the round neatly.

Round 3
- Ch 3 (counts as the first dc), then work 2 dc into the same space.
- Ch 1, then work 3 dc into the next ch-1 space; repeat along the sides.
- Work (3 dc, ch 2, 3 dc) in both corner peak spaces.
- Join with a sl st to the top of the turning ch-3.
Rounds 4 to 30
- Alternate between the Round 2 start and the Round 3 start on each new round.
- Continue until you have completed 30 rounds in total. [30 rounds]
Finishing
Round 31: Lower Border
- Ch 1, then work 1 sc into the same stitch.
- Work 1 sc into every stitch and 1 sc into every ch-1 space all the way around.
- In each of the 2 corner peaks, work 2 sc inside the ch-2 corner space.
- Sl st to join, fasten off, and leave a long tail.
Neckline Trim
- Attach yarn at the back neck slit.
- Round 1: Work 1 sc into each stitch around the neck opening to tidy the edge and close the slit, then sl st to join.
- Round 2: Ch 1, then work 1 sc into each of the next 2 stitches and sk 1 stitch; repeat around, then sl st to join.
- Round 3: Repeat Round 2 (2 sc, sk 1 st) to taper and gather the neckline comfortably.
- Fasten off and weave in all ends.
Attaching the Fringe
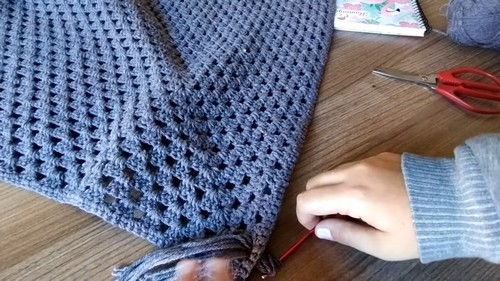
- Wrap yarn 10 times around a small notebook or piece of cardboard, then cut along one edge to create strands of equal length.
- Take a bundle of 5 strands and fold them in half so you have 10 fringe tails.
- Insert your hook from back to front through a ch-space along the bottom border and pull the folded loop through.
- Draw all the loose tails through that loop.
- Pull firmly to secure the knot.
- Repeat in every gap along the entire bottom edge.
- Trim all ends evenly with scissors.
Tips and Troubleshooting
- Count your blocks before joining Row 1. A missed block on one side will pull the peaks off center, and it is far easier to fix before the ring closes.
- Lay the foundation chain flat on a table before you join it. A twist here runs through every round afterward and cannot be corrected later without ripping back.
- Mark each ch-2 corner space with a stitch marker and move it up as you go. The peaks are the only place the shaping happens, so losing one throws off the round.
- Keep your ch-1 spaces relaxed. Tight chains between clusters make the body pucker and stop the poncho from draping over your arms.
- Try the poncho on after about 20 rounds. If it already reaches the length you like, you can plan your finishing from there instead of guessing at the end.
- Cut all your fringe strands before you begin attaching them so every bundle matches in length and thickness.
- If the neckline still feels loose after Round 3, go down a hook size for the trim rounds to pull it in a little more.
Yarn Substitution
Pingouin yarn can be hard to find outside Brazil, so choose a substitute that works comfortably with a 4.0 mm hook, which usually means a DK or light worsted weight. Soft acrylic or an acrylic blend gives you easy care and good stitch definition, while a cotton blend makes a cooler, heavier poncho with more drape. Avoid very fuzzy yarns for this pattern, since they blur the granny spaces and make the fringe harder to knot neatly. Swatch a few rounds of clusters first and check how the fabric falls before committing to your full yarn amount.
Customization Ideas
- Work the body in two colors, switching every few rounds for soft stripes.
- Use a contrast shade for the lower border and neckline trim so the edges stand out.
- Skip the fringe and add a row of small shells along the bottom for a cleaner finish.
- Make the fringe shorter and fuller by wrapping around a smaller notebook.
- Add a few extra rounds for a longer tunic-style poncho, or stop earlier for a cropped capelet.
- Thread a crochet cord through the final neckline round and tie it at the front for adjustable fit.
Frequently Asked Questions
Can a beginner make the Amelia poncho sweater?
Yes. The whole body uses one simple cluster repeat, and the only shaping happens in the two corner peaks. If you know how to chain, work a double crochet, and join with a slip stitch, you can finish this poncho.
Why does the round start change between Rounds 2 and 3?
Alternating the two starts shifts the join slightly each round. This keeps the seam line from stacking in one spot and makes it far less visible on the finished poncho.
How do I keep the peaks centered at the front and back?
Count your blocks carefully in the foundation row before joining, and mark both ch-2 corner spaces. As long as each round places a (3 dc, ch 2, 3 dc) shell in those two spaces, the points stay lined up.
My neckline feels too wide. What can I do?
Try working the trim rounds with a smaller hook, or repeat the (2 sc, sk 1 st) round once more to gather the opening further. Test the fit over your head before fastening off.
How do I stop the fringe from tangling or looking uneven?
Cut every strand before you begin, keep each bundle the same size, and pull each knot firmly. Once all the fringe is attached, lay the poncho flat, comb the strands straight with your fingers, and trim the whole edge at once.