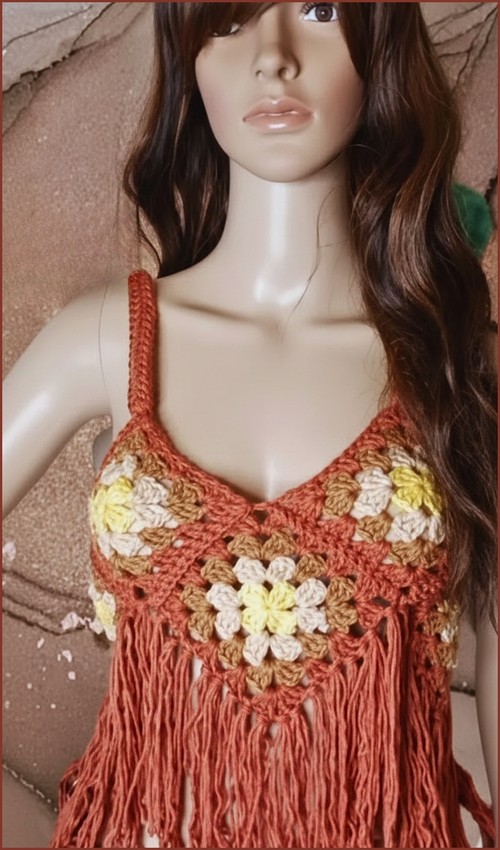
Six granny squares, a handful of accent colors, and chain ties at the corners — this patchwork crop top is one of the faster assembled-square projects in the library, which makes it a good first granny-square garment if you’ve made squares but haven’t turned them into wearables yet. The orange joining color is what holds the disparate accent colors together; it works the same way whether your centers are purple, green, or hot pink. For a fuller-coverage option in the same granny square construction, the granny patchwork sweater with long sleeves shows where the same technique goes when you scale it up.
Crochet Patchwork Tank Top

The two-row layout keeps the square count low enough that you can finish the whole top in a weekend, and the chain tie straps mean no picking up stitches for straps — just crochet a length of chain at each corner and you’re done. If you want to understand the granny square construction before starting, the granny stitch tutorial walks through the magic ring, first round dc clusters, and corner chain spacing that every square here uses.
Materials
- Cotton yarn in multiple colors (medium weight)
- 3.5 mm crochet hook
- Scissors
- Tapestry needle
- Measuring tape
Create the Crochet Squares
- Make a magic ring or chain 4 and join with a slip stitch to form a ring
- Chain 3 and work 2 double crochets into the ring, then chain 2 and work 3 double crochets, repeating until four sides are formed, then join with a slip stitch
- Slip stitch into the corner space, chain 3, work 2 double crochets, chain 2, and work 3 double crochets in the corner
- Work one double crochet in each stitch along the sides and repeat the corner pattern in each corner
- Continue adding rounds until the square reaches your desired size, usually 4 to 5 inches
- Fasten off and weave in all ends
- Repeat to create enough squares for your top

Stitch and Shaping Clarity
- These squares follow the traditional granny square structure, where each corner is created by a group of stitches separated by chain spaces.
- The chain-2 corners are what allow the square to stay flat and turn cleanly at each corner.
- If your square begins to curl or twist, it is usually a sign that the corner chains are being missed or worked too tightly.
- When working the side stitches, placing one double crochet into each stitch (rather than into spaces) helps the square keep a neat, solid edge.
- This makes joining much easier later and helps the finished top look more structured rather than floppy.
Size Guidance for Squares
- A finished square size of 4 to 5 inches is a good balance for wearability.
- Smaller squares create more seams and visual texture, while larger squares result in a simpler, more open look.
- What matters most is that all squares are exactly the same size.
- Measure your first finished square and use it as a reference for the rest.

Assemble the Front and Back Panels
- Lay out the squares in a grid that matches your desired width and length
- Arrange the squares evenly for the front panel and repeat for the back panel
- Join the squares using an invisible seam with a tapestry needle or single crochet on the wrong side
- Complete two panels, one for the front and one for the back
- If you’re new to reading crochet patterns, don’t worry, just follow along with the video tutorial below and use the written pattern as a reference!
Fit and Sizing Guidance
- Before joining anything permanently, take time to arrange the squares on a flat surface and measure the total width and length.
- This is where you control the fit of the top.
- The width of the panel determines how relaxed or fitted the garment will be around the body, while the length determines where it will sit on the torso.
- If you are between sizes, adding or removing a single column of squares is often easier than resizing individual squares.
- This modular structure is one of the biggest advantages of granny square garments.

Joining Method Notes
- An invisible seam creates a clean, almost seamless look from the right side, which works well if you want the squares to visually blend together.
- Single crochet joins add a visible ridge, which can be used as a design feature if you like more texture.
- Whichever method you choose, stay consistent across the entire garment so the panels look balanced.
Join the Sides and Shoulders
- Place the front and back panels together with right sides facing
- Stitch across the top edges to form the shoulders, leaving an opening in the center for the head
- Stitch down both sides, leaving space at the top for armholes
Construction Guidance
- Joining the shoulders first helps establish the neckline shape and makes it easier to judge armhole placement.
- The opening for the head should feel comfortable rather than tight, especially since cotton yarn has limited stretch.
- When stitching the sides, stopping early for the armholes prevents the top from feeling restrictive around the shoulders.
- It helps to try the panels on (or hold them against your body) before finalizing these seams.

Small adjustments at this stage make a big difference in comfort.
Add the Borders and Finish
- Attach yarn to the bottom edge and work two to three rounds of single crochet or half double crochet for the hem
- Work one round of single crochet around the neckline and armholes for a clean finish
- Fasten off and neatly weave in all remaining ends
Finishing Notes
- The border rounds serve both a visual and structural purpose.
- They stabilize the edges, prevent stretching, and give the top a polished look.
- Using single crochet creates a firm edge, while half double crochet adds a little softness and drape.
- Keep your tension relaxed but even so the edges stay smooth.
- Weaving in ends carefully is especially important with granny square garments, as there are more joins than in a solid-piece project.

Secure each end along existing stitches to prevent them from working loose over time.
Beginner Notes and Troubleshooting
- Squares not lying flat: Check your corner chain count and make sure each corner has enough space to turn.
- Panels coming out uneven: Measure often while laying out squares. Adjust before joining, not after.
- Neck opening too small: Remove a few shoulder stitches and rejoin with a wider opening.
- Edges curling after finishing: Go up one hook size for the border rounds or loosen your tension slightly.
Final Thoughts
- This top relies on simple stitches and thoughtful assembly rather than complex shaping.
- Taking your time with square consistency, layout, and joining will give you a garment that fits well and wears comfortably.
- Once you understand this construction, the same approach can be adapted for many other granny square garments with confidence.